
We are Official Certified bubble.io & flutterflow App Development partner


By the end of this post, you will have a fully working conversational AI chatbot inside a FlutterFlow app. Here is what makes it special:
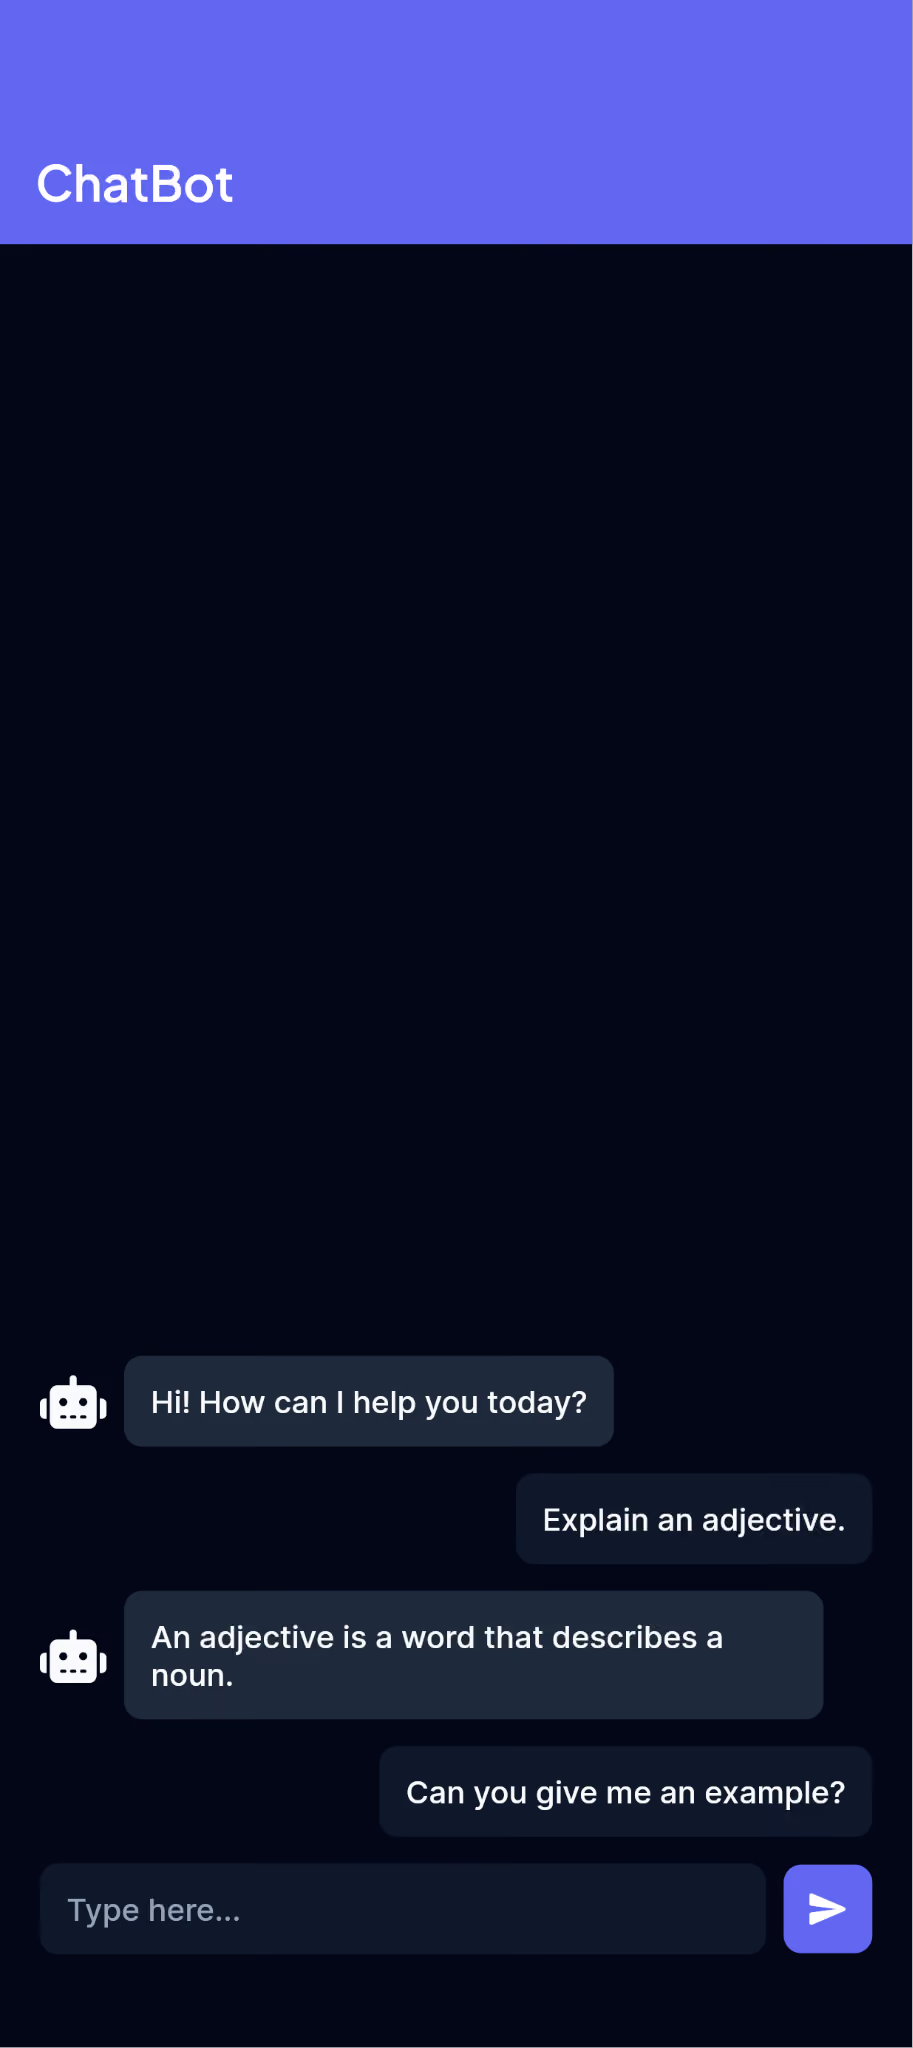
Adding a conversational AI feature used to mean standing up a backend, writing API integration code, and managing your own server. With FlutterFlow and the OpenAI API, you can build a real, context-aware chatbot directly inside your app — no server, no Flutter code, and no AI training required.
This same setup can power a range of real app features. A support chatbot can answer user questions about your app or product and handle follow-up questions naturally. A learning chatbot can explain concepts, quiz the user, and adjust based on their responses within the session. A personal assistant or planner chatbot can help users think through tasks, draft text, or work out ideas conversationally. In each case, the core mechanic is the same: a growing list of messages that gives the AI enough context to feel like a real conversation.
By the end of this post you will not just have a working chatbot — you will understand the pattern well enough to add similar AI features anywhere else in your app.
This guide uses the OpenAI Chat Completions API, and the choice is deliberate. OpenAI’s API is the most widely documented conversational AI API available, which means more tutorials, more community answers, and a lower chance of hitting a wall when something does not work as expected. The request format — a JSON body with a model name and a messages array — is straightforward enough to configure directly in FlutterFlow’s API Calls panel without any custom code. The GPT-3.5 Turbo model used in this guide is also one of the most forgiving for a first build: it is fast, inexpensive, and reliable for conversational tasks. If you later want to upgrade to GPT-4o mini for better quality at a lower price, it is a single line change in the request body.
That said, OpenAI is not the only option. Google’s Gemini API and Anthropic’s Claude API are both capable alternatives with their own strengths — larger context windows, different pricing, and in Gemini’s case, a free tier that is useful for prototyping. The table below compares all three so you can make an informed choice before you start building. Gemini can be swapped in with minimal changes to the setup in this guide. Claude requires more rework due to a different API format.
Prices sourced from official documentation — June 2026. Verify before building as pricing may change.
Before touching any tool, let us understand what happens when a user sends a message.
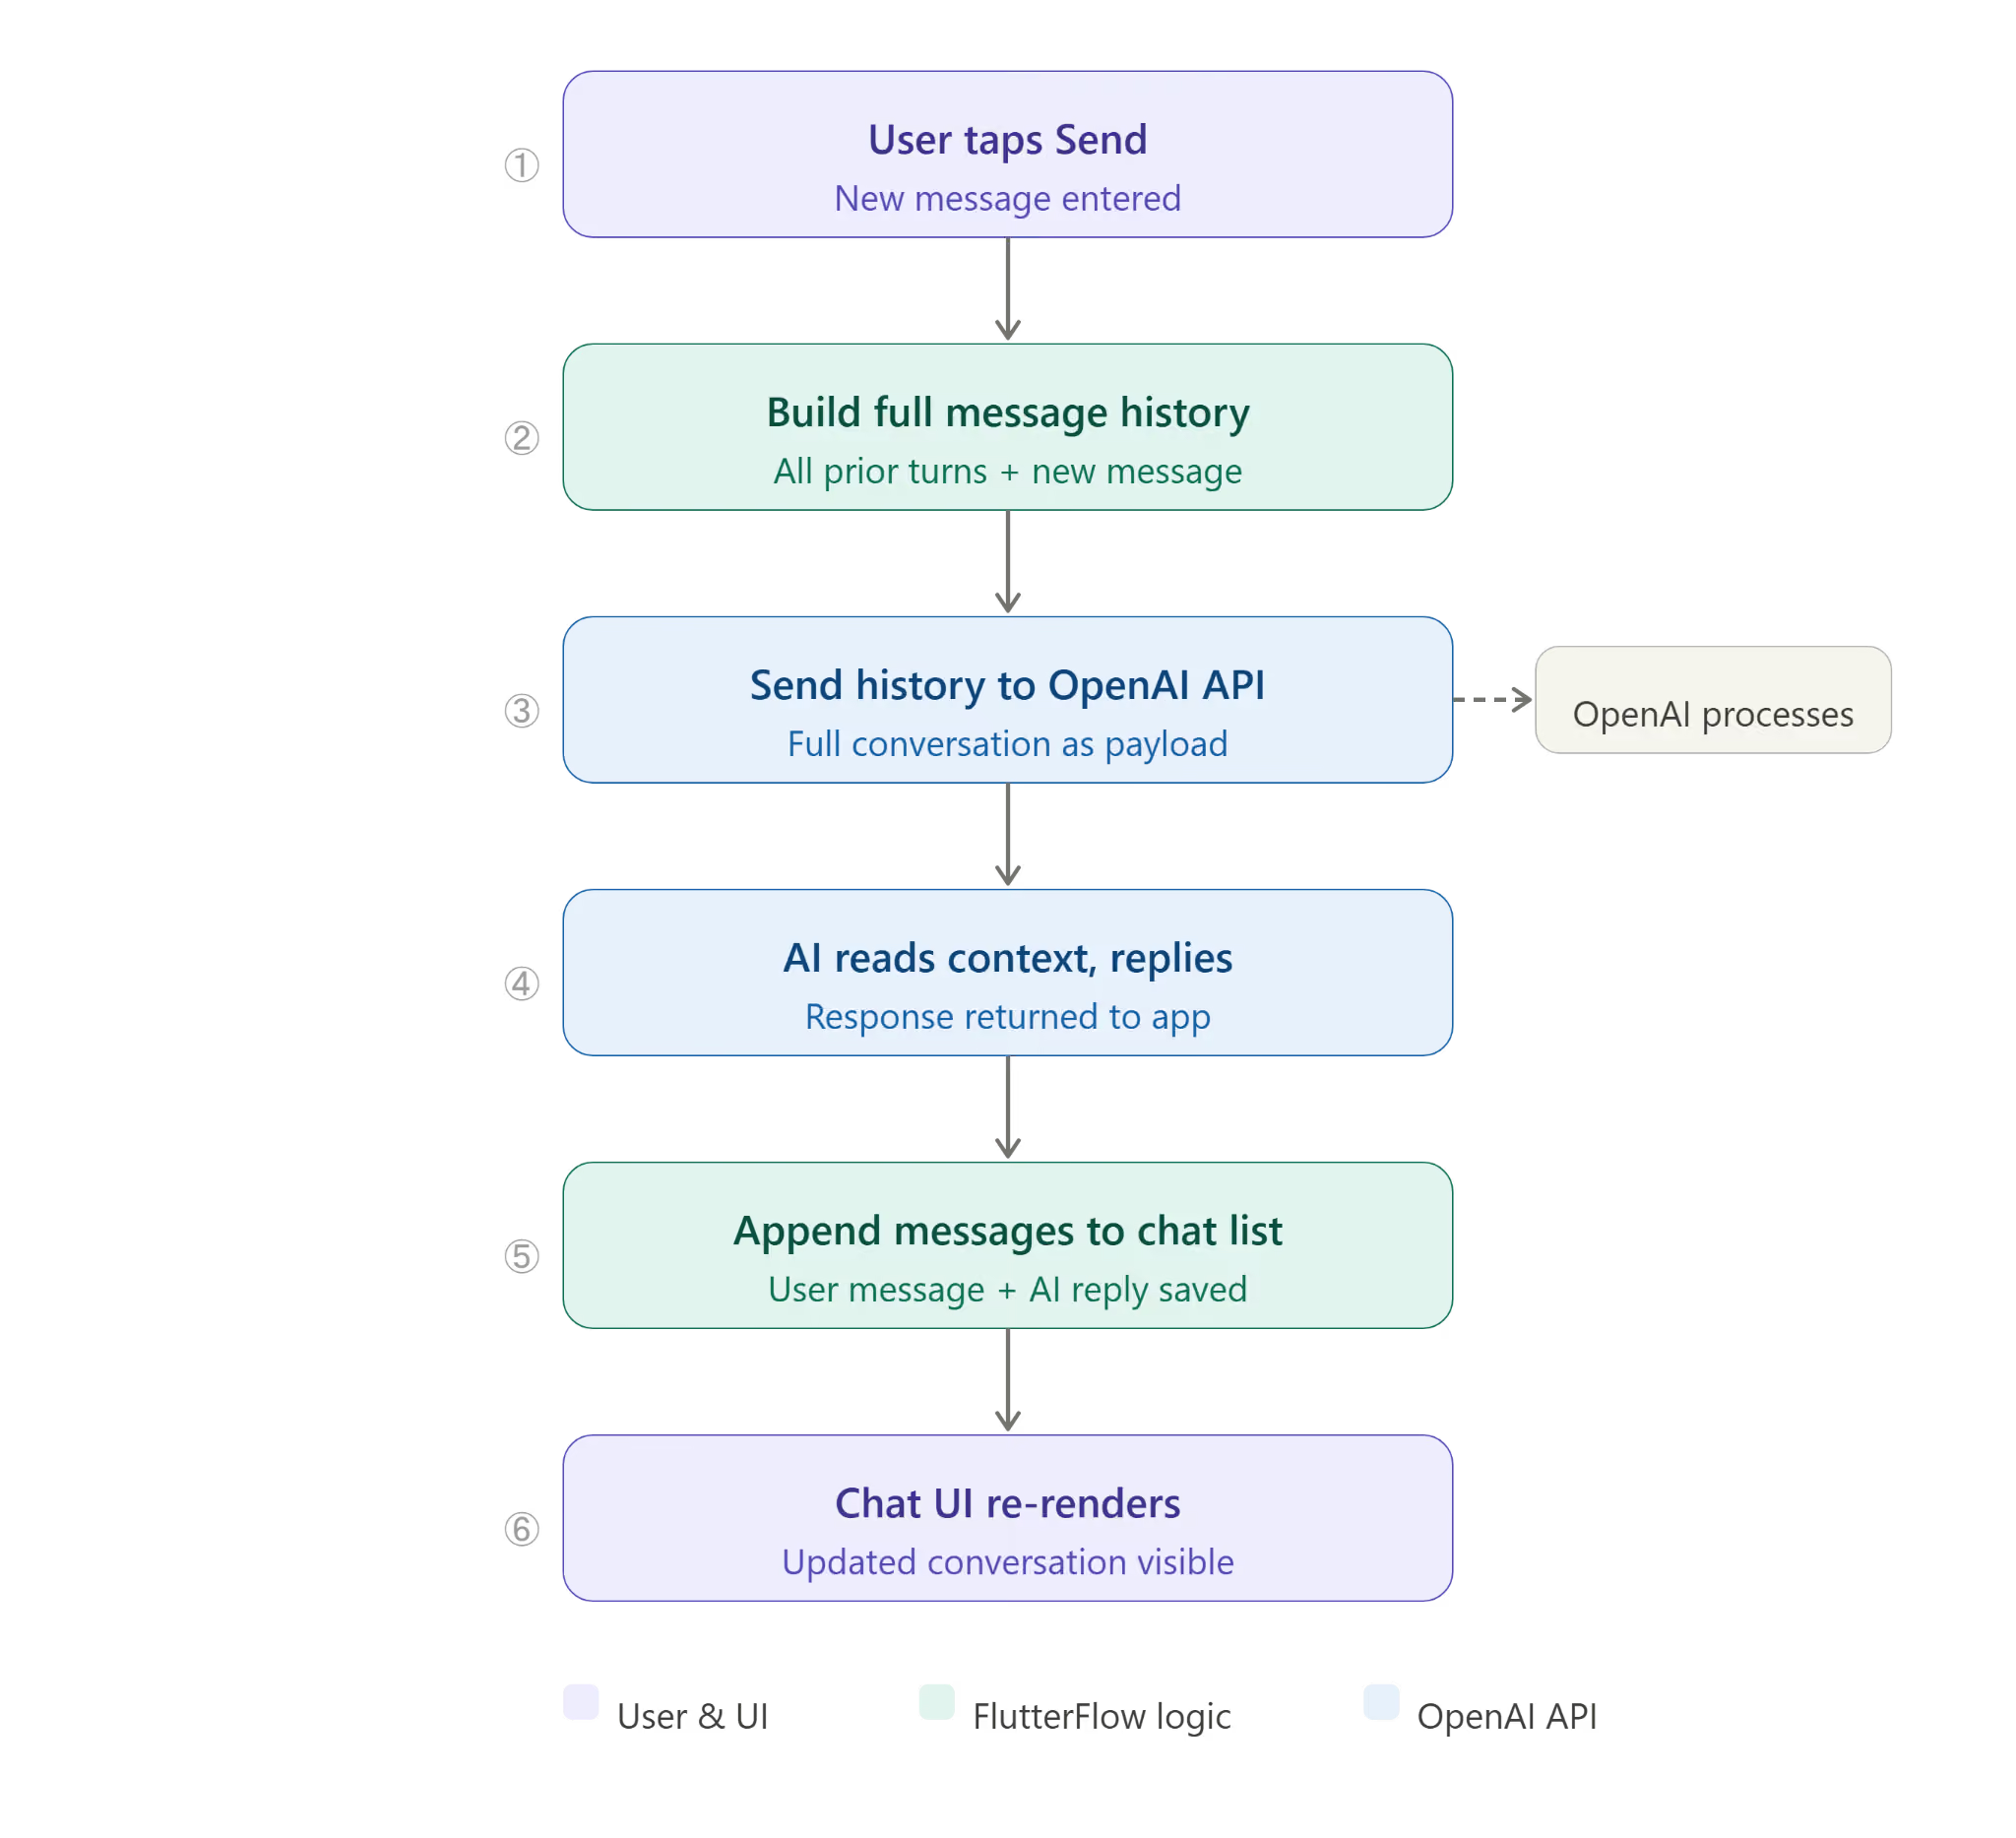
🔑 Key Concept: Why Pass the Full History?
OpenAI has no memory between requests — every API call is independent.
To make the AI feel conversational, you send the entire conversation with each new message.
OpenAI reads all of it and replies in context. This is the same pattern ChatGPT uses.
Make sure you have these ready before starting:
We start by setting up the API call that will send the conversation history to OpenAI. This is done entirely inside FlutterFlow — no external tools needed.
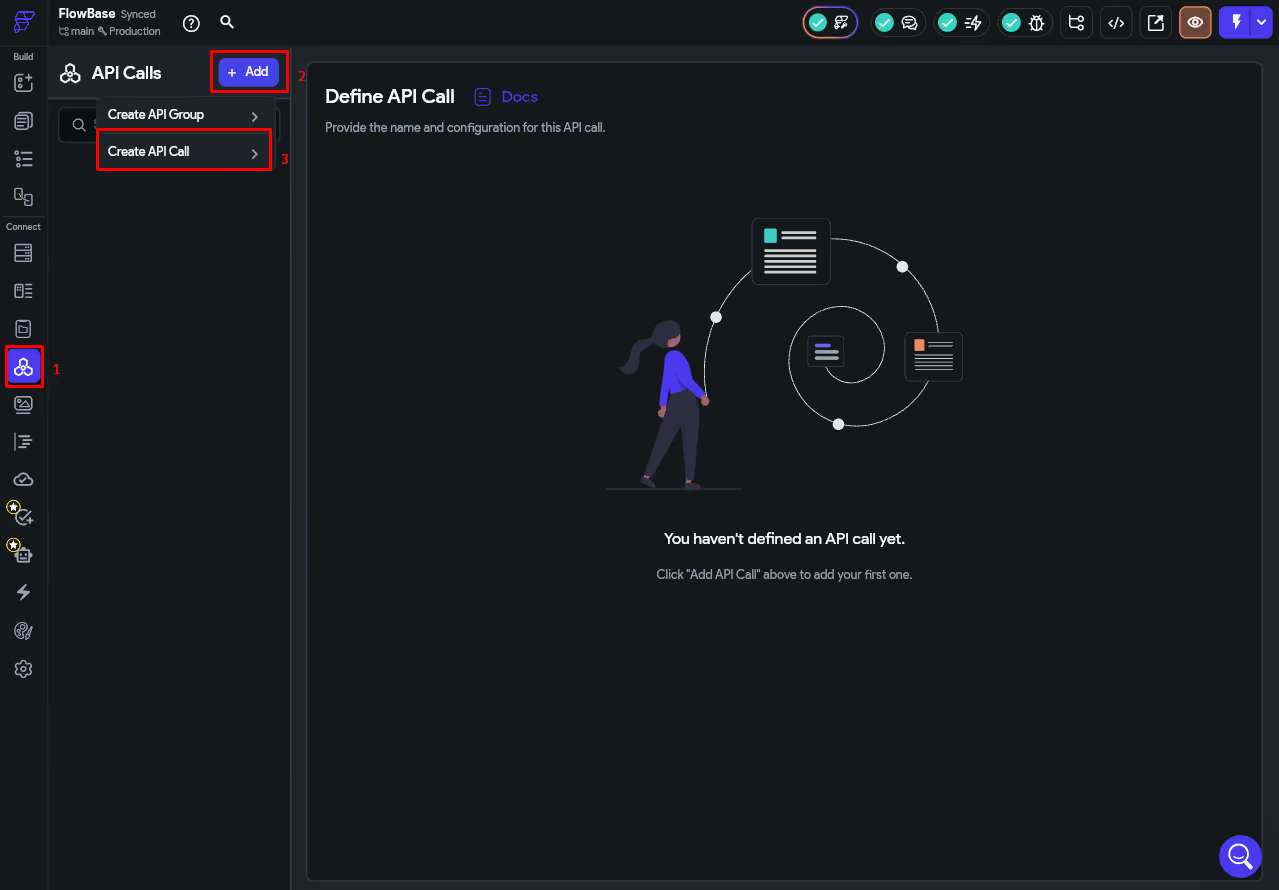
In FlutterFlow, click on the API Calls tab in the left sidebar (the plug/lightning bolt icon). Then click + Add in the top left, and select Create API Call from the dropdown.
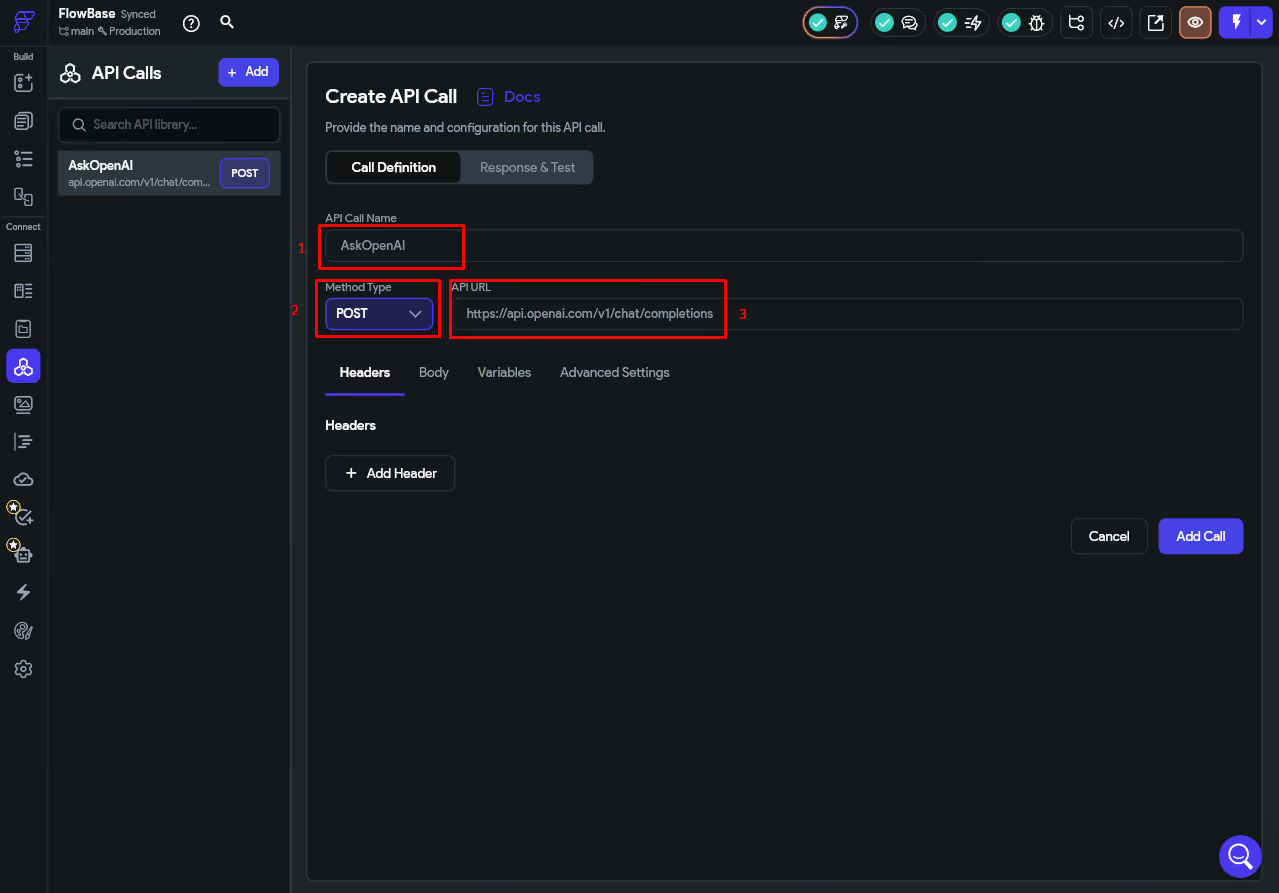
Fill in the following fields on the API call creation screen:
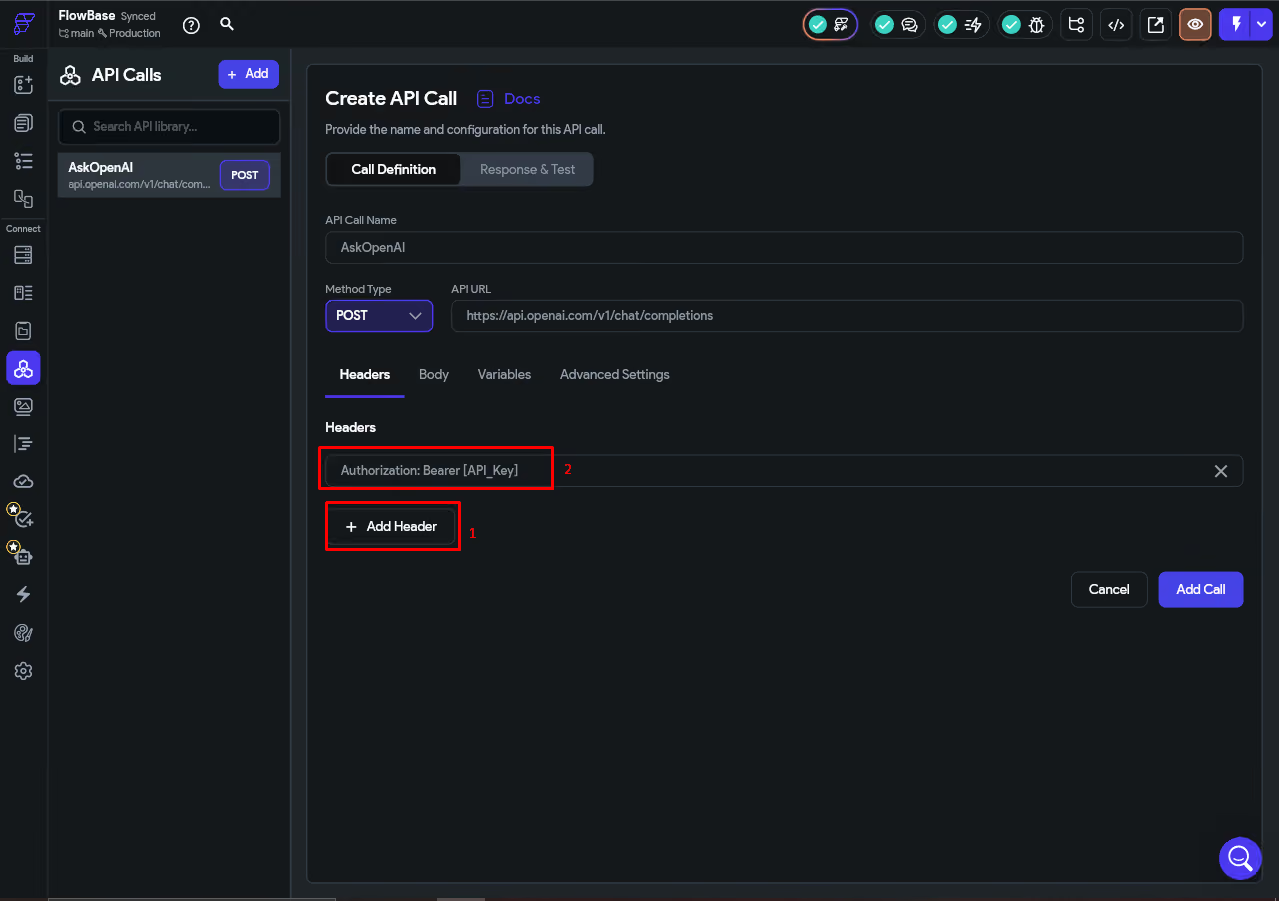
OpenAI requires an API key to be sent with every request. Rather than hardcoding it directly into the header, the screenshots use a FlutterFlow Environment Variable to store the key securely. To set this up first, go to the Settings icon in the left sidebar, then navigate to Project Setup > Dev Environments. Click + Add Value, set the Name to OpenAIKey and the Data Type to String, then click Create. Back in the Production row, paste your actual OpenAI API key into the Value field for OpenAIKey.
Once the environment variable is set, go back to your API call. In the Variables tab, add a variable named API_Key with Type set to String. Set its Default Value by clicking the variable picker and selecting Environment Values > OpenAIKey. Then switch to the Headers tab, click + Add Header, and set the header value to: Authorization: Bearer [API_Key] — referencing the variable you just created.
video will be placed here.
Go to the Body section and select JSON as the body type. Enter the following:
{
"model": "gpt-3.5-turbo",
"messages": <messages>,
"max_tokens": 500
}
Now define the messages body variable by clicking the placeholder:
This is the key part — instead of sending a single message, you are sending the full conversation history as a JSON. Each item in the list looks like this:
{ "role": "user", "content": "What is Flutter?" }
{ "role": "assistant", "content": "Flutter is a UI framework by Google..." }
💡 Why This Format?
This is exactly the format the OpenAI Chat Completions API expects.
The role field tells OpenAI whether it was the user or the AI who said each line.
By including every previous turn, OpenAI can read the full conversation and reply in context.
Now tell FlutterFlow where to find the reply text inside OpenAI's response. Go to the Response section and add a JSON path:
This navigates OpenAI's response structure to extract just the reply text from the first choice returned.
Before wiring anything to the UI, test the API call directly inside FlutterFlow. Click Test API Call and provide a test value for messages:
Test value for messages
[{"role": "user", "content": "What is the capital of France?"}]
Click Send. If everything is configured correctly, you will see a 200 response and the replyText field will contain OpenAI's answer.
The conversation history needs to survive page navigations but reset when the app is closed. App State is the right tool for this.
💡 App State vs Page State vs Firebase
Page State: resets every time you leave the page — too temporary for a growing chat list.
Firebase / Firestore: persists to a database and survives app restarts — too permanent, we want it to reset on close.
App State: lives in memory for the entire app session. Resets automatically when the app closes. Perfect for this.
In the Pages panel, create a new page and name it anything you want.
Here is the target layout:
In FlutterFlow's canvas, build this widget tree:
The ListView will generate one chat bubble per message in chatHistory. In FlutterFlow, this uses the Generate Dynamic Children feature.
To show AI and User messages, set the Row visibility conditionally:
Perform similar steps for the user message row and set the role value to “user”
The Send button runs five actions in sequence. Here is what needs to happen on every tap:
Click the IconButton (the send arrow) in the canvas or Widget Tree, then in the right panel click the Actions tab and select Open next to Action Flow Editor. When prompted, select On Tap as the trigger type.
Click + Add Action and choose State Management > Update App State.
Click + Add Action and choose State Management > Reset Form Fields. Select the TextField as the target. This clears the input immediately after the user sends a message.
Click + Add Action and choose Backend/Database > API Call.
Select AskOpenAI as the API call. Under Variables, set the messages variable value to App State > chatHistory.
⚠️ Troubleshooting Checklist
AI replies but ignores earlier context → confirm chatHistory is App State (not Page State) and the full list is bound to the API call.
API call fails with 401 → your OpenAI API key is incorrect or has no credits. Double-check it in the Authorization header.
Bubbles are not showing → confirm ListView has Generate Dynamic Children enabled and source is App State > chatHistory.
Send button does nothing → check all 5 actions are under On Tap, not a different trigger.
Chat does not reset on app close → this is expected and correct. App State clears automatically when the app process ends.
Here is a summary of every FlutterFlow and development concept used in this post:
Concept
Where You Used It
API Call Body Variables
Defined chatHistory as a List<JSON> variable passed in the POST body
JSON Path mapping
Extracted the reply text using $.choices[:].message
App State (List<JSON>)
Stored the growing chatHistory — session-only, resets on app close, survives page navigation
Generate Dynamic Children
Rendered one chat bubble per message from the chatHistory list
TextField
Read the user's typed message and cleared it after sending
Action Flow (5 steps)
Chained: add user msg > call API > add AI reply > clear field > scroll to bottom
System message
Hidden instruction at the top of each request that controls the AI's personality
OpenAI Chat Completions
Processed the full conversation history and returned a context-aware reply
Now that your conversational chatbot is working, here are ideas to extend it:
The system message is a hidden instruction sent at the top of every request, before any user messages. The AI reads it first and uses it to shape every reply it gives. To add one, go back to your API call body in FlutterFlow and prepend a system entry to the messages array, like this:
{ "role": "system", "content": "You are a helpful support assistant for Acme App. Only answer questions related to the app. Keep your responses concise and friendly." }
This entry sits outside of the chatHistory App State variable — it is hardcoded directly in the request body so it is always sent first, invisible to the user, and never added to the conversation list. You can use the system message to give the AI a specific role, set the tone, restrict what topics it will engage with, or even paste in a short reference document for it to draw answers from. That last technique is particularly useful for support or FAQ bots, where you want the AI to stay grounded in your own content rather than answering from general knowledge.
In this post you built a fully functional conversational AI chatbot in FlutterFlow by:
The key insight is that conversational AI is simply a growing list of messages passed with every request.
.svg)
.svg)


.avif)
