

FlutterFlow Training Guide
Integrating RevenueCat
with FlutterFlow
Add subscriptions and in-app purchases to your app step by step, from zero to live paywall.
What you will learn in this guide:
- What RevenueCat is and why it is the best tool for purchases in FlutterFlow
- How to set up a RevenueCat account with apps, products, entitlements, and offerings
- How to connect RevenueCat to FlutterFlow using your API key
- How to build a Paywall page with a Subscribe button wired to RevenueCat
- How to check subscription status and show or hide premium features
- How to add a Restore Purchases button for App Store compliance
- How to test everything using sandbox/test purchases before going live
What is RevenueCat?
RevenueCat is a service that makes it easy to add subscriptions and in-app purchases to your mobile app. Instead of writing complicated separate code for the App Store and Google Play, RevenueCat handles all of that for you. You just tell it what you sell, and it takes care of payments, receipt validation, and subscription status tracking.
Why use RevenueCat instead of doing it yourself? Handling purchases directly requires separate code for iOS and Android, server-side receipt validation, and complex subscription logic. RevenueCat replaces all of that with a single integration. It also gives you a dashboard to track revenue, see subscriber counts, and manage your products.
The Four Key RevenueCat Concepts
RevenueCat uses four words everywhere. Understanding these before you start will save you a lot of confusion:
💡 Simple way to think about it
An Offering is your paywall screen. Packages are the subscribe buttons on that screen (Monthly, Yearly, Lifetime). Each Package links to a Product (the real App Store item with a price). When someone buys a Package, they get an Entitlement (the "key" that unlocks your premium features). You check the Entitlement to decide what the user can see.
Step 1 Set Up RevenueCat
First you need a RevenueCat account and a project. RevenueCat is free to start they only charge a small cut after your app earns more than $2,500 per month.
1a Create Your Account and Project
1
Create a free account at app.revenuecat.com
Open your browser and go to app.revenuecat.com. Click "Sign Up". You can use Google, GitHub, or an email address to create your account.
2
Click "+ Create new project"
Once logged in, you will see the RevenueCat dashboard. Click the large "+ Create new project" button. Type your app name (e.g. "myapp") and click "Create project".
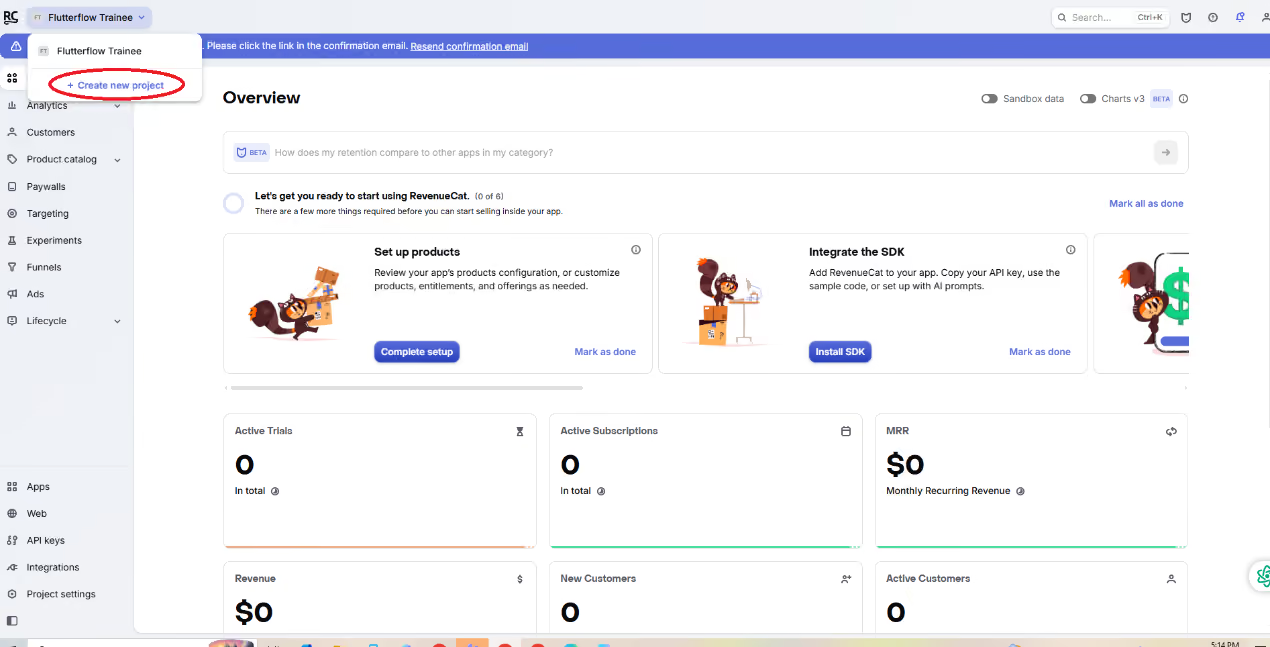
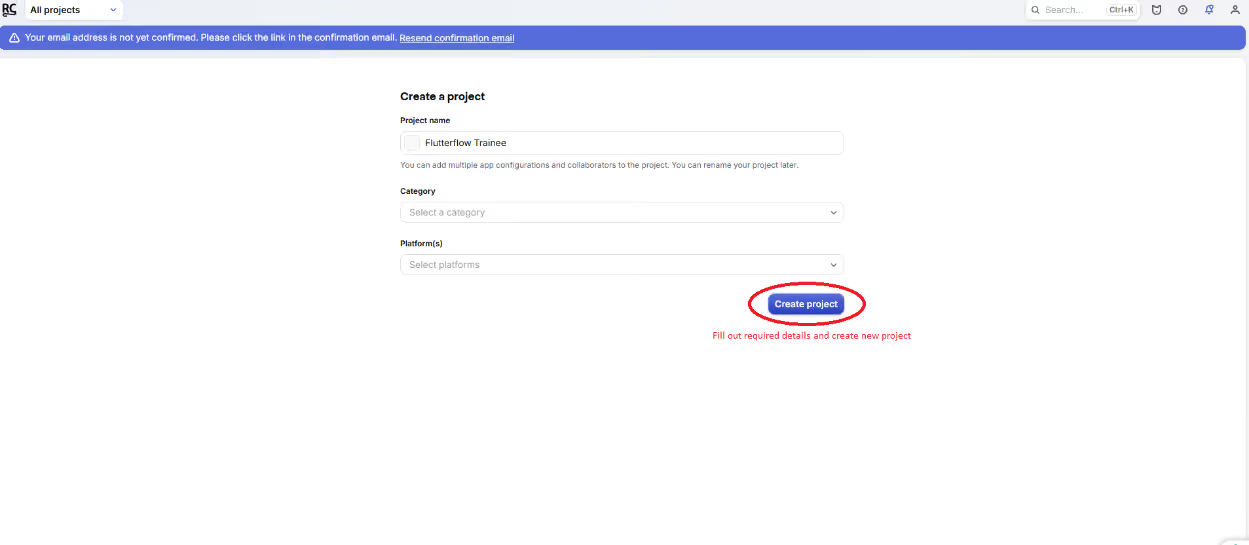
📸 RevenueCat Dashboard click "+ Create new project" to start (red annotation shows where to click)
ℹ️ One project per app
Create one RevenueCat project for each app. If you have two separate apps (e.g. a customer app and a delivery driver app), create two RevenueCat projects.
1b Add Your iOS and Android Apps
Inside your new project, you need to register your iOS app and your Android app separately. This is because the App Store and Google Play are different systems.
1
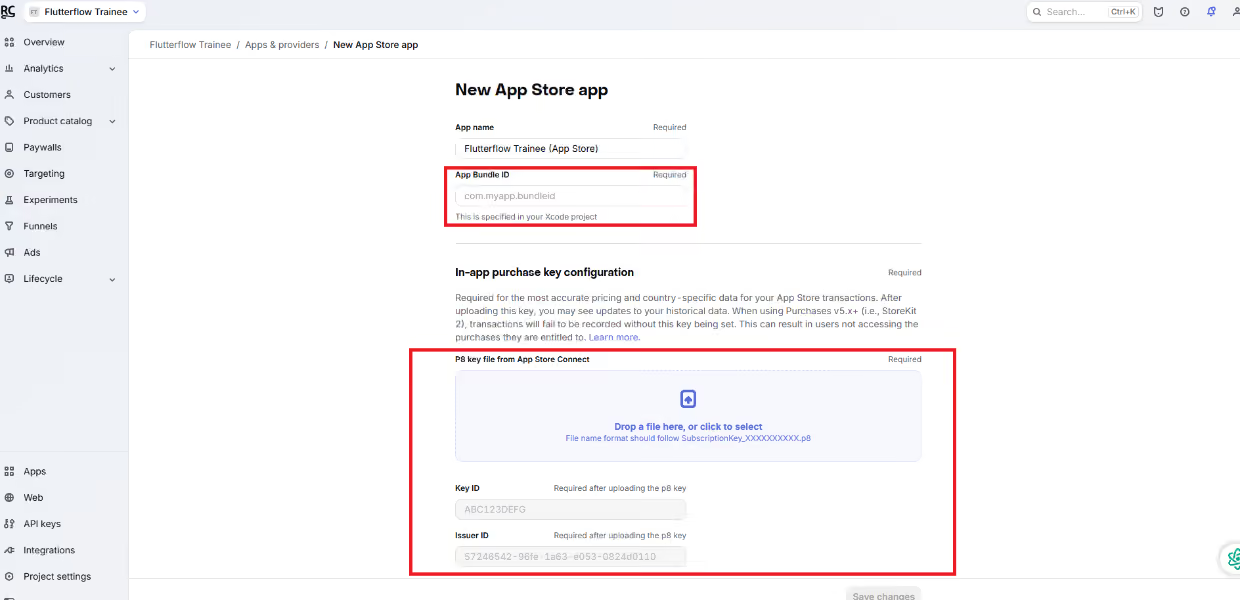
Click "+ New app" and choose App Store (iOS)
In your RevenueCat project, click "Apps" in the left sidebar. Click "New app Configuration". Select "App Store" for iOS. Enter your app's Bundle ID this must exactly match the Bundle ID in App Store Connect (e.g. com.yourcompany.myapp).
2
Enter your App Store Connect API credentials
RevenueCat needs read access to your App Store products. In App Store Connect, go to Users and Access → Integrations → App Store Connect API and generate an API key. Download the .p8 file. Enter the Key ID, Issuer ID, and upload the .p8 file into RevenueCat.
3
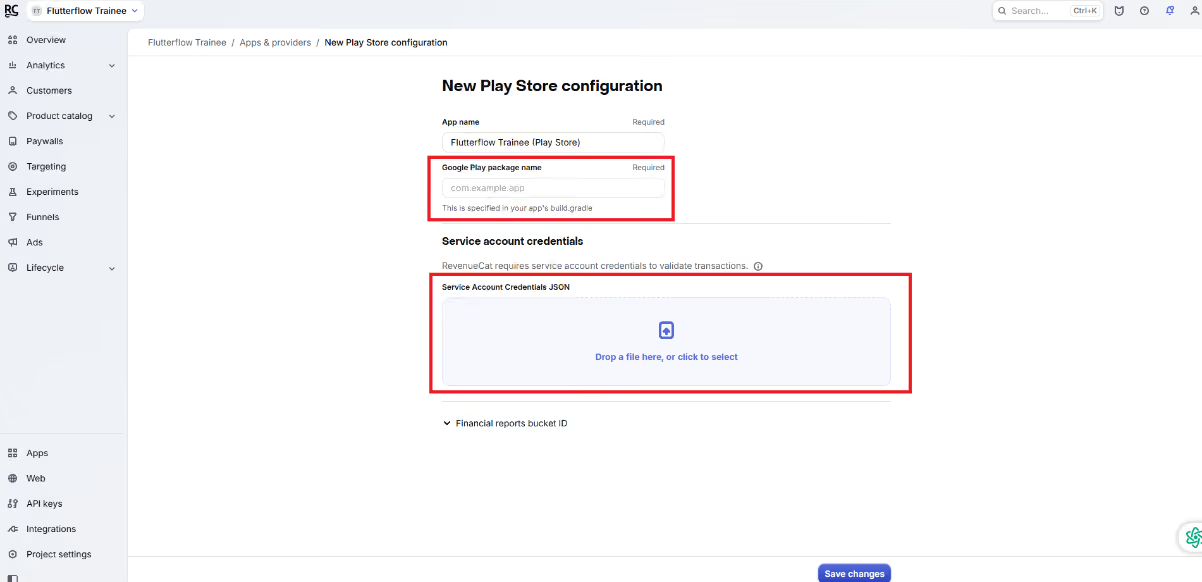
Repeat the process for Google Play (Android)
Click "New app Configuration" again and select "Google Play". Enter your Package Name (e.g. com.yourcompany.myapp). RevenueCat will ask for a Google Play Service Account JSON file. Create this in Google Play Console under Setup → API access → Create new service account.
4
Copy the Public SDK Keys for both platforms
Go to "API Keys" in the left sidebar of your RevenueCat project. You will see a Public App-Specific Key for iOS and one for Android. Copy both you will paste them into FlutterFlow in Step 3.
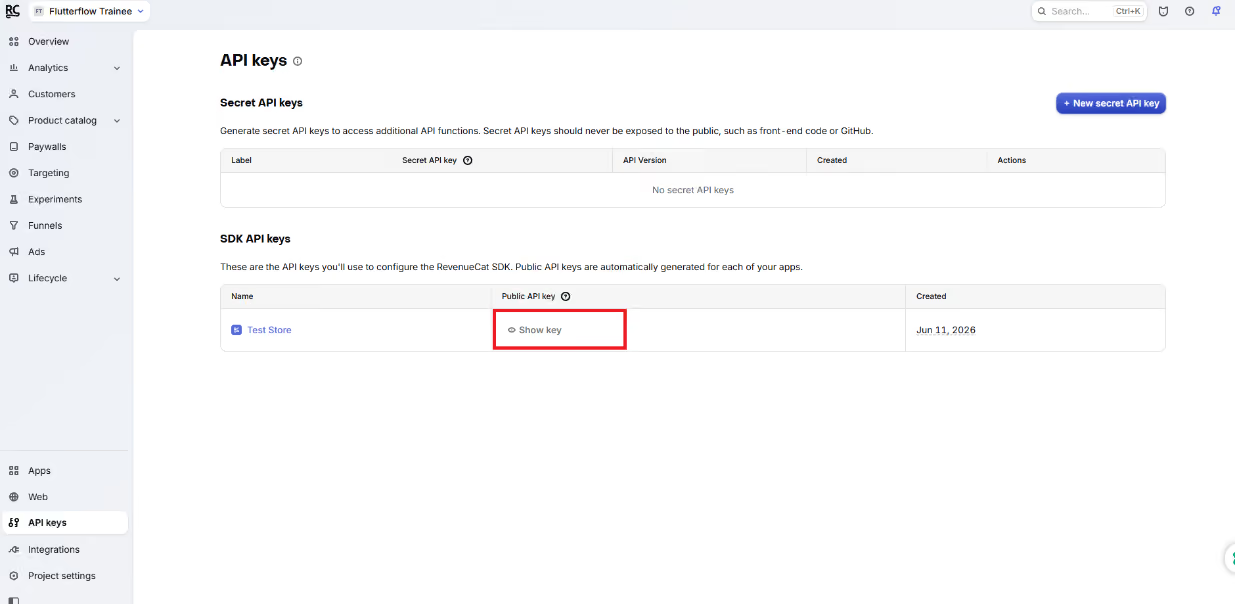
📸 RevenueCat Apps page add your iOS app (Step 1) and Android app (Step 2), then copy both SDK Keys (Step 3, annotated in red)
⚠️ Bundle ID must match exactly
The Bundle ID you enter in RevenueCat must be exactly the same as in App Store Connect and in your FlutterFlow project settings. Even one difference (like a capital letter or extra space) will cause purchases to fail.
Step 2 Create Products, Entitlements, and Offerings
This section has three parts. All three must be completed before your paywall will work. Do them in order: Entitlement first, then Product, then Offering.
2a Create an Entitlement
An Entitlement is the name of the access level your user gets after paying. Think of it as a door key. You give the user this key when they subscribe, and you check for it every time they try to access premium content. Use a simple, lowercase identifier with no spaces.
1
Go to Entitlements in the left sidebar
In your RevenueCat project, click "Entitlements" in the left menu. Click the "+ New" button to create a new entitlement.
2
Type "premium" as the Entitlement Identifier and click Add
The identifier "premium" is the standard choice. This is the exact string your FlutterFlow app will check later when deciding what to show the user. Click "Add" to save it.
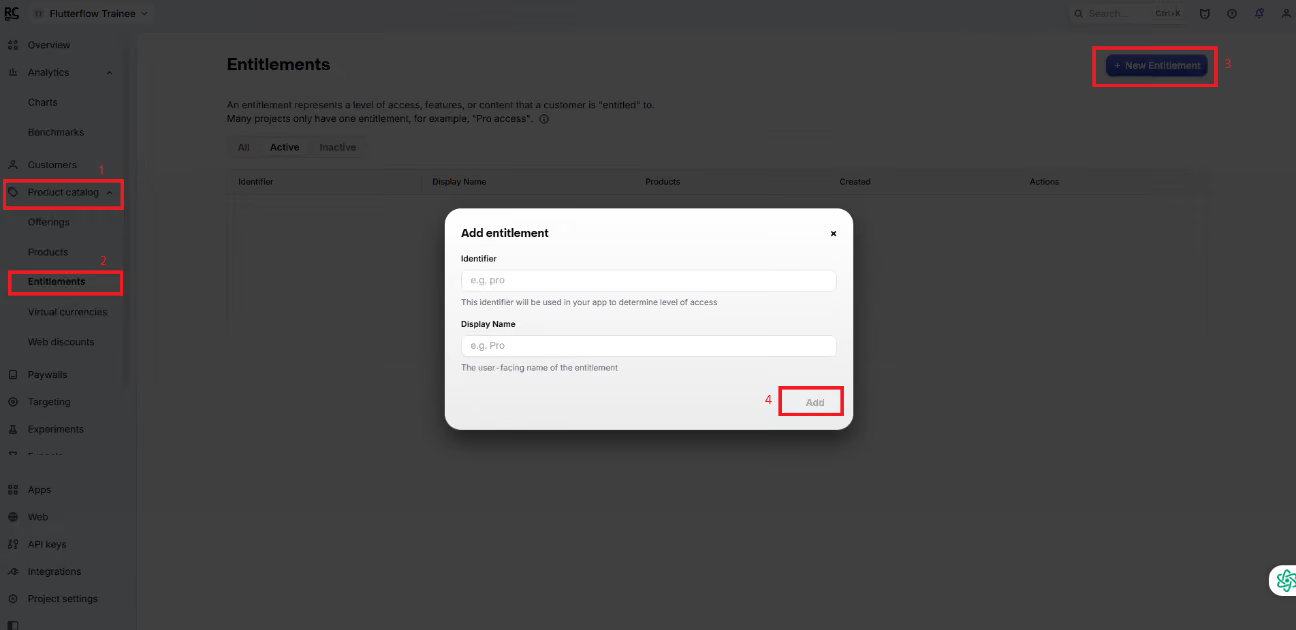
2b Add Your Products
A Product is the actual subscription item that lives in App Store Connect or Google Play Console. Important: you must create the product in App Store Connect (and/or Google Play Console) first, Then add it to RevenueCat.
1
Create the subscription product in App Store Connect
In App Store Connect, go to your app page → Subscriptions. Create a Subscription Group (e.g. "Premium"). Add a subscription inside it (e.g. "Premium Monthly" at $9.99/month). Note the exact Product ID you give it e.g. com.yourapp.premium_monthly.
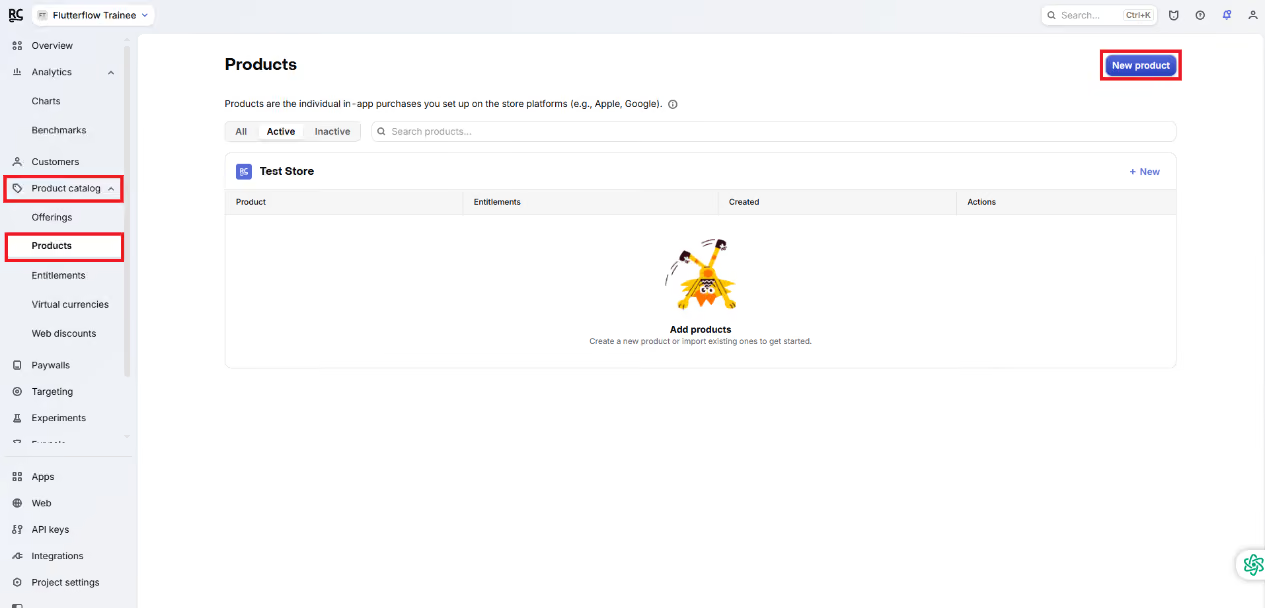
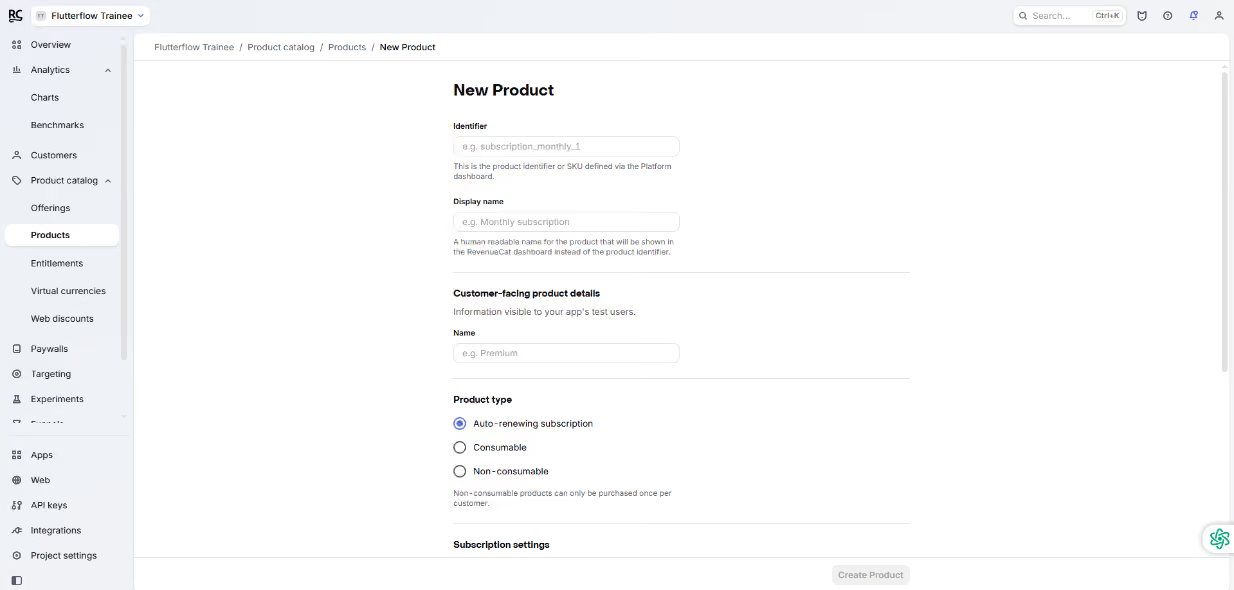
2
Add the product in RevenueCat
In RevenueCat, click "Products" in the left sidebar. Click "+ New". Type the exact Product ID from App Store Connect (e.g. com.yourapp.premium_monthly). Select iOS as the platform. Click "Save". Repeat for Android products with their Play Store product IDs.
3
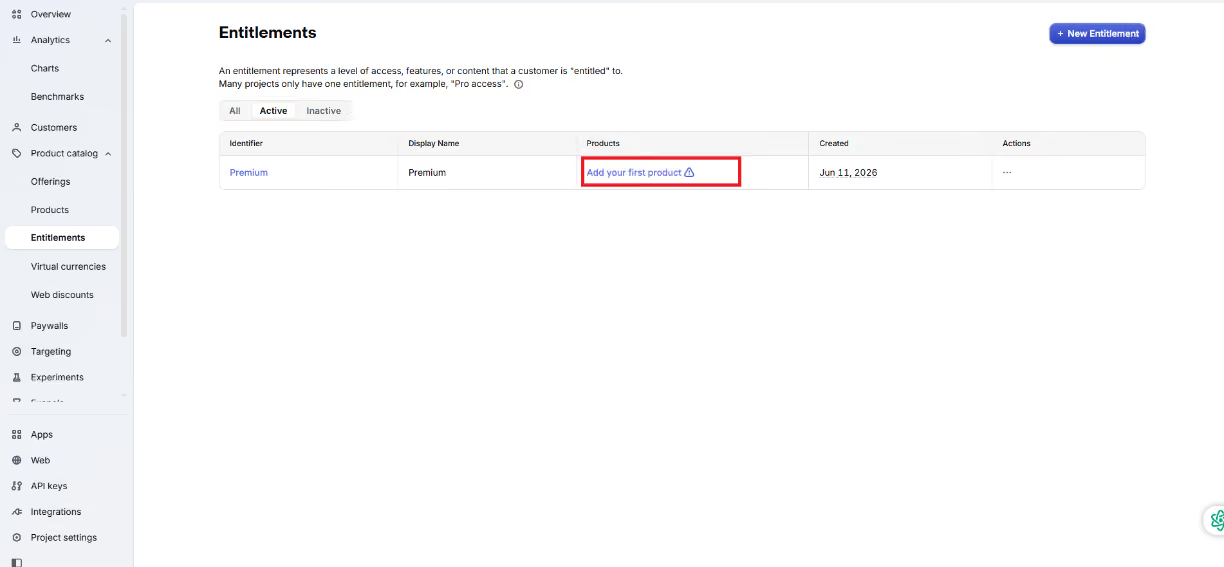
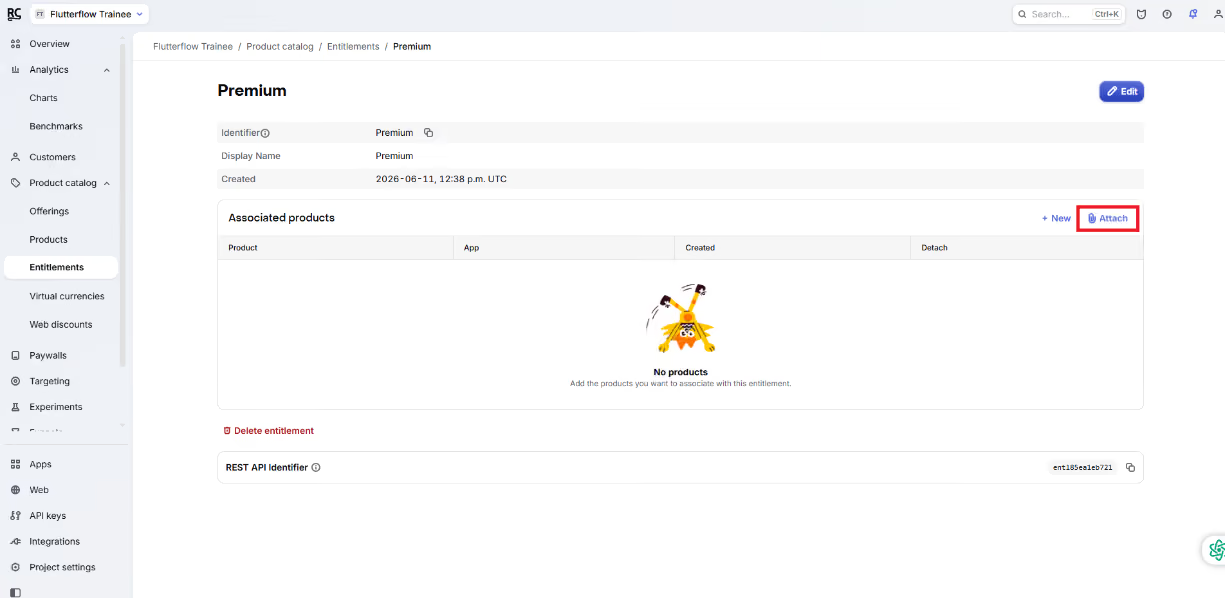
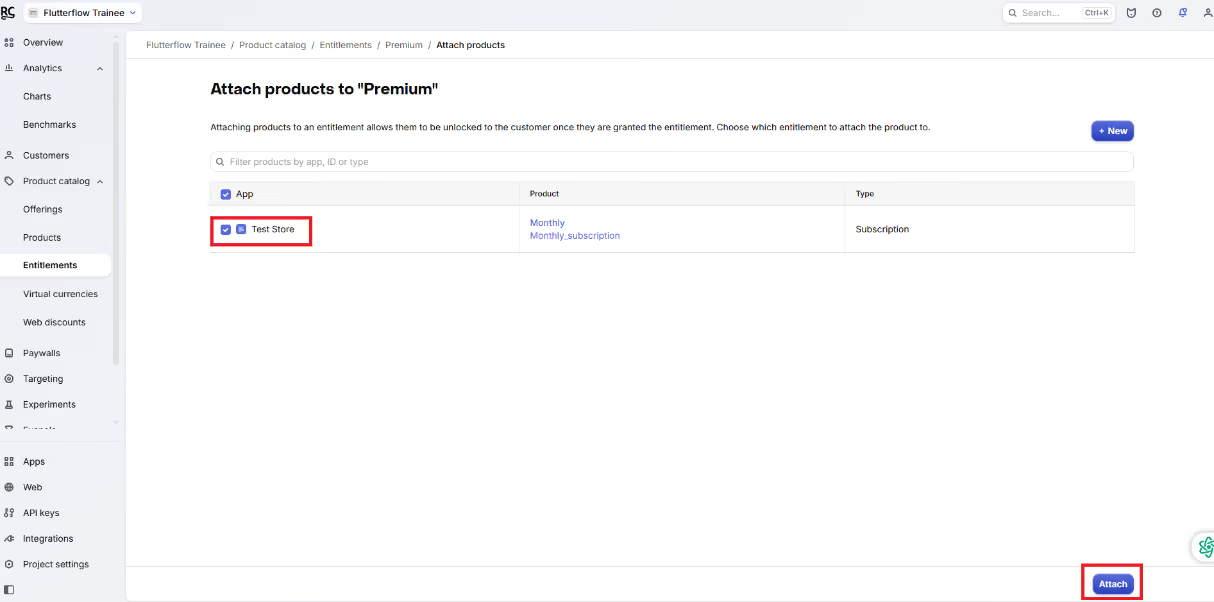
Link the product to your Entitlement
This is the key step. Click on "Entitlements" → open "premium" → click "Attach". Select the product you just added. This tells RevenueCat: when someone buys this product, give them the "premium" entitlement. Repeat for every product you want to unlock premium access.
2c Create an Offering
An Offering is the set of purchase options shown to the user on your paywall screen. The one named "default" is what FlutterFlow's RevenueCat actions look for automatically. You must create it with that exact name.
1
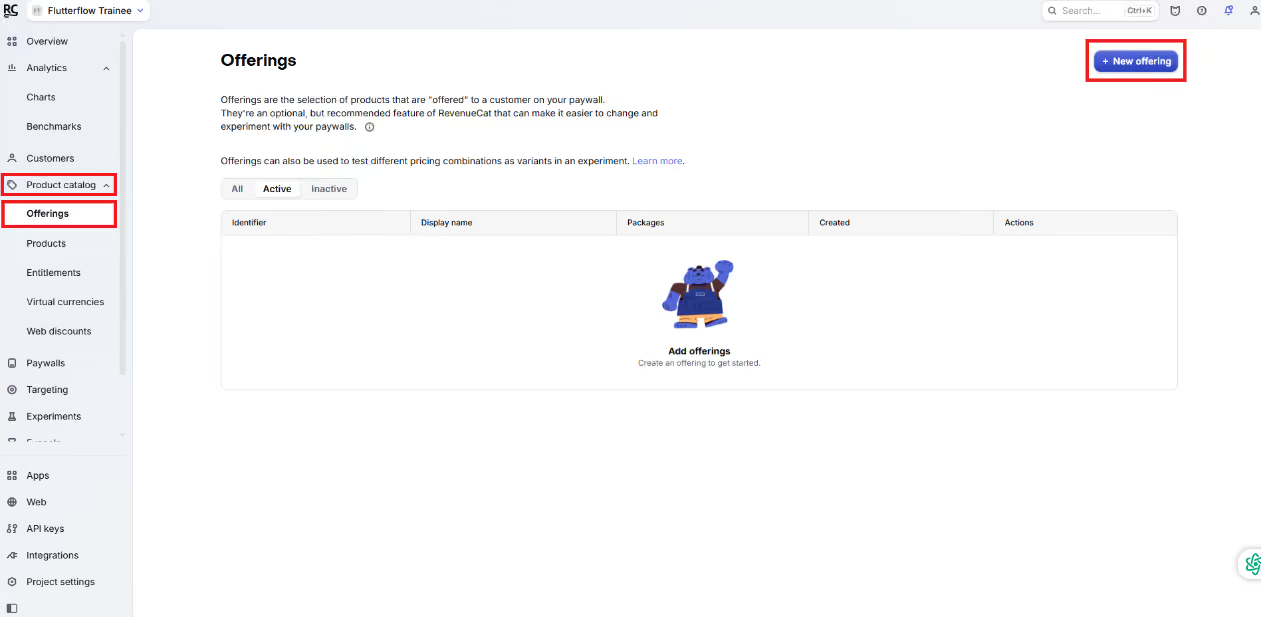
Click "Offerings" in the sidebar and create a new Offering
In RevenueCat, click "Offerings". Click "+ New Offering". Name it "default" (must be exactly this, all lowercase). Click "Add".
2
Add Packages inside the default Offering
Open the "default" offering. Click "+ New Package". Add one package for each subscription option you want to display. For example: a Monthly package linked to your monthly product, and a Yearly package linked to your yearly product. Each package maps a display option to a real purchasable product.
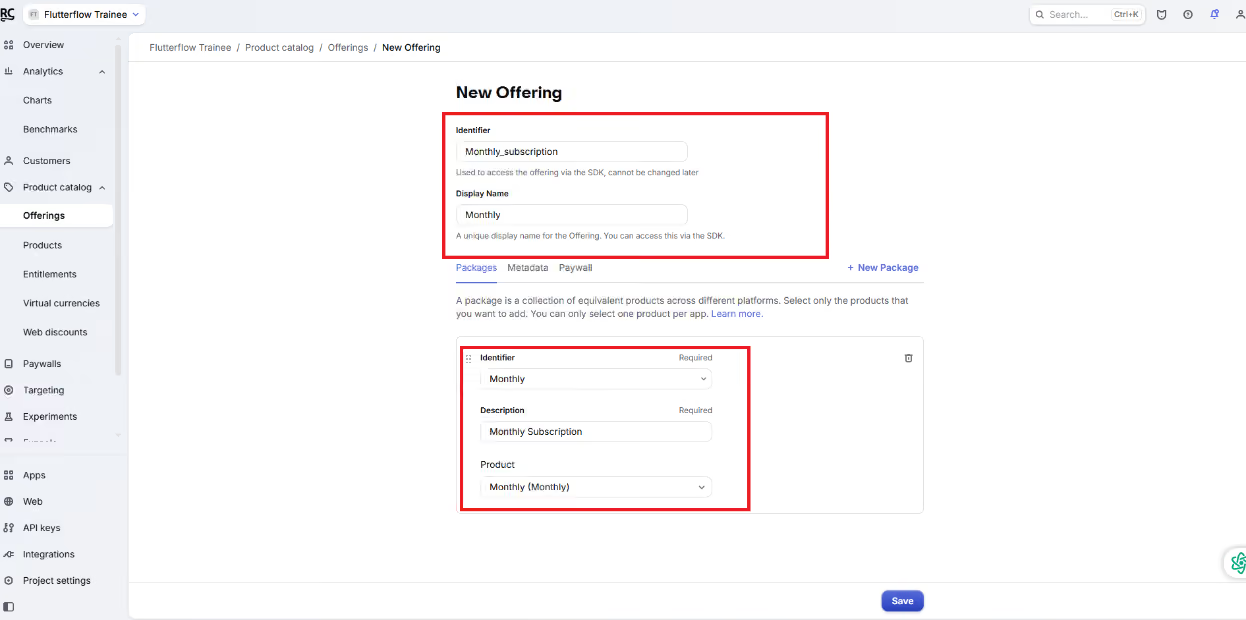
📸 RevenueCat create the Entitlement (Step 1), add a Product and link it (Step 2), then create the default Offering with Packages (Step 3)
✅ Quick check before moving on
You should now have: (1) an Entitlement called "premium", (2) at least one Product linked to that entitlement, (3) a default Offering with at least one Package. If any of these three are missing, the paywall will not load in your app.
Step 3 Connect RevenueCat to FlutterFlow
Now you will open your FlutterFlow project and enter the API keys from RevenueCat. FlutterFlow has a built-in RevenueCat integration no code needed at all.
3a Enable the Integration
1
Open your FlutterFlow project
Go to app.flutterflow.io and open the project you want to add purchases to.
2
Click the gear icon ⚙ in the left sidebar, then click Integrations
On the left edge of FlutterFlow you will see a narrow column of icons. At the bottom is a gear icon for Settings. Click it. In the settings panel that opens, click "Integrations".
3
Click the RevenueCat card
In the Integrations page you will see cards for different services. Find the "RevenueCat" card (it has the RevenueCat logo) and click on it to open its settings.
4
Paste your iOS SDK Key in the iOS field
In the RevenueCat integration panel, find the iOS SDK Key field. Paste the iOS Public SDK Key you copied from RevenueCat Dashboard → API Keys. Make sure it goes in the iOS field, not the Android field.
5
Paste your Android SDK Key in the Android field
Paste the Android Public SDK Key into the Android field. Again, double-check you have the right key in the right field.
6
Toggle "Enable RevenueCat" to ON and click Save
Switch the Enable toggle to ON. Click "Save Configuration". FlutterFlow will automatically add the RevenueCat SDK to your project in the background.
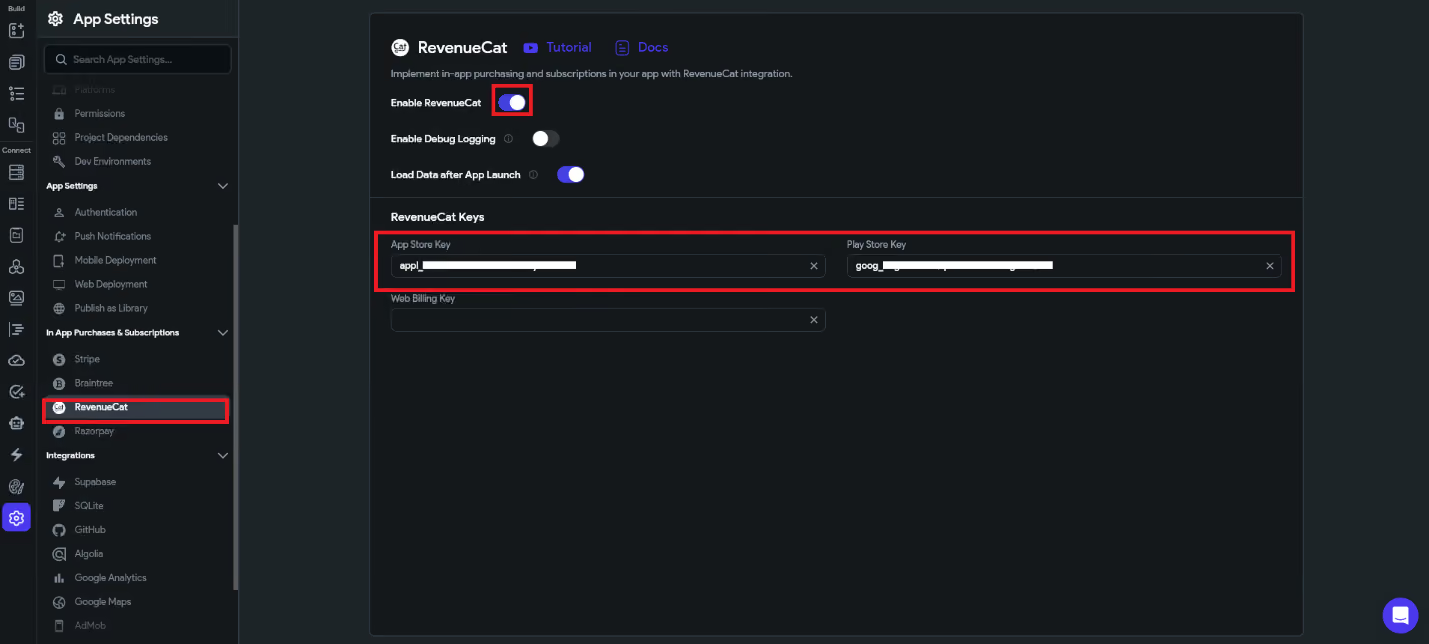
📸 FlutterFlow RevenueCat settings paste iOS key (Step 1), paste Android key (Step 2), toggle ON (Step 3), click Save (Step 4)
✅ Integration done
After saving, you will now see RevenueCat actions available in the Action Flow Editor. Look for options like "Purchase Package", "Restore Purchases", and "Is Entitlement Active?" when you add actions to buttons.
Step 4 Build a Paywall Page
A Paywall is the screen where users choose a subscription plan and tap Subscribe. You will design this page in FlutterFlow and connect the buttons to RevenueCat actions.
4a Design the Paywall Layout
Here is a simple, effective paywall layout. You do not need to follow this exactly but all good paywalls include these elements:
4b Wire the Subscribe Button
This is the most important step. The Subscribe button needs an action that calls RevenueCat to process the payment.
1
Select the Subscribe button in the widget tree
Click on your Subscribe button in the widget tree panel on the left side of FlutterFlow, or click it directly on the canvas. Its properties will appear on the right.
2
Click the lightning bolt icon to open the Action Flow Editor
In the Properties panel on the right, scroll down to find the "On Tap" action section. Click the lightning bolt icon or "+ Add Action" to open the Action Flow Editor.
3
Search for "RevenueCat" and select "Purchase Package"
Inside the Action Flow Editor, click the "+" button to add a new action. Type "RevenueCat" in the search box. A list of RevenueCat actions will appear. Click "Purchase Package".
4
Set Offering Identifier to "default" and choose your Package
In the action settings, set the Offering Identifier field to "default". For the Package field, select which package this button purchases (e.g. Monthly or Yearly). If you have separate buttons for each price, each button gets its own Purchase Package action with a different package selected.
5
Add a Conditional action after the purchase for success and failure
After the Purchase Package action, add a new action: "Conditional". Set the condition to check if the purchase was successful. If YES: navigate to the Home screen. If NO: show a Snack Bar saying "Purchase failed, please try again."
4c Add the Restore Purchases Button
Apple requires every app with subscriptions to have a Restore Purchases option. Your app will be rejected from the App Store without it.
1
Select your Restore Purchases text or button widget
Click on the "Restore Purchases" text widget or button you placed on the paywall.
2
Add Action → RevenueCat → Restore Purchases
Open the Action Flow Editor. Add a new action. Search for "RevenueCat" and select "Restore Purchases". No additional configuration is needed.
3
Add a Snack Bar message after restore
After the Restore action, add a "Show Snack Bar" action with a message like "Purchases restored successfully!" so the user gets confirmation that it worked.
⚠️ Restore Purchases is mandatory for App Store
Apple will reject your app if it has subscriptions but no Restore Purchases button. This is not optional. Android does not require it, but it is still good practice to include it.
Step 5 Gate Features Behind Subscription
Now you need to check whether a user is actually subscribed before showing them premium content. This is called "gating" a feature. RevenueCat provides a simple way to do this check inside FlutterFlow.
5a The Logic: Show or Hide Based on Entitlement
Every time a user opens a page with premium content, your app asks RevenueCat: "Does this user have the premium entitlement?" Based on the answer, you show different content:
5b Set Conditional Visibility on Widgets
The cleanest way to gate content is using FlutterFlow's Conditional Visibility feature. The widget only appears when a condition is true.
1
Select the widget that only premium users should see
In your widget tree, click the Container, Column, or widget that holds your premium content.
2
Open the Conditional Visibility settings
In the Properties panel on the right, look for a section called "Conditional" or click the eye icon 👁. Click "Set Condition".
3
Choose RevenueCat → Is Entitlement Active?
In the condition builder, scroll to find the RevenueCat section. Select "Is Entitlement Active?". In the Entitlement Identifier field, type "premium" exactly as you named it in RevenueCat.
4
Set the OPPOSITE condition on the Upgrade widget
On your "Go Premium" banner or upgrade prompt widget, apply the same RevenueCat condition but enable the "Negate" option (or select "Is NOT Active"). This makes the upgrade prompt appear only when the user is NOT subscribed.
💡 Also redirect on Page Load for fully locked pages
For pages that should only be accessible to subscribers, add an On Page Load action: check if entitlement is active → if NOT → navigate to the Paywall page. This prevents free users from reaching the page at all.
Step 6 Test Your Purchases
Never test with real money. Both Apple and Google provide test environments where purchases complete without any real charge. Always test on both platforms before submitting your app.
Testing on iOS Sandbox
1
Create a Sandbox tester in App Store Connect
In App Store Connect, go to Users and Access → Sandbox Testers. Click "+". Use a brand new email address that has never been used as an Apple ID. This creates a fake account just for testing purchases.
2
Set the Sandbox account on your iPhone
On your test iPhone, go to Settings → App Store → scroll to the bottom to find "Sandbox Account". Sign in with the sandbox tester email. Do not sign out of your main Apple ID the sandbox account activates automatically during a purchase.
3
Run your app and test the Subscribe button
Build and run your FlutterFlow app on the iPhone. Open the paywall. Tap Subscribe. A dialog will appear that says "SANDBOX ENVIRONMENT" at the top this means it is a test purchase. Confirm it. You will not be charged.
4
Check RevenueCat Dashboard to confirm
Go to RevenueCat → Customers. You should see a new customer entry with the sandbox purchase. The entitlement status should show as "active". This confirms the full flow is working.
Testing on Android License Testers
1
Add a License Tester in Google Play Console
In Google Play Console, go to Setup → License Testing. Click "Add license testers". Add the Google account email you use on your test Android phone.
2
Publish to the Internal Testing track
Android test purchases only work on apps installed from the Play Store. Upload your app as an APK or AAB to Play Console → Internal Testing → create a release. Install the app on your test device via the Play Store testing link.
3
Test the purchase and verify in RevenueCat
Open the app, go to the paywall, and subscribe. You will see a test purchase dialog. Complete it, you will not be charged. Check RevenueCat → Customers to confirm the purchase appears and the entitlement is active.
✅ Both platforms tested, ready to go live
Once test purchases work correctly on both iOS and Android and the entitlement shows as active in RevenueCat, your integration is complete. You are ready to submit to the App Store and Google Play.
Troubleshooting Common Problems
Here are the most common problems beginners run into and exactly how to fix each one:
Final Checklist
Use this before submitting your app to make sure everything is in place.
RevenueCat Setup
- Account created at app.revenuecat.com
- Project created with your app name
- iOS app added with correct Bundle ID and App Store Connect API key
- Android app added with correct Package Name and Service Account JSON
- Entitlement "premium" created
- Products created in App Store Connect and Google Play Console
- Products added in RevenueCat and linked to the "premium" entitlement
- Default Offering created with at least one Package inside it
- iOS and Android Public SDK Keys copied
FlutterFlow Setup
- RevenueCat integration enabled in Settings → Integrations
- iOS SDK Key pasted in the iOS field
- Android SDK Key pasted in the Android field
- Configuration saved successfully
- Paywall page built with Subscribe button
- "Purchase Package" action on Subscribe button with correct Offering and Package
- Success navigation and failure Snack Bar added after purchase action
- "Restore Purchases" button with Restore Purchases action
- Conditional Visibility on premium widgets, shows when entitlement active
- Upgrade prompt, shows when entitlement is NOT active
Testing
- Sandbox tester created in App Store Connect
- License tester added in Google Play Console
- Test purchase completed on iOS visible in RevenueCat Customers
- Test purchase completed on Android visible in RevenueCat Customers
- Entitlement shows as "active" after purchase
- Restore Purchases tested and working on iOS
- Premium content correctly hidden from free users
- Premium content correctly visible after subscribing
🏆 You are done, your app has real subscriptions!
RevenueCat handles all the complex payment logic across iOS and Android. Your job now is to make your premium content valuable enough that users want to pay for it. Good luck!
For further details go to RevenueCat Integration
Heading 1
Heading 2
Heading 3
Heading 4
Heading 5
Heading 6
Lorem ipsum dolor sit amet, consectetur adipiscing elit, sed do eiusmod tempor incididunt ut labore et dolore magna aliqua. Ut enim ad minim veniam, quis nostrud exercitation ullamco laboris nisi ut aliquip ex ea commodo consequat. Duis aute irure dolor in reprehenderit in voluptate velit esse cillum dolore eu fugiat nulla pariatur.
Block quote
Ordered list
- Item 1
- Item 2
- Item 3
Unordered list
- Item A
- Item B
- Item C
Bold text
Emphasis
Superscript
Subscript
.avif)


.avif)


