

Firebase Store Relation and Get Document by Reference/Filter Queries in FlutterFlow
What Is Firestore?
Your app needs somewhere to store information. Think of Firestore like a filing cabinet in the cloud.
The Filing Cabinet Analogy
Just like a real filing cabinet:
- Firebase = The entire filing cabinet system
- Firestore = The cabinet itself where files go
- Collections = Drawers in the cabinet
- Documents = Individual files/cards in the drawer
- Fields = Information written on each card
Why Connect Data Together?
The Problem (Without Connections)
Imagine you run a coaching app. Ali books 10 appointments.
The Wrong Way (Storing everything in each appointment):
Appointment 1: "Coaching Session"
- Student Name: Ali
- Student Email: ali@email.com
- Student Phone: 03001234567
- Coach Name: Sarah
- Coach Email: sarah@email.com
- Coach Phone: 032310456988
Appointment 2: "Coaching Session"
- Student Name: John
- Student Email: john@email.com
- Student Phone: 0300125678
- Coach Name: Sarah
- Coach Email: sarah@email.com
- Coach Phone: 032310456988
Appointment 3: "Coaching Session"
- Student Name: Darry
- Student Email: darry@email.com
- Student Phone: 03901238567
- Coach Name: Sarah
- Coach Email: sarah@email.com
- Coach Phone: 032310456988
Problems:
- Same information repeated 10 times
- If Sarah changes his phone number, you must update 10 appointments
- Takes up lots of storage space
- Easy to make mistakes (one appointment has wrong email)
The Solution (With Document References)
The Right Way:
Users:
- Sarah: Email: sarah@email.com, Phone: 032310456988
Appointments:
- Appointment 1: Points to Sarah
- Appointment 2: Points to Sarah
- Appointment 3: Points to Sarah
Benefits:
- Sarah's info stored ONE time only
- Change his phone once all appointments automatically updated
- Uses much less storage
- No mistakes because there's only one copy
- Super organized
Real Example: Sarah changes her phone to 03109876543
Without connections: Update 10 appointment cards
With connections: Update Ali's user card once, done!
Understanding Document References
What Is a Document Reference?
A Document Reference is like a link or pointer. It says: "Hey, this appointment belongs to THIS user."
Instead of copying Sarah's name into the appointment, you just point to Sarah's user card.
Simple Comparison
Without Reference:
Appointment Card:
- Title: Coaching
- Student: Ali Khan
- Email: ali@email.com
- Phone: 03001234567
- Coach Name: Sarah
- Coach Email: sarah@email.com
- Coach Phone: 032310456988
With Reference:
Appointment Card:
- Title: Coaching
- Student: → [Points to Sarah's card in Users collection]
It's like having a sticky note that says "See Sarah's card for his info" instead of writing his whole biography on every appointment.
How to Create Document References: Simple Steps
What You're Going to Do
You will tell FlutterFlow: "This appointment should point to a user."
Step-by-Step Guide
Step 1: Open Your Database in FlutterFlow
- Go to your FlutterFlow project
- Look for Database or Firestore in the left menu
- Create your collections
- You should see collections like "users", "appointments", etc
Step 2: Click on "Appointments" Collection
- Find the "appointments" collection
- Click on it
- You will see all the fields: title, date, status, etc.
Step 3: Add a New Field
- Look for "+ Add Field" or "+" button
- Click it
- Select
- Field Name: Type user_reference
- This is just a name so you remember what it points to
Step 4: Choose the Data Type
- Find the "Data Type" dropdown
- Open it
- Look for "Document Reference" option
- Click it
- This tells FlutterFlow: "This field will point to another document"
Step 5: Pick Which Collection It Points To
- A new dropdown will appear asking: "Which collection does this reference?"
- Select "users" collection
- This means: "This field points to a user card"
Step 6: Save It
- Click Save or Confirm
- Done!
What you've created:
appointments collection:
title: "Coaching Session"
date: "Jan 15"
user_reference: → Points to users collection
Now every appointment can say which user it belongs to

How to Show Data From the Connected Collection
Your appointment now points to a user. But you need to actually show the user's information on your app.
Two-Part Setup
Part 1: Get the data (Backend)
Part 2: Show the data (Frontend)
Part 1: Get the Data — Backend Setup
Step 1: Open Backend Queries
- Open the page where you want to show appointment details
- Look for Backend Query or Query section in left sidebar
- Click "+ Add Query" button
Step 2: Create a Query to Get the Connected User
- A menu will appear asking what type of query
- Find and click "Document From Reference"
- This query type means: "Go get the user that this appointment points to"
Step 3: Tell It Which Reference to Follow
- FlutterFlow will ask: "Which appointment field has the reference?"
- Select "user_reference"
- Click Save
What just happened: You told FlutterFlow: "When someone (like Ali or Sarah) views an appointment, automatically go fetch the user that this appointment points to."
Steps to Apply a Query
Backend Query > Add query > Select query type
Types of Queries
1. Collection Query
Used to retrieve multiple documents from a collection.
2. Single Document Query
Used to fetch one specific document.
3. Query with Filters
Filters allow you to display only records that meet certain conditions.
Example:
Status = Active and User ID = Current User
4. Using Document References
FlutterFlow supports document references, making it easy to connect related collections and retrieve linked data.
Filter Queries in FlutterFlow
Filter queries allow developers to retrieve specific records based on conditions.

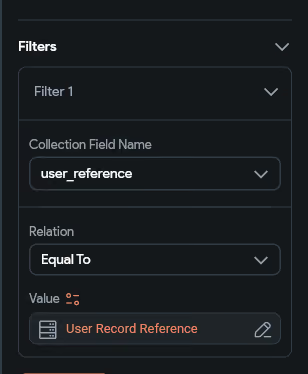
if you want to show only appointments created by the currently logged-in user:
Collection Query:
appointments
Filter:
user_reference = Current User Reference
This query returns only appointments linked to the authenticated user.

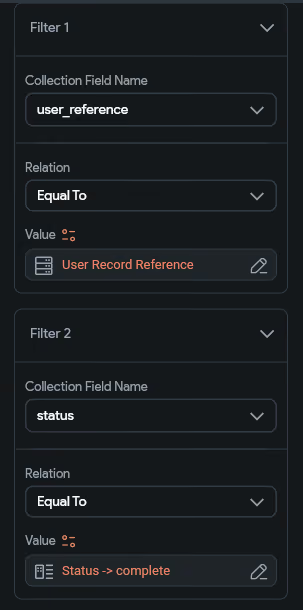
Another example:
if you want to show only appointments created by the currently logged-in user and the appointment status is complete
Collection Query:
appointments
filter:
user_reference = Current User Reference
status = complete
This query returns only the appointments associated with the authenticated user and whose status is marked as complete.This helps create personalized dashboards and filtered lists.
Steps to apply filter
Backend Query > Add query > Query collection > Select collection > Add filter > Enter field name > relation > value
Part 2: Show the Data — Frontend Setup
Now you have the user's data. Time to display it on your app.
Step 1: Add a Text Widget
- Open your appointment detail page in FlutterFlow
- Find the Text Widget in the left sidebar (under Widgets)
- Drag it onto your page where you want the user's name to appear
- Example: Drag it to the top to show "Coaching with [User Name]"
Step 2: Connect the Widget to Your Data
- Click on the Text widget you just added
- Look at the right side for Properties panel
- Find the text field where it says something like "Enter text here"
- Look for a variable icon (looks like {} or a small orange icon)
- Click it
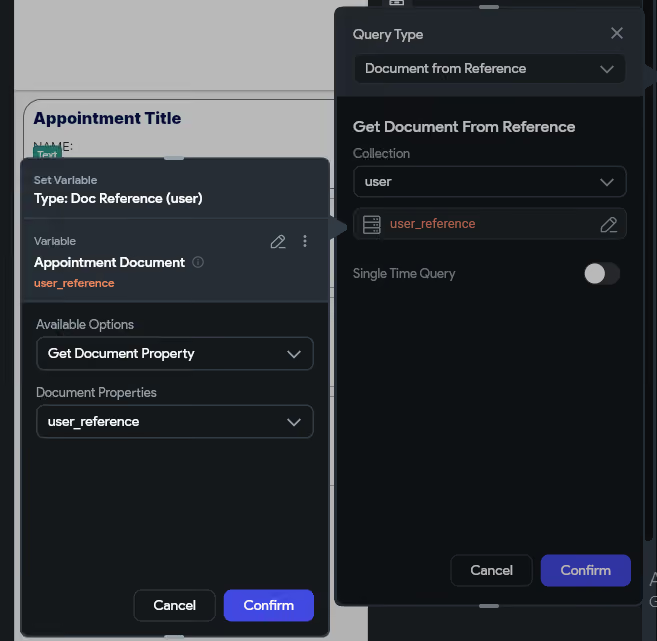
Steps to Documents by Reference: Backend Query > Add query >
Document From Reference >Select the document whose reference is stored >Select the record reference name.
Step 3: Select the Data
- A menu will open showing available data
- Find your query from Part 1 (the "Document From Reference" query)
- Click on it
- It will show available fields from the user: name, email, phone, etc.
- Click "display_name" to show the user's name
Step 4: Test It
- Go to Run Mode (Preview your app)
- Open an appointment
- You should see the user's name displayed
Example of what you created:
User Info Appears Here:
Ali Khan
ali@email.com
03001234567
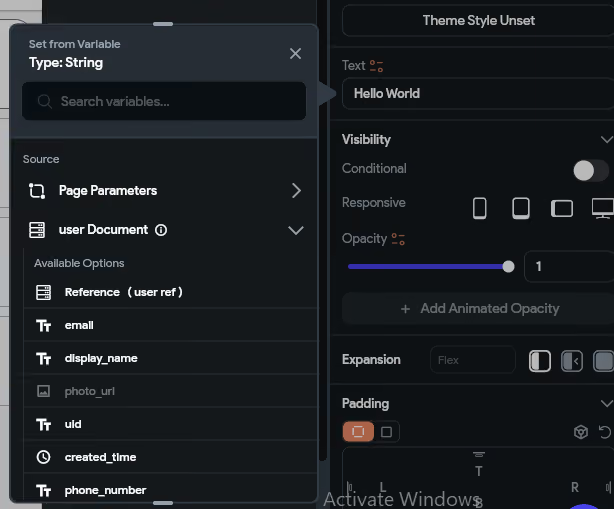
Steps to show data get from Documents by Reference: Add text widget > Set from variable > Select collection > Select field
Best Practices for References and Queries
When working with Firebase relationships in FlutterFlow:
1. Use Document References instead of storing duplicate data.
2. Keep collections focused on a single purpose.
3. Use filter queries to reduce unnecessary database reads.
4. Avoid storing complete user profiles inside related collections.
5. Structure relationships carefully before starting development.
Following these practices improves performance and keeps your Firestore database scalable as your application grows.
Conclusion
Document References are one of the most powerful features of Firebase Firestore in FlutterFlow. They allow developers to create relationships between collections without duplicating data. Combined with filter queries, references make it easy to retrieve only the data needed for a specific user or feature.
By properly structuring relationships and using reference-based queries, you can build cleaner, faster, and more maintainable FlutterFlow applications.
Heading 1
Heading 2
Heading 3
Heading 4
Heading 5
Heading 6
Lorem ipsum dolor sit amet, consectetur adipiscing elit, sed do eiusmod tempor incididunt ut labore et dolore magna aliqua. Ut enim ad minim veniam, quis nostrud exercitation ullamco laboris nisi ut aliquip ex ea commodo consequat. Duis aute irure dolor in reprehenderit in voluptate velit esse cillum dolore eu fugiat nulla pariatur.
Block quote
Ordered list
- Item 1
- Item 2
- Item 3
Unordered list
- Item A
- Item B
- Item C
Bold text
Emphasis
Superscript
Subscript
.avif)


.avif)


