


Supabase + FlutterFlow Complete Guide: Authentication, CRUD, Pagination & Multiple Deletion
Introduction
If you are building a FlutterFlow app and need a backend that is powerful, easy to use, and free to start — Supabase is one of the best choices. This guide will walk you through everything you need to know, from setting up Supabase all the way to building complex features like pagination and bulk deletion.
What You Will Learn
By the end of this guide you will know how to: (1) Connect Supabase to FlutterFlow, (2) Implement Authentication (Sign Up, Login, Logout), (3) Perform full CRUD operations (Create, Read, Update, Delete), (4) Add Pagination to large data lists, and (5) Implement Multiple/Bulk Deletion with checkboxes.
Prerequisites
You need: a FlutterFlow account (free tier is fine), a Supabase account (free at supabase.com), and basic familiarity with FlutterFlow's canvas and widget panel. No coding experience required for most of this guide.
Part 1: Setting Up Supabase
1.1 Creating a Supabase Project
- Go to supabase.com and click Start your project.
- Sign in with GitHub or create a new account.
- Click New Project in the dashboard.
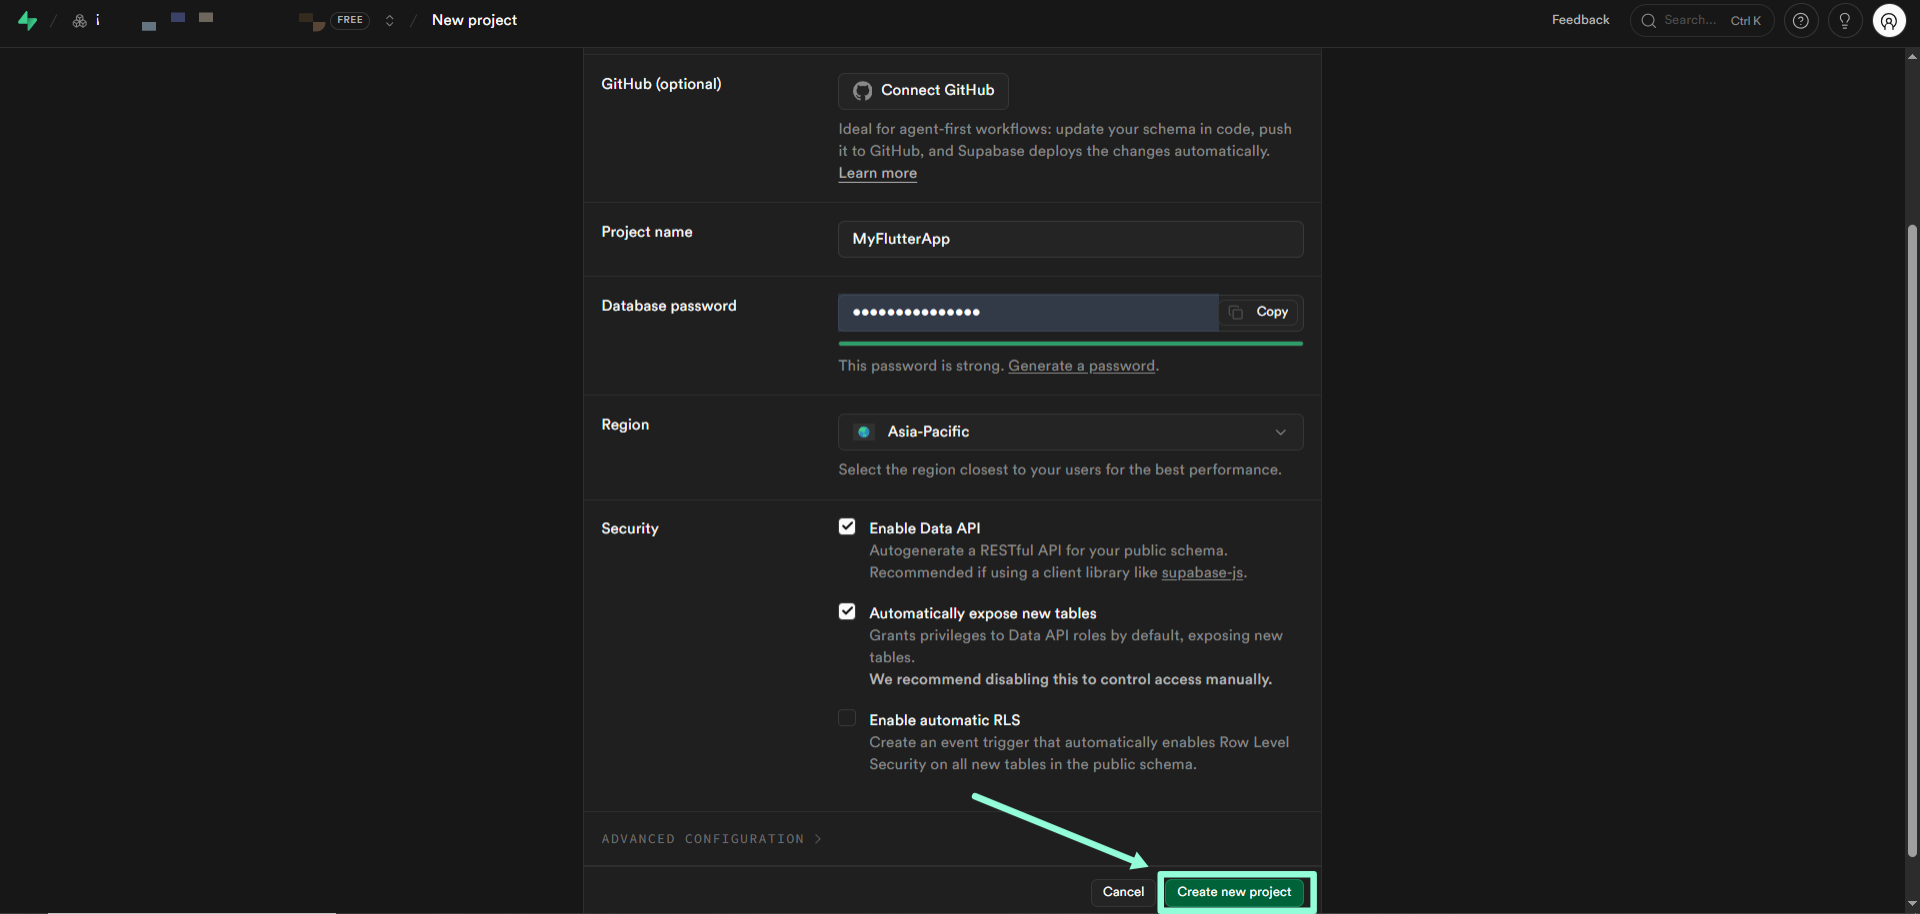
- Fill in the following details: Organization (create one if needed), Project Name (e.g., MyFlutterApp), Database Password (save this somewhere safe!), and Region (choose the one closest to your users).
- Click Create new project. It takes about 2 minutes to provision.
1.2 Creating Your First Database Table
For this guide, we will build a simple Todo app. Let us create a todos table in Supabase.
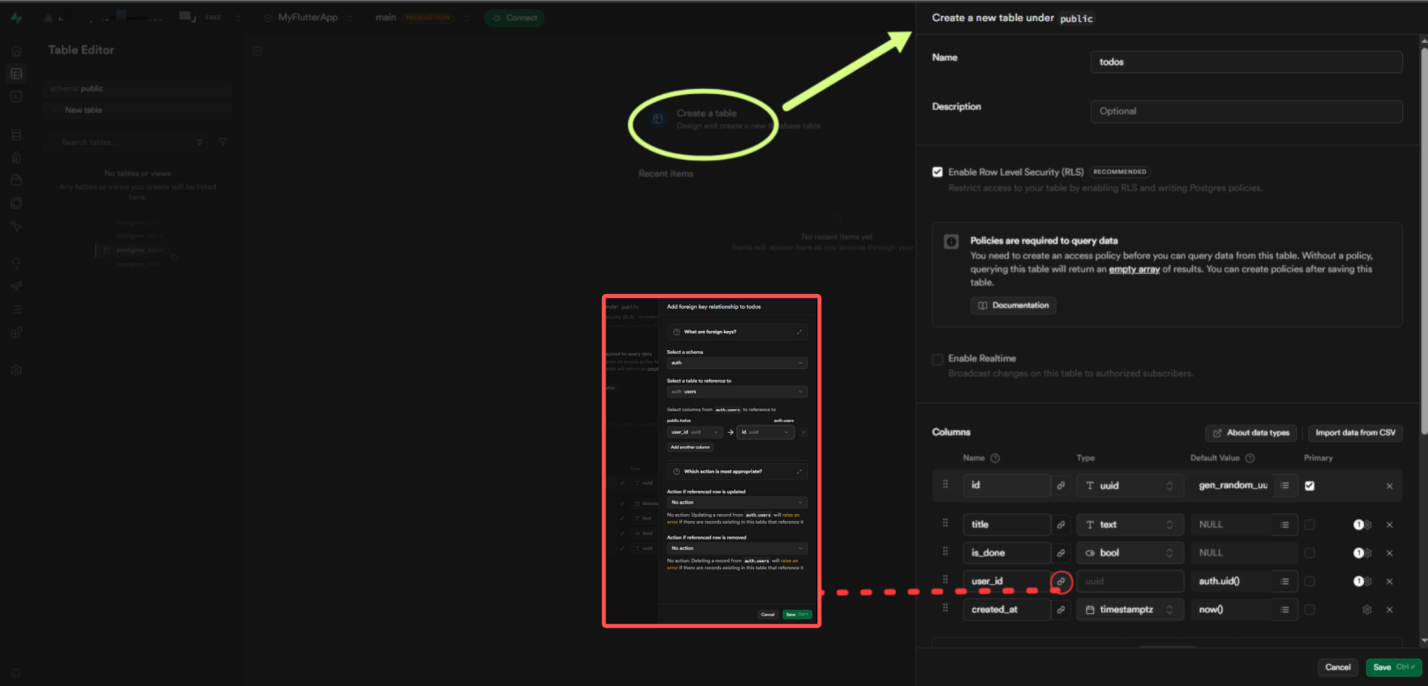
- In your Supabase project, click Table Editor in the left sidebar.
- Click Create a new table.
- Name the table: todos
- Enable Row Level Security (RLS) — keep the toggle ON (important for security).
- Add the following columns using the table below as reference:
- Click Save to create the table.
1.3 Setting Up Row Level Security (RLS) Policies
RLS is Supabase's security layer. Without policies, no one can read or write data — not even your app. Let us add the right policies for our todos table.
- Click the todos table in Table Editor.
- Click the Authentication tab, then Policies.
- Click New Policy and select Create a policy from scratch.
- Add the SELECT policy — Name: Allow users to read own todos | For: SELECT | Using expression: auth.uid() = user_id
- Add the INSERT policy — Name: Allow users to insert own todos | For: INSERT | With check: auth.uid() = user_id
- Add the UPDATE policy — Name: Allow users to update own todos | For: UPDATE | Using: auth.uid() = user_id
- Add the DELETE policy — Name: Allow users to delete own todos | For: DELETE | Using: auth.uid() = user_id
Why RLS Matters
Without RLS policies, your database is open to anyone who has your API key. With these policies, each user can only see and modify THEIR OWN todos. This is critical for any production app.

1.4 Connecting Supabase to FlutterFlow
- In FlutterFlow, click Settings (gear icon) in the left sidebar.
- Click Supabase.
- Toggle Enable Supabase ON.
- Go back to Supabase and click Project Settings > API.
- Copy the Project URL (it looks like https://xxxx.supabase.co).
- Copy the anon / public key (the long string under Project API Keys).
- Paste both values into FlutterFlow's Supabase settings.
- Click Get Schema. FlutterFlow will automatically detect your todos table.
- Click Save. You should see the todos table listed under your schema.
Part 2: Authentication
Supabase Authentication in FlutterFlow gives you Sign Up, Login, Logout, and session persistence out of the box. Let us build it step by step.
2.1 Understanding Supabase Auth
Supabase Auth works by issuing JWT tokens when a user signs in. FlutterFlow automatically manages these tokens and the user session. The authenticated user's ID (auth.uid()) is what we use in our RLS policies to protect data.
2.2 Building the Sign Up Page
2.3 Building the Login Page
- Create a new page named LoginPage.
- Add the same email and password TextFields as the Sign Up page.
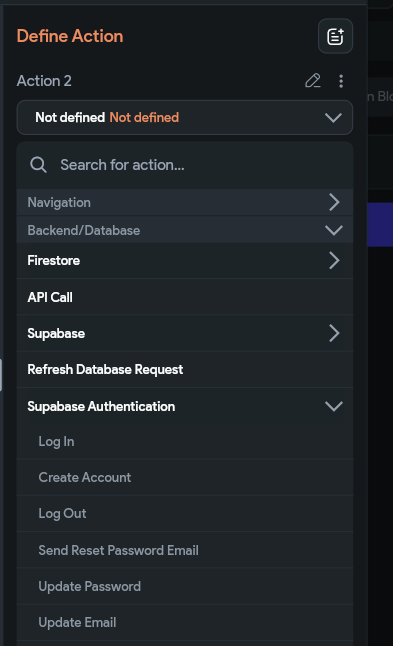
- Add a Login button. In its action choose: Authentication > Supabase Auth > Log In.
- Map Email to emailField.text and Password to passwordField.text.
- On success: Navigate to HomePage. On failure: Show Snackbar 'Invalid email or password'.
- Add a Text button below: 'Don't have an account? Sign Up' — navigate to SignUpPage on tap.
2.4 Implementing Logout
- On your HomePage, add a Logout button (or an icon button in the AppBar).
- In its Action: choose Authentication > Supabase Auth > Log Out.
- After Log Out: Navigate to LoginPage and clear the navigation stack so the user cannot go back.
2.5 Protecting Pages (Auth Guard)
You do not want unauthenticated users accessing your HomePage. Set up route guards:
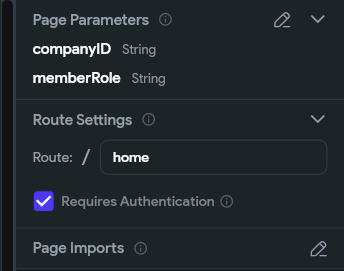
- Click on your HomePage in the page list.
- In the right panel, find Route Settings.
- Toggle Require Authentication ON.
- Set Redirect to Page: LoginPage.
Now if a user tries to navigate to HomePage without being logged in, they are automatically redirected to LoginPage. Do this for every page that needs authentication.
Part 3: CRUD Operations
CRUD stands for Create, Read, Update, Delete — the four basic operations of any data-driven app. Let us implement all four for our todos table.
3.1 READ — Displaying Todos
Let us build the main screen that shows a list of todos from Supabase.
- Go to your HomePage in FlutterFlow.
- Drag a ListView widget onto the page.
- In the ListView's properties, click Generate Dynamic Children.
- Under Backend Query: Choose Supabase > todos table.
- Add a Filter: user_id Equals auth.currentUserUid. This ensures users only see their own todos.
- Set Order By: created_at descending (newest first).
- Click Confirm.
- Design the list item: inside the ListView, add a Row with a Checkbox, a Text widget, and a Delete button.
- Bind the Text widget to: todoItem.title
- Bind the Checkbox to: todoItem.is_done

3.2 CREATE — Adding a New Todo

- Add a FloatingActionButton to your HomePage.
- Optionally, create a separate AddTodoPage with a TextField and a Save button.
- On the Save button action, choose: Supabase > Insert Row > todos table.
- Set the following field values:
- the TextField's text value: title
- auth.currentUserUid: user_id
- false (hardcoded boolean): is_done
- leave empty — Supabase fills it automatically: created_at
- On success: navigate back to HomePage or refresh the list.
3.3 UPDATE — Editing a Todo
We will implement two types of updates: marking a todo as done (via checkbox) and editing the title (via a dialog).
Marking as Done (Checkbox Update)
- Select the Checkbox widget in your ListView item.
- On its On Changed action: choose Supabase > Update Row > todos table.
- Set Matching Rows: id Equals todoItem.id
- Set Fields to Update: is_done = the Checkbox's new value (use the action's toggled value parameter).
Editing the Title
- Add an Edit (pencil) IconButton to each list item.
- On tap: Open a Dialog with a pre-filled TextField (initial value: todoItem.title).
- Add a Save button in the dialog. On its action: Supabase > Update Row > todos.
- Set Matching Rows: id Equals todoItem.id
- Set Fields: title = the dialog TextField's text.
3.4 DELETE — Removing a Single Todo
- Select the Delete (trash) IconButton in your list item.
- Add a Confirm Dialog action first — ask 'Are you sure you want to delete this todo?'
- On Confirm: choose Supabase > Delete Row > todos table.
- Set Matching Rows: id Equals todoItem.id
- After delete: the ListView automatically refreshes since it is query-based.
Part 4: Implementing Pagination
When your todos table grows to hundreds or thousands of rows, loading everything at once will make your app slow and unresponsive. Pagination solves this by fetching a fixed number of rows at a time — for example, 20 records per page — and letting the user navigate between pages.
4.1 Understanding Pagination in Supabase
Supabase uses a range-based approach for pagination. Instead of LIMIT/OFFSET SQL syntax, the Supabase Dart client uses a .range(from, to) method where from is the index of the first row to fetch and to is the index of the last row — both inclusive.
// Page 1: fetch rows 0 to 19 (20 rows)
supabase.from('todos').select().range(0, 19);
// Page 2: fetch rows 20 to 39 (20 rows)
supabase.from('todos').select().range(20, 39);
// Page 3: fetch rows 40 to 59 (20 rows)
supabase.from('todos').select().range(40, 59);
// General formula for any page:
// from = (currentPage - 1) * pageSize
// to = from + pageSize - 1
4.2 Why a Custom Action Is Required for Supabase Pagination
FlutterFlow currently does not support pagination or infinite scroll for Supabase queries through the built-in Backend Query settings. Unlike Firebase — which has native Infinite Scroll support — Supabase queries in FlutterFlow's visual query panel do not allow you to pass a dynamic range at runtime.
Important: Firebase vs Supabase in FlutterFlow
FlutterFlow provides built-in Infinite Scroll support for Firebase (Firestore) queries. For Supabase data sources, however, both pagination and infinite scrolling currently require a custom implementation using Custom Actions and Supabase range queries. This is a known limitation of FlutterFlow's current Supabase integration.
The workaround is to write a Custom Action in Dart that accepts the current page number and page size as parameters, calculates the correct range, and queries Supabase directly. You then call this action from your page load event and from your Next/Previous buttons.
4.3 Manual Pagination for Supabase (Custom Action Required)
Follow these steps to implement a working Previous/Next pagination system for any Supabase table in FlutterFlow.
Step 1 — Create Page State Variables
- Open your page in FlutterFlow and go to the Page State panel.
- Add a variable: currentPage | Type: Integer | Default: 1 (pages are numbered from 1, not 0)
- Add a variable: pageSize | Type: Integer | Default: 20
Step 2 — Create the Custom Action
- In FlutterFlow, go to Custom Code > Custom Actions > Add Action.
- Name the action: fetchPaginatedTodos
- Add two input parameters: pageSize (Integer) and currentPage (Integer)
- Set the return type to a List of your row type (or String if you prefer to return JSON).
- Inside the Custom Action, calculate the range using this formula and write the Supabase query:
import '/backend/supabase/supabase.dart';
Future<List<dynamic>> fetchPaginatedTodos(
int pageSize,
int currentPage,
) async {
// Calculate the row range for this page
final from = (currentPage - 1) * pageSize; // e.g. page 1 → 0, page 2 → 20
final to = from + pageSize - 1; // e.g. page 1 → 19, page 2 → 39
final response = await SupaFlow.client
.from('todos')
.select()
.eq('user_id', currentUserUid) // filter to current user's data
.order('created_at', ascending: false)
.range(from, to); // fetch only this page's rows
return response;
}
- Click Compile to check for errors, then click Save.
Step 3 — Bind the Result to Your ListView
- On your page, add a ListView widget.
- Do NOT attach a Backend Query to this ListView — it will be driven entirely by the Custom Action result.
- Call the fetchPaginatedTodos Custom Action from the page's On Page Load event, passing pageSize and currentPage from Page State.
- Store the action's output in a Page State variable (e.g. todoResults, type: List).
- Set the ListView to generate children from the todoResults Page State variable and design the list item widget as normal.
Step 4 — Add the Next and Previous Buttons
- Below the ListView, add a Row containing two Buttons: label them 'Previous' and 'Next'.
- On the Next Page button, configure this action sequence:
- Increment currentPage by 1 (Update Page State: currentPage = currentPage + 1)
- Execute the fetchPaginatedTodos Custom Action again with the updated currentPage
- Update todoResults with the new action output
- On the Previous Page button, configure this action sequence:
- Decrement currentPage by 1 (Update Page State: currentPage = currentPage - 1)
- Execute the fetchPaginatedTodos Custom Action again with the updated currentPage
- Update todoResults with the new action output
- Set the Previous button's Conditional Visibility to only show when currentPage is greater than 1. This prevents going below page 1.
How .range() Works
The .range(from, to) call tells Supabase to return only the rows between index 'from' and index 'to', both inclusive. The formula (currentPage - 1) * pageSize gives the correct starting index for any page. For example: Page 1 → range(0, 19), Page 2 → range(20, 39), Page 3 → range(40, 59). The Custom Action recalculates this every time it is called, so all you need to update in FlutterFlow is the currentPage variable.
Part 5: Multiple / Bulk Deletion
Multiple deletion lets users select several items at once and delete them all with a single tap — similar to how Gmail lets you select multiple emails and delete them together. This section walks through the complete implementation step by step.
5.1 The Architecture: How Multiple Selection Works
The approach is straightforward: maintain a list of selected item IDs in Page State. When the user taps an item, its ID is added to the list. When they tap it again, the ID is removed. The Delete button is only visible when the list has at least one item in it. When the user confirms deletion, a Custom Action deletes all rows matching those IDs in a single Supabase call.
The Data Flow
User taps item A → add item A's ID to selectedTodoIds. User taps item A again → remove item A's ID from selectedTodoIds. Delete button appears automatically when selectedTodoIds.length > 0. User taps Delete → Custom Action deletes all matching rows in one Supabase call → clear selectedTodoIds.
5.2 Setting Up the Page State Variable
- Open your page in FlutterFlow and go to the Page State panel (the icon that looks like a document with a small page symbol, in the left sidebar under your page name).
- Click Add Field.
- Configure it as follows: Name: selectedTodoIds | Type: List | List Item Type: String | Default Value: empty list
- Click Confirm. This single variable is all we need — it holds the IDs of every item the user has currently selected.
5.3 Updating the List Item Design
Each list item needs a visual indicator to show whether it is selected. The simplest approach in FlutterFlow is to change the background colour of the item's container based on whether its ID is in the selectedTodoIds list.
- In your ListView, select the Container or Row that wraps each list item.
- In the Properties panel, find the Background Color field.
- Click the conditional colour option (the small branch icon next to the colour picker).
- Set condition: IF selectedTodoIds contains todoItem.id THEN colour = light blue (e.g. #DBEAFE). ELSE colour = white (or your default background).
- This gives the user a clear visual highlight showing which items are currently selected.
5.4 Handling Item Tap to Toggle Selection
We use a simple On Tap action on each list item to toggle its selection state — adding the ID if it is not in the list, or removing it if it already is.
- Select the Container or Row that wraps your list item.
- Add an On Tap action.
- Add a Conditional action with two branches:
- Remove todoItem.id from selectedTodoIds (action: Update Page State > Remove Item from List > selectedTodoIds > value: todoItem.id): IF selectedTodoIds contains todoItem.id
- Add todoItem.id to selectedTodoIds (action: Update Page State > Add Item to List > selectedTodoIds > value: todoItem.id): ELSE (the ID is not yet in the list)
5.5 Showing the Delete Button Conditionally
The Delete Selected button and the selection count should only appear when at least one item is selected. We use Conditional Visibility driven directly by the list length — no extra boolean variable needed.
- In your AppBar or at the top of the page, add a Row containing: a Delete icon button and a Text widget (to show the count of selected items).
- Select that Row and open the Conditional Visibility settings.
- Set the condition: selectedTodoIds length > 0. The Row — and everything inside it — will now only appear when something is selected.
- Select the Text widget inside the Row. Bind its value to: selectedTodoIds length (displayed as a string). This will automatically show '1 selected', '3 selected', etc.
- Also add a Cancel/Clear button beside the delete button. On tap: set selectedTodoIds to an empty list. This lets the user deselect everything and exit selection mode cleanly.
5.6 The Bulk Delete Custom Action
FlutterFlow's built-in Supabase Delete Row action can only delete one row at a time. For bulk deletion we need a Custom Action that uses Supabase's .inFilter() method — this deletes all matching rows in a single database call.
- Go to Custom Code in the left sidebar, then Custom Actions > Add Action.
- Name it: deleteMultipleTodos
- Add one input parameter: todoIds | Type: List of Strings
- Return type: void (this action does not need to return a value)
- Write the following code:
import '/backend/supabase/supabase.dart';
// Deletes multiple todo rows in a single Supabase call.
// Parameter:
// todoIds — the list of row IDs to delete (passed from Page State)
Future deleteMultipleTodos(List<String> todoIds) async {
// Safety check: do nothing if the list is somehow empty
if (todoIds.isEmpty) return;
await SupaFlow.client
.from('todos')
.delete()
.inFilter('id', todoIds); // deletes ALL rows whose id is in the list
}
- Click Compile to verify the code, then click Save.
How .inFilter() Works
The .inFilter('id', todoIds) call tells Supabase: delete every row in the todos table where the id column matches any value in the todoIds list. This is the equivalent of the SQL statement: DELETE FROM todos WHERE id IN ('id1', 'id2', 'id3'). It executes as one network request regardless of how many items are selected.
5.7 Wiring the Delete Button
Now connect the Delete button to the Custom Action and clean up the state afterwards.
- Select the Delete icon button you added in section 5.5.
- Open the Action Flow Editor and add the following sequence of actions in order:
- Action 1 — Alert Dialog: show a confirmation message such as 'Delete (selectedTodoIds length) items? This cannot be undone.' Wait for user confirmation before proceeding.
- Action 2 — Custom Action: call deleteMultipleTodos. Pass selectedTodoIds (Page State) as the todoIds parameter.
- Action 3 — Update Page State: set selectedTodoIds to an empty list. This clears the selection and automatically hides the delete button (since length is now 0).
- Action 4 — Refresh the ListView so the deleted items disappear from the screen immediately.
5.8 Adding a 'Select All' Feature
For convenience, add a Select All button that fills selectedTodoIds with every visible item's ID at once.
- Add a Text button labelled 'Select All' near the top of your page or in the AppBar.
- Go to Custom Code > Custom Actions > Add Action. Name it: getAllTodoIds.
- Add one input parameter: userId | Type: String (we pass this in rather than accessing it inside the action, which is the correct pattern for FlutterFlow Custom Actions)
- Set the return type to List of Strings.
- Write the following code:
import '/backend/supabase/supabase.dart';
// Returns a list of all todo IDs belonging to the current user.
// Parameter:
// userId — pass currentUserUid from FlutterFlow when calling this action
Future<List<String>> getAllTodoIds(String userId) async {
final response = await SupaFlow.client
.from('todos')
.select('id') // only fetch the id column — faster than fetching all columns
.eq('user_id', userId);
// Extract just the id value from each row and return as a plain String list
return List<String>.from(response.map((row) => row['id'].toString()));
}
- Click Compile and then Save.
- On the Select All button, add an action: call getAllTodoIds. For the userId parameter, pass: Authenticated User > User UID (this is how you correctly pass the current user's ID in FlutterFlow).
- After the action: update selectedTodoIds Page State with the returned list.
Part 6: Putting It All Together
Here is the complete feature set we have built:
Common Issues & Solutions
Issue: Supabase query returns no data even though rows exist
Solution: Check your RLS policies. The most common cause is that the policy filter auth.uid() = user_id is not matching because user_id is null or the user is not authenticated. Test by temporarily disabling RLS in Supabase (only for debugging — never leave it off in production).
Issue: 'Schema could not be loaded' when connecting FlutterFlow to Supabase
Solution: Make sure you are using the anon/public key, not the service_role key. Also verify the Project URL does not have a trailing slash. Try clicking 'Get Schema' again after saving.
Issue: Checkbox does not update in the list after checking
Solution: The ListView needs to refresh after the update action. Add a Refresh action after the Supabase Update Row action. Alternatively, use a local Page State variable to track the checked state and sync to Supabase in the background.
Issue: Bulk delete only deletes the first item
Solution: Make sure you are using the Custom Action with .inFilter() and not the built-in Delete Row action. The built-in action only handles one row at a time.
Conclusion
Congratulations! You have learned how to implement the full stack of Supabase features in FlutterFlow. Let us recap what you built:
- A secure Supabase project with RLS policies protecting user data
- Full authentication flow: Sign Up, Login, Logout, and protected routes
- Complete CRUD operations: Create, Read, Update, and Delete todos
- Pagination via Custom Action using Supabase .range() with Previous and Next buttons
- Multi-select with tap-to-toggle UI, conditional delete button, and bulk deletion via a single Custom Action
What to Build Next
Try extending this project: add real-time updates (toggle the Real-Time switch in the Backend Query), add image uploads using Supabase Storage, build a category/folder system using a related categories table with foreign keys, or add push notifications when todos are due.
The skills you learned here — especially using Page State for multi-select, Custom Actions for operations FlutterFlow does not support natively, and deriving UI visibility from a single list variable — are patterns you will use in almost every app you build. Keep experimenting and happy building!
Written by Sheharyar Ahmad | Patronecs
1. Can FlutterFlow work with Supabase?
Yes, FlutterFlow integrates with Supabase and allows you to build apps with Supabase authentication, database operations, storage, and backend functionality.
2. How do I connect Supabase to FlutterFlow?
You can connect Supabase to FlutterFlow by adding your Supabase project URL and anon key in FlutterFlow settings, then loading your database schema.
3. Does FlutterFlow support Supabase authentication?
Yes, FlutterFlow supports Supabase authentication, including sign up, login, logout, session management, and protected pages.
4. What CRUD operations can I perform with Supabase in FlutterFlow?
You can perform all CRUD operations: create new records, read data from tables, update existing records, and delete records using Supabase actions in FlutterFlow.
5. How does pagination work with Supabase and FlutterFlow?
Supabase pagination in FlutterFlow can be implemented using Custom Actions with range queries. This allows you to load a fixed number of records per page instead of loading the entire database.
6. Does FlutterFlow support Supabase pagination automatically?
Currently, FlutterFlow does not provide built-in pagination support for Supabase queries. A Custom Action is required to implement pagination using Supabase range queries.
7. How do I delete multiple records in Supabase using FlutterFlow?
Bulk deletion can be implemented using a Custom Action with Supabase’s filtering methods. This allows multiple records to be deleted in a single database request.
8. What is Row Level Security (RLS) in Supabase?
Row Level Security (RLS) is Supabase’s database security feature that controls who can access or modify specific rows. It ensures users only access their own data.
9. Why is my Supabase data not showing in FlutterFlow?
The most common reasons are incorrect RLS policies, missing authentication, incorrect API keys, or a mismatch between the user ID and database records.
10. Can I build a production app with FlutterFlow and Supabase?
Yes, FlutterFlow and Supabase can be used together to build production applications. Proper authentication, RLS policies, database design, and backend logic are important for scalability and security.
11. Do I need coding experience to use Supabase with FlutterFlow?
No. Most features can be built visually in FlutterFlow, but advanced features like pagination and bulk operations may require basic Dart Custom Actions.
.svg)
.svg)


.avif)
