


Extending Your UI: A Guide to Custom Widgets in FlutterFlow
FlutterFlow provides a robust set of built-in layout elements and widgets that satisfy the design requirements of most applications. However, when you need a highly specialized visual element, a unique layout structure, or a specific functional behavior that goes beyond the standard options, Custom Widgets bridge the gap.
This guide walks you through the What, Why, and How of building custom UI components, featuring a real-world example that solves one of the most common challenges developers face when handling database records.
1. What are Custom Widgets?
A Custom Widget in FlutterFlow is a reusable user interface component written in native Flutter (Dart) code. Unlike Custom Functions (which handle quick math/logic) or Custom Actions (which handle background workflows), Custom Widgets are designed entirely to render visual components on the screen.
Core Properties of a Custom Widget
- Width & Height Parameters: Explicit dimensions required by FlutterFlow to size and bound the custom canvas container inside the layout engine.
- Parameters / Arguments: Inbound configurations (like strings, integers, lists, or custom database records) passed from the parent screen to customize the widget.
- Callback Actions: Outbound events that pass user-selected data or interactions back up to the main FlutterFlow app thread.
2. Why Use Custom Widgets?
Integrating custom UI code into your visual builder unlocks advanced frontend capabilities:
- Incorporate Third-Party Packages: Access thousands of specialized open-source UI libraries on pub.dev—such as advanced charting tools, custom carousels, or interactive sliders.
- Solve Logic-UI Architecture Gaps: Overcome the limitations of default low-code components when you need total control over data types and visual representation simultaneously.
- Maintain High Performance: Because these are written in native Dart, they execute efficiently on the user's device without adding layout overhead.
3. The Problem We Are Solving (A Real-World Scenario)
The Core Problem
When building data-driven applications in FlutterFlow, you frequently need dropdown menus to let users choose an item from a database collection (e.g., selecting a Category, a City, or an Assignment).
The standard FlutterFlow dropdown widget presents a major limitation here: It forces you to choose between displaying a clean label or capturing the underlying document reference. If you populate the dropdown with a list of document strings (like category.name), the dropdown's selected value output is just that literal string.
If two categories have the same name, or if you need the actual backend Firestore Document/Reference ID to attach to a new record, a string output isn't enough. You are forced to perform complex backend lookups just to find the document that matches the selected text, which wastes read operations and slows down your application.
The Solution
We solve this by building a Firestore Custom Dropdown Widget. This custom component accepts the entire list of database documents directly. It visually displays the readable string property (like a name or title) inside the UI, but when a user makes a selection, it returns the entire database record object back to FlutterFlow through a Callback Action.
4. How to Implement the Firestore Dropdown Widget
Step 1: Create the Custom Widget in FlutterFlow
- Open your project and navigate to the Custom Code tab (</>) in the left navigation sidebar.
- Click + Add and select Widget.
- Name your widget exactly FirestoreDropdown.
[📷 Screenshot Placeholder 1]
Capture the FlutterFlow custom code manager panel with the "+ Add > Widget" option selected and the primary settings dashboard open.
Step 2: Configure Parameters and Callbacks
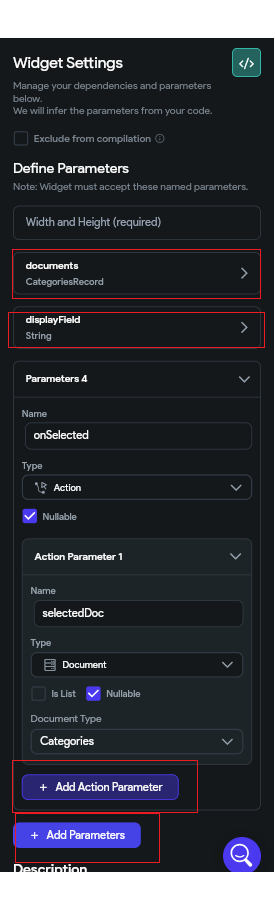
To pass records in and send chosen objects out, define your properties in the right configuration panel:
- Width & Height: Set default boundaries (e.g., Width: 300, Height: 50).
- Arguments: Click + Add Argument:
- documents: Set Type to Record -> Select your Collection (e.g., categories), and check Is List.
- displayField: Set Type to String (this tells the widget which text field to display).
- Callback Actions: Click + Add Callback Action:
- Name it onSelected.
- Add an argument inside it named selectedDoc, set its type to Record, and map it to your target collection type.
Step 3: Insert the Custom Code
Copy and paste the code below into the center code editor window:
// Automatic FlutterFlow imports
import '/backend/backend.dart';
import '/backend/schema/structs/index.dart';
import '/backend/schema/enums/enums.dart';
import '/actions/actions.dart' as action_blocks;
import '/flutter_flow/flutter_flow_theme.dart';
import '/flutter_flow/flutter_flow_util.dart';
import '/custom_code/widgets/index.dart'; // Imports other custom widgets
import '/custom_code/actions/index.dart'; // Imports custom actions
import '/flutter_flow/custom_functions.dart'; // Imports custom functions
import 'package:flutter/material.dart';
// Begin custom widget code
// DO NOT REMOVE OR MODIFY THE CODE ABOVE!
class FirestoreDropdown extends StatefulWidget {
const FirestoreDropdown({
super.key,
this.width,
this.height,
required this.documents,
required this.displayField,
required this.onSelected,
});
final double? width;
final double? height;
final List<CategoriesRecord> documents;
final String displayField;
final Future Function(CategoriesRecord? selectedDoc) onSelected;
@override
State<FirestoreDropdown> createState() => _FirestoreDropdownState();
}
class _FirestoreDropdownState extends State<FirestoreDropdown> {
CategoriesRecord? _selectedValue;
@override
Widget build(BuildContext context) {
return SizedBox(
width: widget.width,
height: widget.height,
child: DropdownButton<CategoriesRecord>(
value: _selectedValue,
hint: const Text('Select an option'),
isExpanded: true,
items: widget.documents.map((CategoriesRecord document) {
// Extracts the display field dynamically, falling back to a default value
final displayValue = document.name ?? 'Unnamed';
return DropdownMenuItem<CategoriesRecord>(
value: document,
child: Text(displayValue),
);
}).toList(),
onChanged: (CategoriesRecord? value) {
setState(() {
_selectedValue = value;
});
// Triggers the FlutterFlow callback action, passing back the entire document reference object
widget.onSelected(value);
},
),
);
}
}
Step 4: Compile and Embed on a Page
- Click Compile in the top-right corner to validate your code syntax.
- Go to your visual UI builder canvas page.
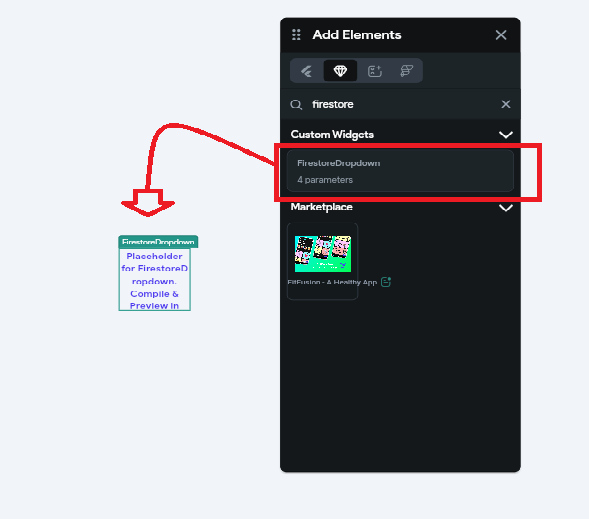
- Open the Widget Palette, go to Components (or Custom Code), and drag your FirestoreDropdown onto your form layout.
- Pass your database collection list (fetched via a Backend Query on your page or parent container) directly into the documents parameter field.

Step 5: Capture the Selection
- Select the FirestoreDropdown component on your canvas.
- Open the Actions panel on the right. You will see the native onSelected trigger available.
- Open the Action Flow Editor and choose Update Page State or perform your target database update.
- Select your state variable (configured to hold a Document Reference), and set its value using Action Parameters > selectedDoc > Document Reference (reference).


Now you can use this state anywhere. It will return you the whole document not only the title or display name.
5. Crucial Production Best Practices
1. Guard Against Empty Document Lists
If your backend query yields zero results (e.g., an empty collection), passing an empty list to certain dropdown layouts can sometimes result in sizing anomalies or unexpected behaviors. Always use conditional visibility on the parent container to show a simple placeholder state if the target document list count equals zero.
2. Isolate the Widget Dimensions
When building custom inputs, prioritize wrapping internal element trees with layout boundaries that look clean on various viewports. Setting isExpanded: true on your DropdownButton combined with an outer SizedBox bound to widget.width ensures your custom element spans elegantly to fill its visual layout container.
3. Match Collection Schema Safely
If you decide to reuse this template for different collections (e.g., swapping CategoriesRecord out for an AssignmentsRecord), update the import references and schema data type targets explicitly across the code parameters. Matching your variables with strict document definitions prevents compilation errors during complex environment builds.
What are Custom Widgets in FlutterFlow?
Custom Widgets are reusable user interface components built with Flutter (Dart) code. They allow developers to create custom visual elements, layouts, and interactive components that go beyond FlutterFlow's built-in widgets while integrating seamlessly into the visual builder.
When should I use a Custom Widget instead of a Custom Function?
Use a Custom Widget when you need to build or customize the user interface. Custom Functions are intended for lightweight calculations and logic, while Custom Widgets render visual components such as dropdowns, charts, calendars, maps, and interactive UI elements.
Can Custom Widgets use third-party Flutter packages?
Yes. FlutterFlow Custom Widgets support Flutter packages available on pub.dev, allowing you to integrate advanced charts, animations, maps, carousels, sliders, and other community-built UI components.
Why use a Firestore Custom Dropdown Widget?
A Firestore Custom Dropdown Widget allows you to display user-friendly text while returning the complete Firestore document instead of only a string value. This eliminates additional database lookups, reduces Firestore reads, and simplifies backend workflows.
How do I pass data into a FlutterFlow Custom Widget?
You can pass data using widget parameters (arguments). These parameters can include strings, numbers, booleans, lists, document records, document references, custom data types, and callback actions that communicate user interactions back to FlutterFlow.
Can Custom Widgets trigger FlutterFlow actions?
Yes. Custom Widgets support Callback Actions that send data back to FlutterFlow. These callbacks can trigger page state updates, Firestore writes, navigation, API calls, or any other action available in FlutterFlow's Action Flow Editor.
Are Custom Widgets reusable across multiple pages?
Yes. Once created, a Custom Widget can be reused throughout your FlutterFlow project. Any updates made to the widget automatically apply everywhere it is used, making maintenance easier and improving development efficiency.
What are the best practices for FlutterFlow Custom Widgets?
Use explicit width and height parameters, validate empty datasets, keep widget logic focused, use callback actions for communication, match Firestore record types correctly, and thoroughly test widgets across different screen sizes before deployment.
.svg)
.svg)


.avif)
