


How to structure supabase database for FlutterFlow application
When building scalable mobile or web apps with FlutterFlow, choosing Supabase as your backend gives you the power of a fully relational, production-grade PostgreSQL database. However, because FlutterFlow is a client-side visual builder, how you structure your schemas and execute your CRUD (Create, Read, Update, Delete) workflows directly impacts your app's performance.
This guide breaks down the structural architecture you need, walks you step-by-step through CRUD operations, and outlines crucial production best practices.
1. What is a FlutterFlow-Centric Supabase Structure?
A properly aligned Supabase structure means organizing your relational PostgreSQL database so it maps cleanly to FlutterFlow's front-end querying mechanics. Unlike Firebase (which is non-relational NoSQL), Supabase relies on strict tables, rows, columns, data types, and explicit foreign key constraints.
Core Architecture Components
- The Schema: The layout of your database tables, columns, and variable types.
- Foreign Keys (FK): Links a column in one table directly to the primary key (id) of another table, ensuring references remain valid.
- Database Views: Virtual tables generated by a stored query. They combine columns from multiple tables, allowing FlutterFlow to fetch complex relational data in a single request.
- Row Level Security (RLS): Supabase’s built-in access control system that acts as a database firewall.
2. Why Database Structure and Native CRUD Matter
FlutterFlow handles database operations via client-side API requests. A poorly engineered database structure or sloppy CRUD setup will quickly introduce hurdles:
- Eliminates "Query Cascading": A relational structure combined with a Database View allows you to fetch a post and its author's profile details in a single query, rather than nesting multiple backend calls in FlutterFlow.
- Enforces Clean Data Integrity: If a user deletes their account, PostgreSQL can automatically clean up ("cascade delete") all associated records natively.
- Guarantees Bulletproof Security: Securing your data structure via Supabase RLS policies ensures your data is protected at the database tier, even if client-side checks are bypassed.
3. How to Set Up and Implement Your Workflow
Step 1: Connect FlutterFlow to Supabase
Before diving into CRUD operations, make sure your Supabase project is live, your baseline tables are established, and your FlutterFlow project is open.
- In your Supabase project, navigate to Project Settings > API. Copy the Project URL and the Anon Public Key.
- Return to FlutterFlow, navigate to Settings and Integrations > Integrations > Supabase.
- Toggle Enable Supabase, paste your credentials, and tap Connect.
- Click the Get Schema button. This fetches all tables and structural types natively into your FlutterFlow builder environment.
Step 2: The Core Database Architecture (User Sync & Views)
To dynamically link users and avoid heavy data joins on the front end, establish your foundational relations and views first.
A. Set Up the Public Users Table
Create a public users table to store custom profile data tied directly to Supabase Auth. Set the primary key id column to the type uuid, and link a Foreign Key pointing to auth.users.id with On Delete Cascade enabled.
B. Generate a Database View for FlutterFlow
FlutterFlow reads flat, single tables best. To display nested data (like a post paired with its creator's username), execute a view inside your Supabase SQL editor:
SQL:
-- Example Trigger to automate Step 2A
create function public.handle_new_user()
returns trigger as $$
begin
insert into public.users (id, display_name, avatar_url)
values (new.id, new.raw_user_meta_data->>'display_name', new.raw_user_meta_data->>'avatar_url');
return new;
end;
$$ language plpgsql security definer;
create trigger on_auth_user_created
after insert on auth.users
for each row execute procedure public.handle_new_user();
id;
Note: After running this, go back to FlutterFlow’s Supabase settings and click Get Schema again to make the view queryable as a native table asset.
Step 3: Inserting Rows (Create)
To push data from text fields or inputs into a Supabase table:
- Select the Widget (e.g., a "Submit" Button) that will trigger the event.
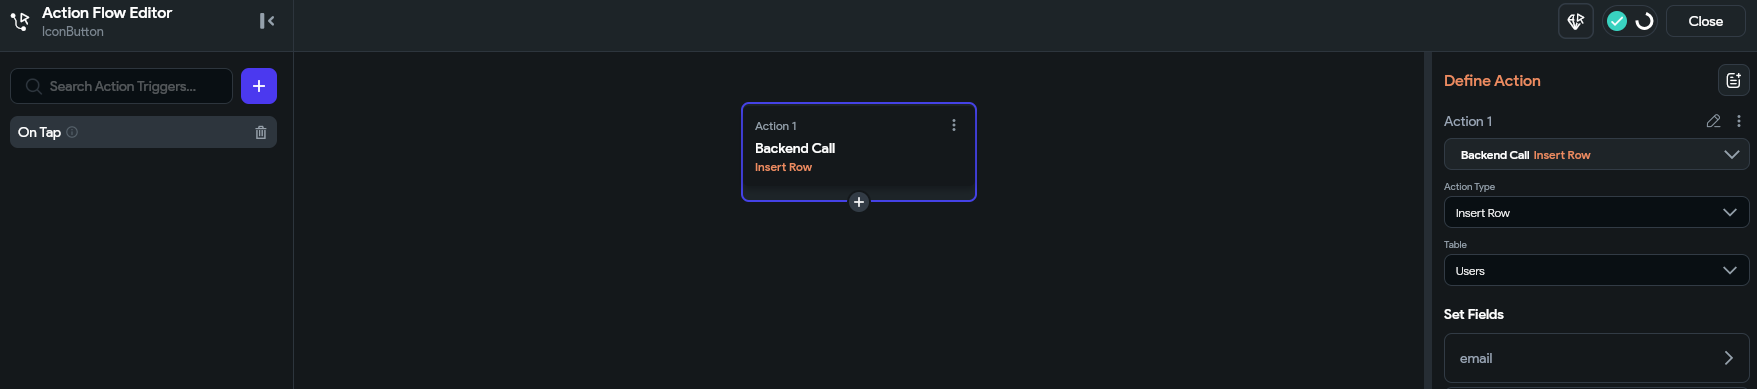
- Select Actions from the Properties panel (right menu) and click Open to access the Action Flow Editor.
- Click + Add Action, then search for and select Supabase > Insert Row.
- Set the Table to your desired destination table name (e.g., users).
- Under the Set Fields section, click + Add Field.
- Select your database column field name, change the Value Source dropdown to From Variable, click Unset, and link it to Widget State > Name of your TextField. Repeat this for all UI entry inputs.
Step 4: Selecting and Displaying Rows (Read)
To feed list items dynamically into your interface:
- Select a layout wrapper widget like a ListView or Column.
- Select Backend Query from the right-hand properties panel and click Add Backend Query.
- Set the Query Type to Supabase Query.
- Select your target Table or your newly created Database View from the dropdown.
- Set the Query Type to List of Rows.
- (Optional) If handling thousands of entries, toggle on a record limit (e.g., 100 rows) or implement infinite scroll to save device memory.
- Confirm the dialog and map your child widgets (Text, Images) to the fields provided by the query.

Step 5: Updating Rows (Update)
To modify an existing row using an entry form:
- Open the Action Flow Editor on your "Save Changes" widget and add the Supabase > Update Row action.
- Select your target Table.
- (Optional) If you need to immediately utilize the freshly updated data in subsequent actions, enable Return Matching Rows.
- Identify the targeted record: Click + Add Filter inside the Matching Rows section. Set the Field Name to your identifier column (typically id), set the Relation to Equal To, and set the Value Source From Variable to pass the specific row ID context.
- Under Set Fields, map your database columns to your updated Widget States using the same variable rules as your Insert step.

Step 6: Deleting Rows (Delete)
To safely remove an active item from your table:
- Open the Action Flow Editor on your target widget (e.g., a trash can icon button) and select the Supabase > Delete Row action.
- Select your target Table.
- Inside the Matching Rows section, click + Add Filter.
- Set the Field Name to id, set the Relation to Equal To, and set the Value Source to provide the contextual ID of the row you intend to erase.
4. Crucial Production Best Practices
1. Never Leave Row Level Security (RLS) Disabled
Disabling RLS leaves your database entirely vulnerable to outside tampering. Always toggle Enable Row Level Security (RLS) on for every single table in your Supabase dashboard. Write strict authorization policies such as:
- Enable read access for all users (for public feeds).
- Enable insert for authenticated users only (to block anonymous spam).
2. Index Your Foreign Keys
Whenever you filter, sort, or join rows on a specific column (such as tracking matching items with a user_id or an assignment_id), make sure that column is Indexed in Supabase. Without explicit indexing, PostgreSQL is forced to scan your entire database linearly, which slows down your app builder queries as your production data volume grows.
3. Delegate Heavy Calculations to the Database
Counting row arrays or calculating point metrics directly inside repetitive FlutterFlow layout elements strains device performance. Instead, leverage database functions/triggers to update pre-computed counter columns, or calculate aggregates natively inside your Supabase tier before returning the clean values to FlutterFlow.
1. How should I structure a Supabase database for FlutterFlow?
Use a relational database structure with well-defined tables, foreign keys, Row Level Security (RLS), and database views. This makes querying data in FlutterFlow faster and easier.
2. Why is Row Level Security (RLS) important in Supabase?
RLS protects your database by ensuring users can only access data they are authorized to view or modify. It is essential for production applications.
3. Can FlutterFlow perform CRUD operations with Supabase?
Yes. FlutterFlow supports Create, Read, Update, and Delete (CRUD) operations through its built-in Supabase integration and Action Flow Editor.
4. What are database views in Supabase?
Database views are virtual tables created from SQL queries. They simplify complex relationships and allow FlutterFlow to retrieve related data in a single query.
5. Why should I use foreign keys in Supabase?
Foreign keys maintain relationships between tables, improve data integrity, and support features such as cascade deletion.
6. How do I connect Supabase to FlutterFlow?
Copy your Supabase Project URL and Anon Key into FlutterFlow's Supabase settings, then click Get Schema to import your database tables.
7. Should I index foreign key columns in Supabase?
Yes. Indexing frequently queried columns, such as user_id, improves query performance and helps your app scale efficiently.8. How can I improve FlutterFlow app performance with Supabase?
Use indexed columns, database views, Row Level Security, efficient queries, and move heavy calculations to the database instead of the client.
9. Can I use Supabase for production FlutterFlow applications?
Yes. Supabase is a production-ready PostgreSQL backend that supports authentication, relational databases, security policies, storage, and scalable APIs for FlutterFlow applications.
10. What are the biggest database mistakes to avoid in FlutterFlow?
Common mistakes include disabling RLS, skipping foreign keys, avoiding indexes, performing heavy calculations on the client, and designing tables without proper relationships.
.svg)
.svg)


.avif)
