


Security Rules Implementation using FlutterFlow
A Complete Developer Tutorial
1. Introduction
What is FlutterFlow?
FlutterFlow is a low-code visual development platform that allows developers and non-developers alike to build fully functional mobile and web applications without writing every line of code from scratch. It provides a drag-and-drop interface for designing screens, connecting data sources, and configuring business logic — all within a browser-based environment.
Under the hood, FlutterFlow generates production-ready Flutter (Dart) code and integrates tightly with Firebase — Google's mobile and web development platform. This includes Firebase Authentication for user login, Cloud Firestore as the NoSQL database, and Firebase Storage for file uploads.
What are Security Rules?
Security Rules are access control policies enforced by Firebase on the server side. They determine who can read, write, create, or delete data inside your Cloud Firestore database — before any request reaches your actual data.
Without Security Rules, your database is either wide open to anyone on the internet, or locked completely shut. Neither extreme is desirable for a real application. Security Rules give you fine-grained, declarative control over exactly who can do what with which data.
💡 Key Insight
Security Rules live inside Firebase — not inside your app. Even if someone bypasses your app's UI and calls the Firestore API directly (e.g. from a script or Postman), the rules will still protect your data. This makes them your last line of defence.
2. Why Do We Need Security Rules?
Without correctly configured Security Rules, your application is vulnerable to a range of serious risks:
FlutterFlow provides a built-in Security Rules editor that lets you configure these protections visually, without needing to write raw Firebase rules syntax from scratch.
3. What Each Rule Controls
FlutterFlow exposes four core operations that map directly to Firebase Security Rule actions. You configure each one per collection:
Access Levels Per Operation
For each of the four operations above, FlutterFlow allows you to choose from the following access levels:
- Everyone — Both authenticated and unauthenticated users can perform this operation. Use for public-read data only.
- Authenticated Users — Only users who are signed in (via Email, Google, Apple, etc.) can perform this operation.
- Tagged Users — Only the specific user referenced in a field of the document (e.g., the created_by field) can perform this operation. This is the key rule for owner-based access.
- Users Collection — Used exclusively on the users collection. Ensures a user can only read or edit their own user profile document.
- No One — Nobody — including authenticated users — can perform this operation. Use to lock down operations that should only happen via backend functions.
⚠️ Important
The 'Tagged Users' option requires that the document contains a field holding either a Firestore User Reference or a String containing the user's UID. FlutterFlow will ask you to select this field when you choose 'Tagged Users'.
4. The Three Checkboxes Explained
Below the main rule selectors, FlutterFlow provides three optional checkboxes that fine-tune how rules are applied and managed. Understanding them is essential.
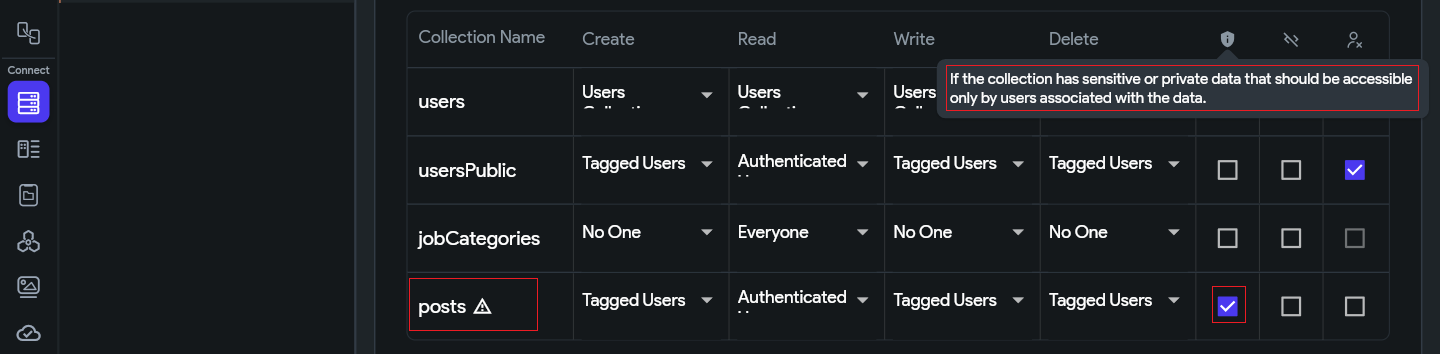
☑ Has Private Data
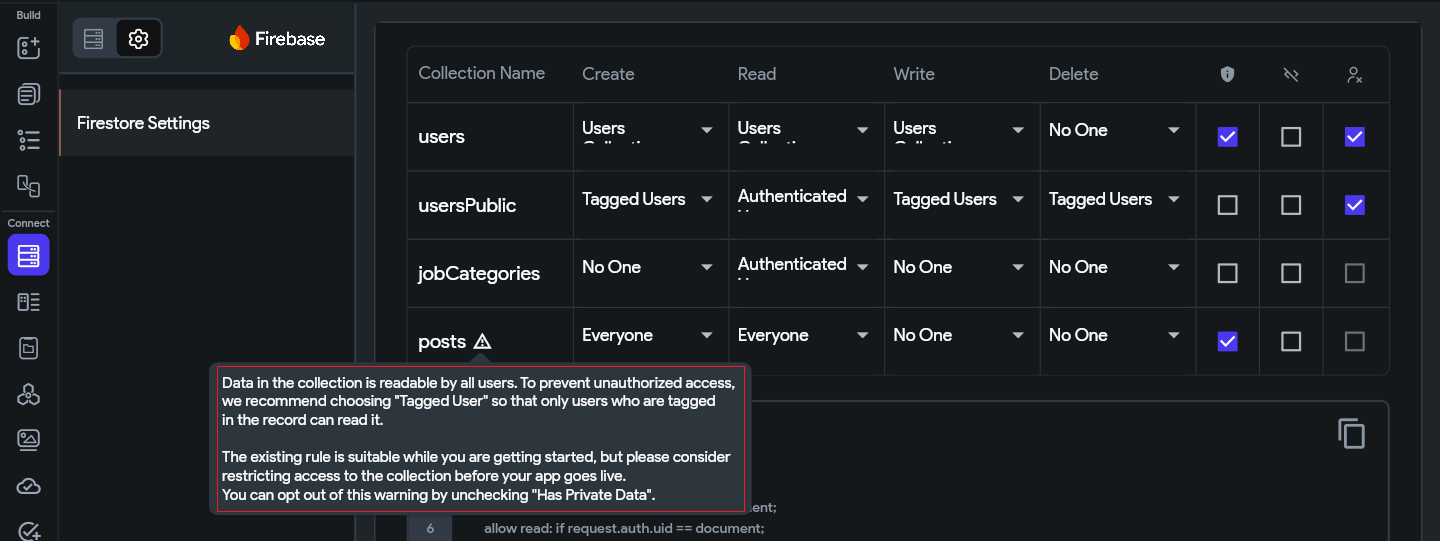
Marking a collection as 'Has Private Data' is a safety flag. It tells FlutterFlow: this collection contains sensitive information that should not be broadly accessible. It does not change the rule itself — it activates a warning system that alerts you if your access rules look too permissive for sensitive data.
When this checkbox is enabled and your rules allow broad access (e.g., Read → Everyone), FlutterFlow will display a warning banner prompting you to tighten the rules before deployment. Think of it as a safety net for your own mistakes.
When to Enable Has Private Data — Real Examples
💬 Example 1: One-to-One Chat Messages
Collection: messages | Read Rule: Tagged Users (participants)
In a chat app, a message document might have a participants field containing references to both users in the conversation. Read is set to Tagged Users so only those two people can access the messages.
✅ Has Private Data: ON — because an authenticated user who is NOT part of that chat must still be blocked. If you accidentally change Read to 'Authenticated Users', FlutterFlow will immediately warn you that private data is now exposed to everyone in the app.
👤 Example 2: User Profiles (Sensitive Fields)
Collection: users | Read Rule: Users Collection
The users collection typically holds phone numbers, addresses, date of birth, and other personal details. The Users Collection rule already restricts each user to their own profile document.
✅ Has Private Data: ON — because if a rule misconfiguration accidentally opens Read to 'Everyone', personal details of all users become publicly readable. The flag ensures FlutterFlow warns you before that ever gets deployed.
📝 Example 3: Private Notes or Diary Entries
Collection: notes | Read Rule: Tagged Users (owner_ref)
A notes app where each note belongs to one user. Only the creator should ever read their own notes — not other authenticated users, not guests.
✅ Has Private Data: ON — highly personal content. Any accidental loosening of the Read rule should be caught immediately by FlutterFlow's warning system.
📢 Example 4: Public Posts Feed (Leave it OFF)
Collection: posts | Read Rule: Everyone
In our social feed use case, posts are intentionally public. All visitors — including guests — are meant to read them. There is no sensitivity here.
❌ Has Private Data: OFF — enabling it would generate misleading warnings in FlutterFlow, since 'Everyone can read' is the correct and intended behaviour for this collection.
Rule of thumb: If any authenticated user who is not the document owner should be blocked from reading it — enable Has Private Data. If the data is genuinely meant for broad access, leave it off.
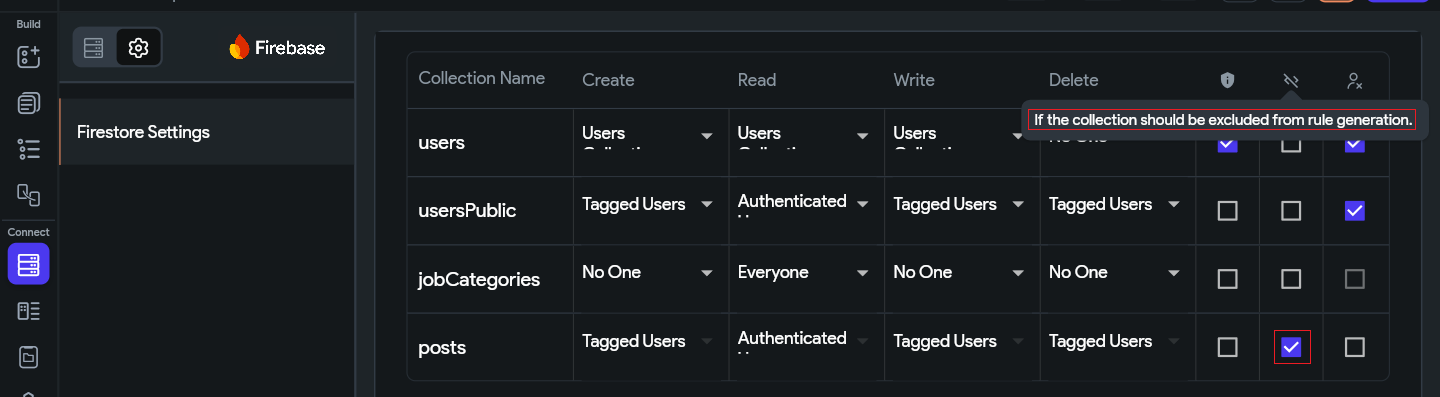
☑ Exclude
When 'Exclude' is checked on a collection, FlutterFlow will NOT include that collection in the rules it generates and deploys. This means the collection's rules are entirely managed by you — outside of FlutterFlow.
This is the escape hatch for advanced use cases. If you need custom, complex logic (e.g., rate-limiting, cross-collection validation, or multi-tenant access control) that FlutterFlow's UI cannot express, check 'Exclude' and write the rules manually in the Firebase Console.
When to use Exclude
Use Exclude when:
• You need advanced rule logic beyond 4 access levels
• You are validating field contents or document size
• You require cross-collection lookups in your rules
• You want to manage rules entirely in the Firebase Console
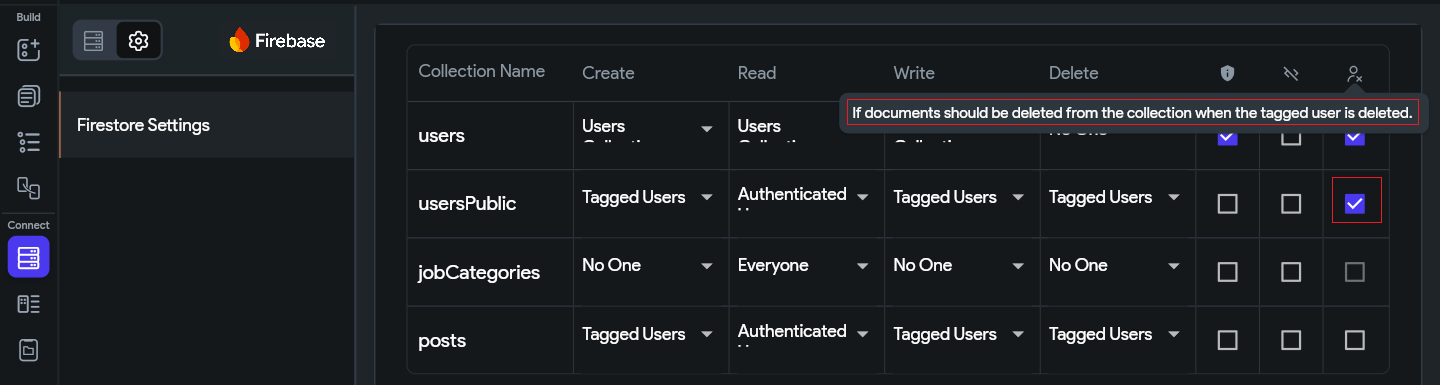
☑ Delete Reference Data
This checkbox applies only when the Delete rule is set to 'Tagged Users'. When enabled, FlutterFlow automatically deletes all documents in this collection that are associated with a user when that user account is deleted from your app.
This is important for GDPR compliance and general data hygiene. If a user deletes their account, you likely want all their posts, messages, and private records removed from Firestore as well. Enabling this checkbox automates that cleanup.
Example
A posts collection has Delete set to 'Tagged Users' referencing the created_by field. With 'Delete Reference Data' checked: when User A's account is deleted, all posts where created_by == User A are automatically deleted too.
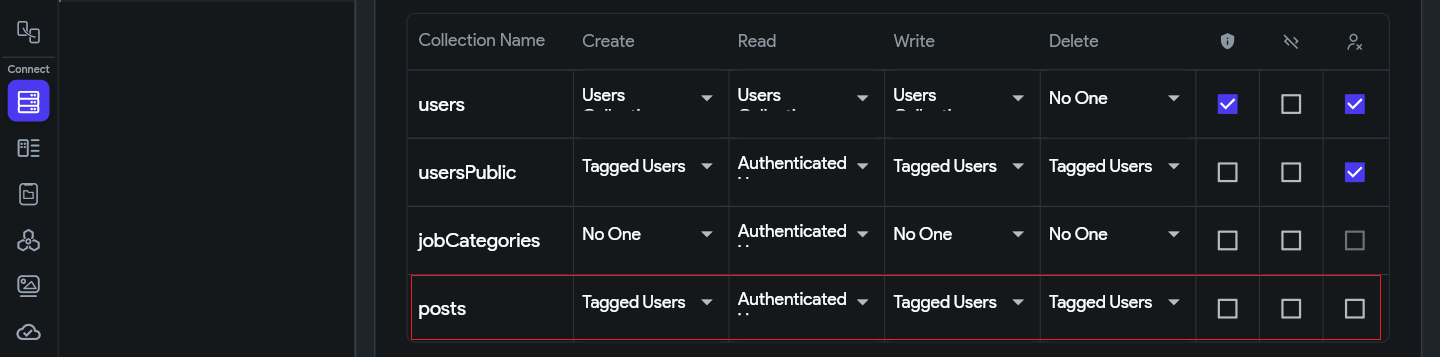
5. How to Implement Rules in FlutterFlow UI
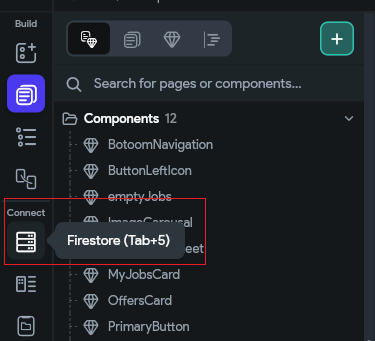
FlutterFlow's rule editor is accessed through the Firestore Settings panel. Here is how to navigate there and configure each rule type.
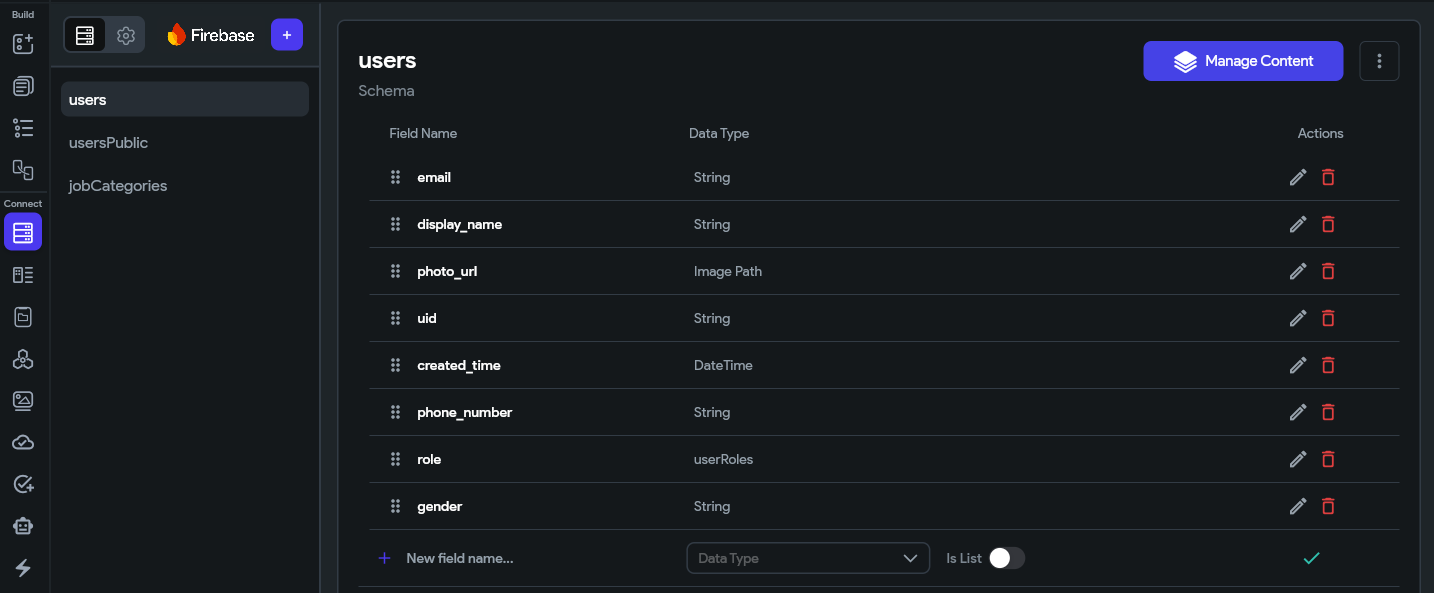
Navigating to the Firestore Rules Panel
- Click on the Firestore Settings tab in the left sidebar.
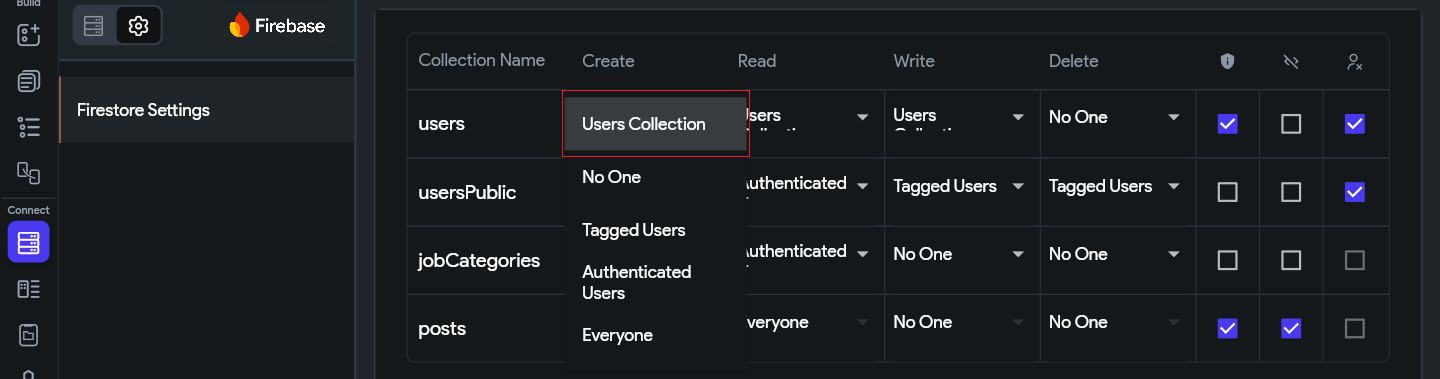
- You will see a list of all your collections, each with rule selectors for Create, Read, Write, and Delete.
Setting a Rule to 'Users Collection'
- Find your collection in the panel.
- Click the dropdown next to Create and select Users Collection.
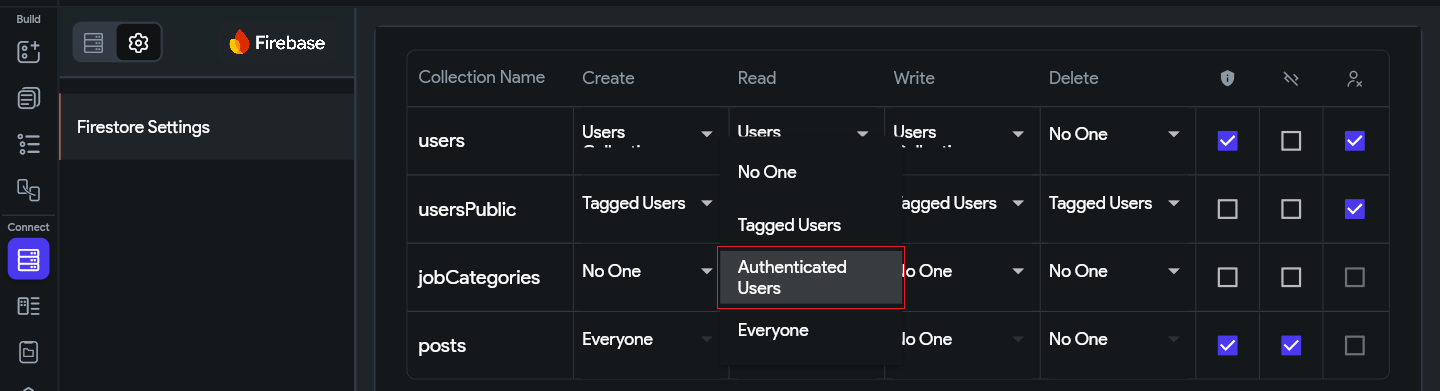
Setting a Rule to 'Authenticated Users'
- Find your collection in the panel.
- Click the dropdown next to Create and select Authenticated Users.
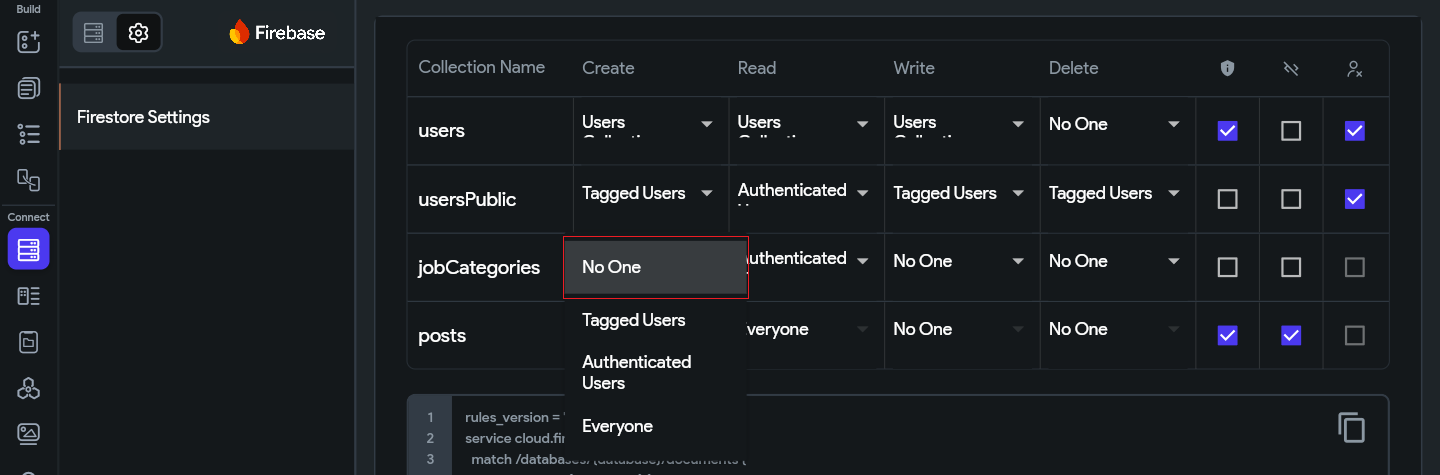
Setting a Rule to 'No One'
- Find your collection in the panel.
- Click the dropdown next to Create and select No One.
Setting a Rule to 'Tagged Users'
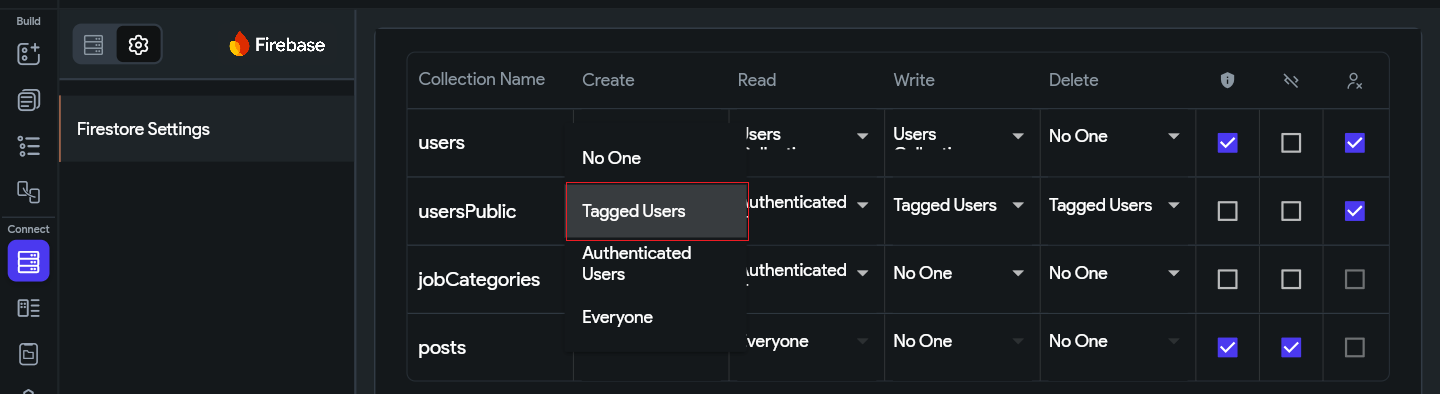
- Click the dropdown for Write (or Delete) and select Tagged Users.
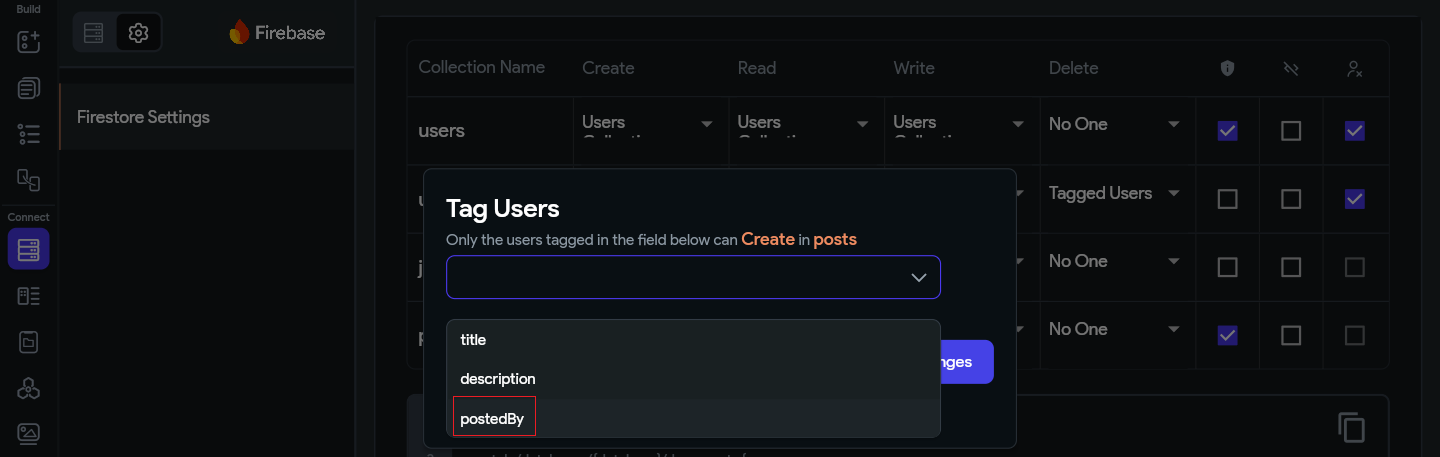
- A popup titled Tag Users will appear.
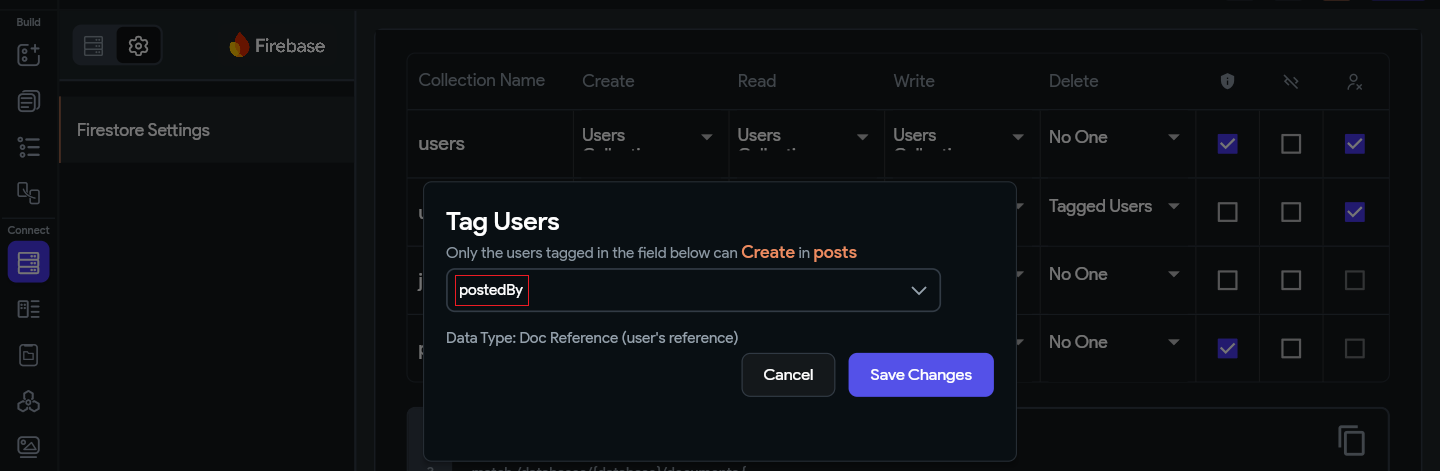
- Click the Unset dropdown and select the field in your document that holds the user reference or user UID. For example, select postedBy.
- Click Save Changes.
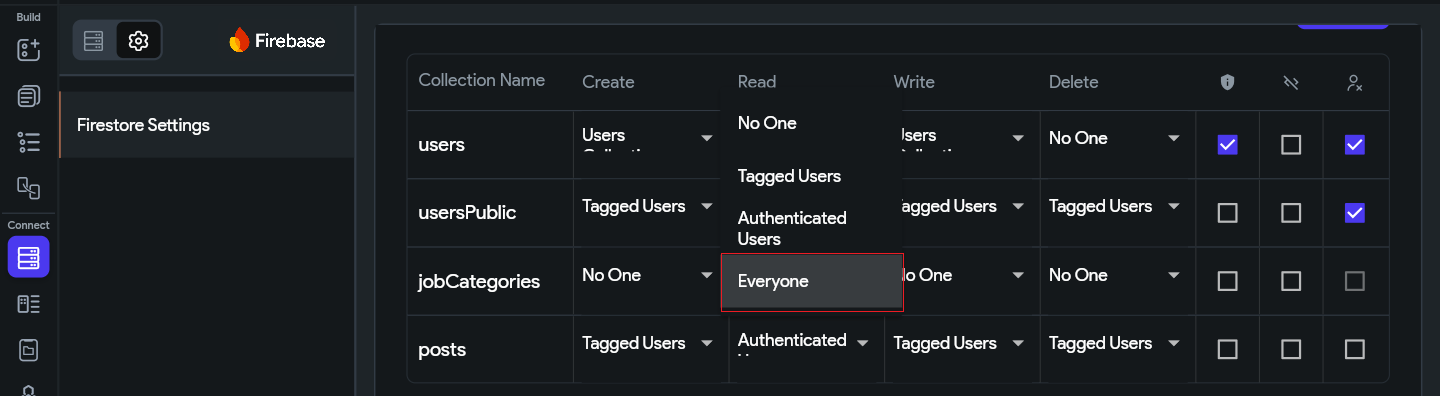
Setting a Rule to 'EveryOne'
- Find your collection in the panel.
- Click the dropdown next to Create and select EveryOne.
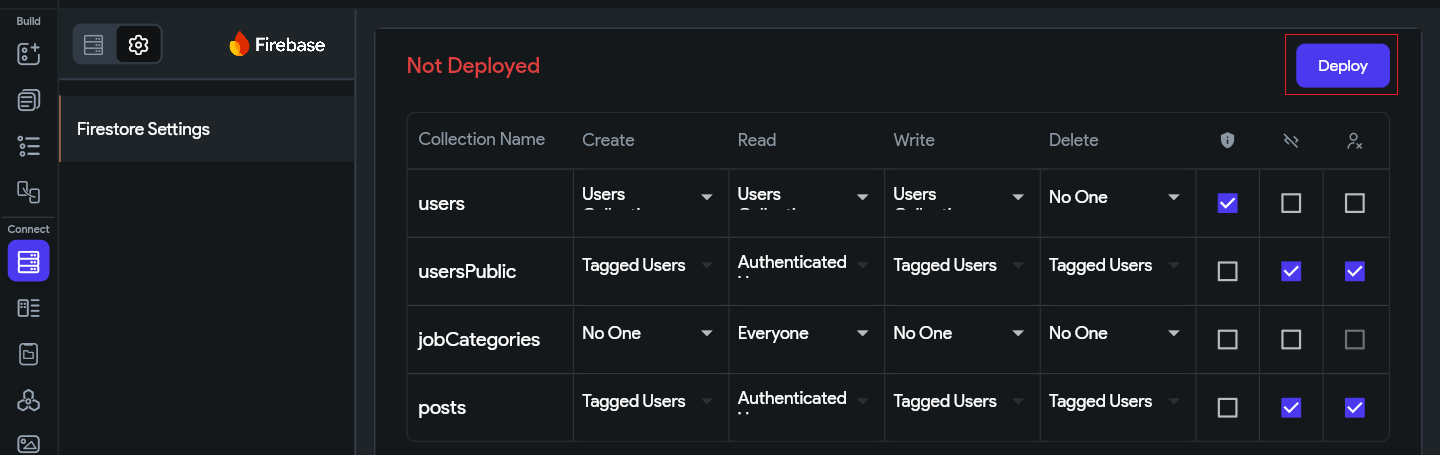
Deploying the Rules
Important: Rules do not take effect until you deploy them. Any time you modify rules, you must deploy.
- Click the Deploy button at the top of the Firestore Rules panel.
- A diff popup will appear showing what has changed between your current live rules and the new ones.
- Review the changes, then click Deploy Now.
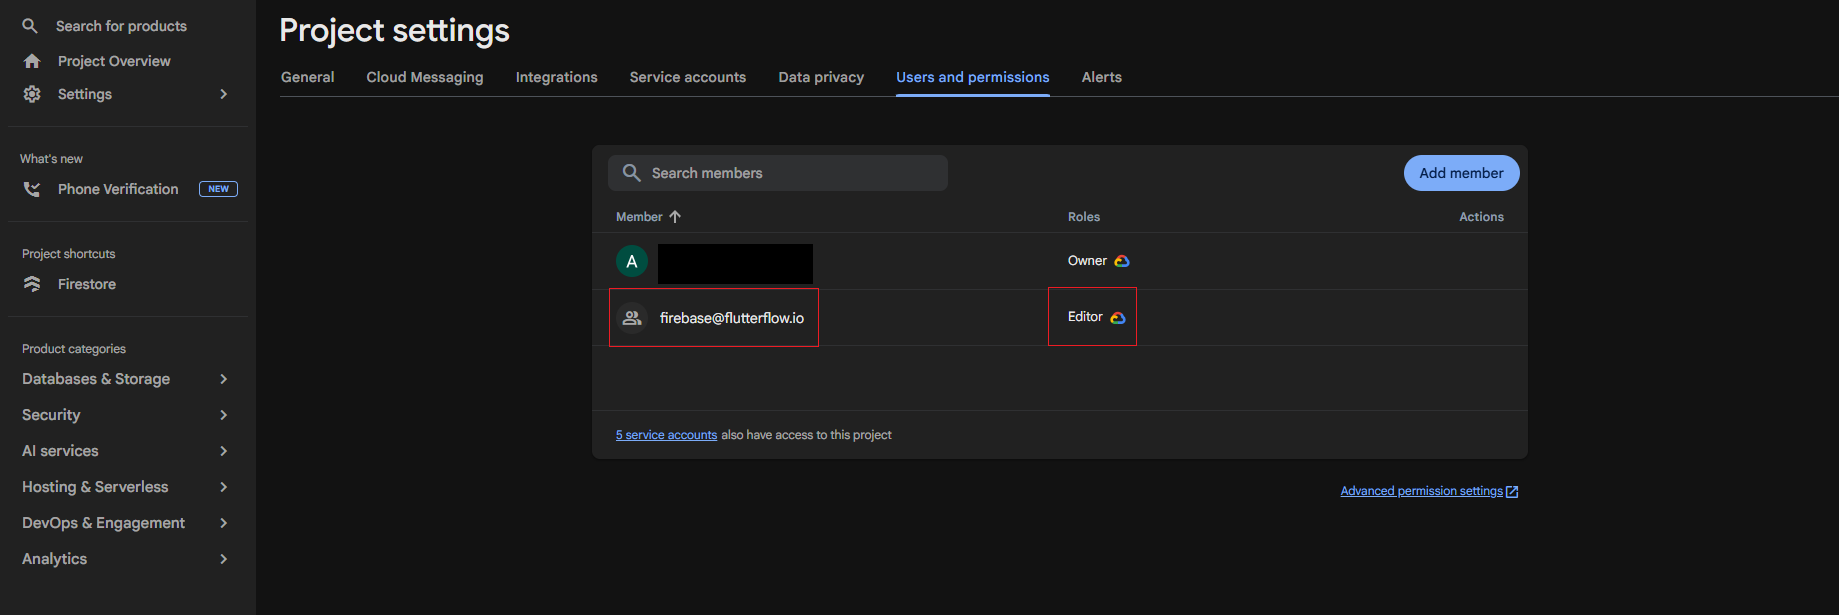
- You need to make sure the email firebase@flutterflow.io is added as Editor in Firebase as it is needed to deploy the rules from Flutterflow
⚠️ Caution Before Going Live
Before publishing your app to production, remove the default Firebase Test Mode rule: allow read, write: if true;
This rule grants full access to everyone and is only meant for development. FlutterFlow will warn you if it detects this rule is still active.
6. Practical Use Case: A Social Post Feed
To bring everything together, let's walk through a real-world scenario and apply security rules step by step.
📌 Scenario
We are building a social feed app where:
• Any registered user can create a post.
• All users (even guests) can read and view posts in the feed.
• Only the user who created a post can edit it.
• Only the user who created a post can delete it.
• When a user deletes their account, all their posts are deleted too.
• The posts collection contains personal content — flag it as private data.
Step 1: Set Up the 'posts' Collection
Ensure your Firestore collection is named 'posts' and contains at least the following fields:
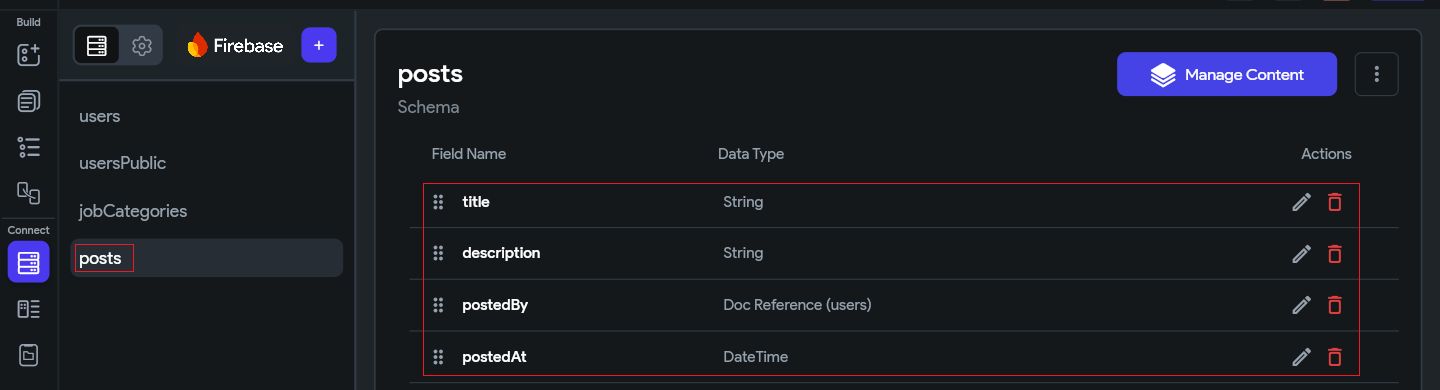
Step 2: Open the Firestore Rules Panel
In FlutterFlow, navigate to the Firestore settings for your project as described in Section 5. Locate the 'posts' collection entry in the rules list.
Step 3: Configure the CREATE Rule
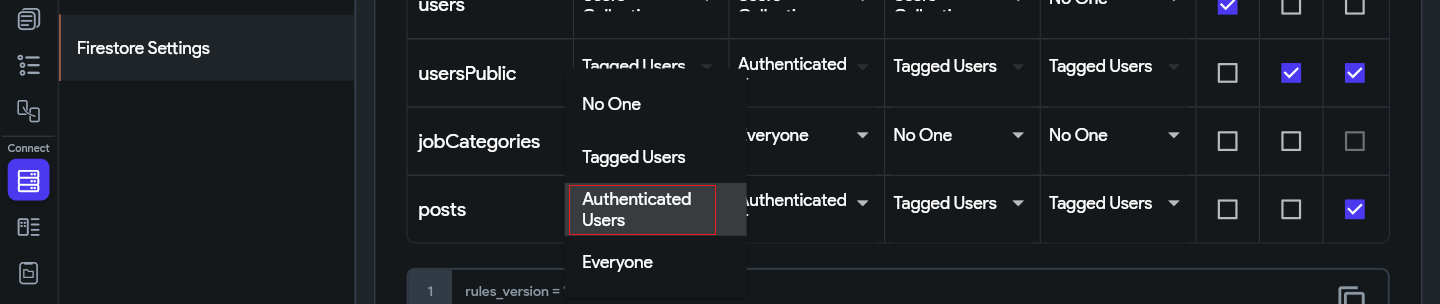
Step 3 Create → Authenticated Users
Requirement: Only registered, signed-in users can publish a new post.
- Next to Create, click the dropdown.
- Select Authenticated Users.
Why not Everyone?
If 'Create' were set to 'Everyone', anonymous users and bots could flood your database with fake posts. Restricting to Authenticated Users ensures only real, verified accounts can post.
Step 4: Configure the READ Rule
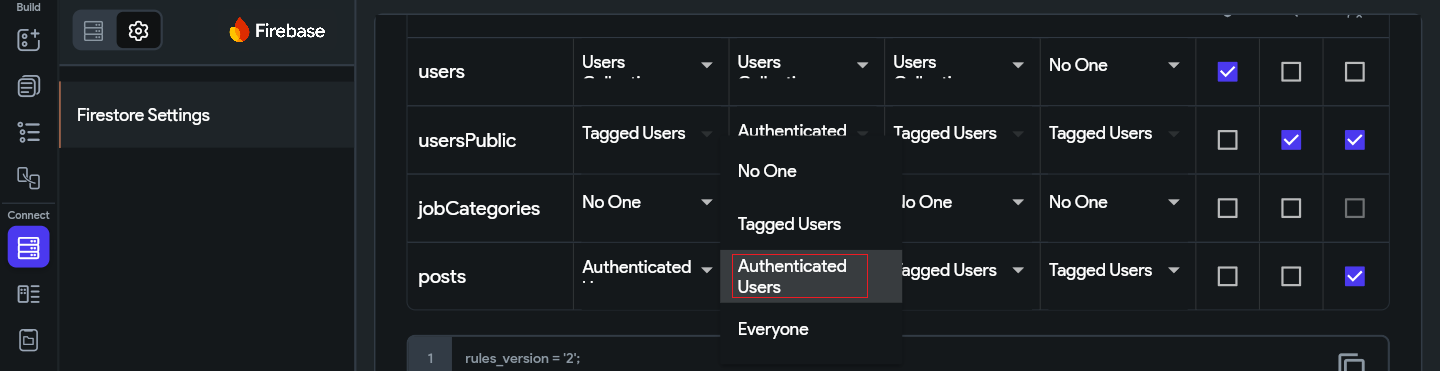
Step 4 Read → Authenticated
Requirement: All logged in users can browse and read posts in the feed.
- Next to Read, click the dropdown.
- Select Authenticated.
Public Read + Has Private Data
Since we are enabling public reads (Everyone) but the posts may contain personal content, enable the 'Has Private Data' checkbox. This serves as a reminder flag and will warn you if you accidentally loosen access in the future.
Step 5: Configure the WRITE Rule
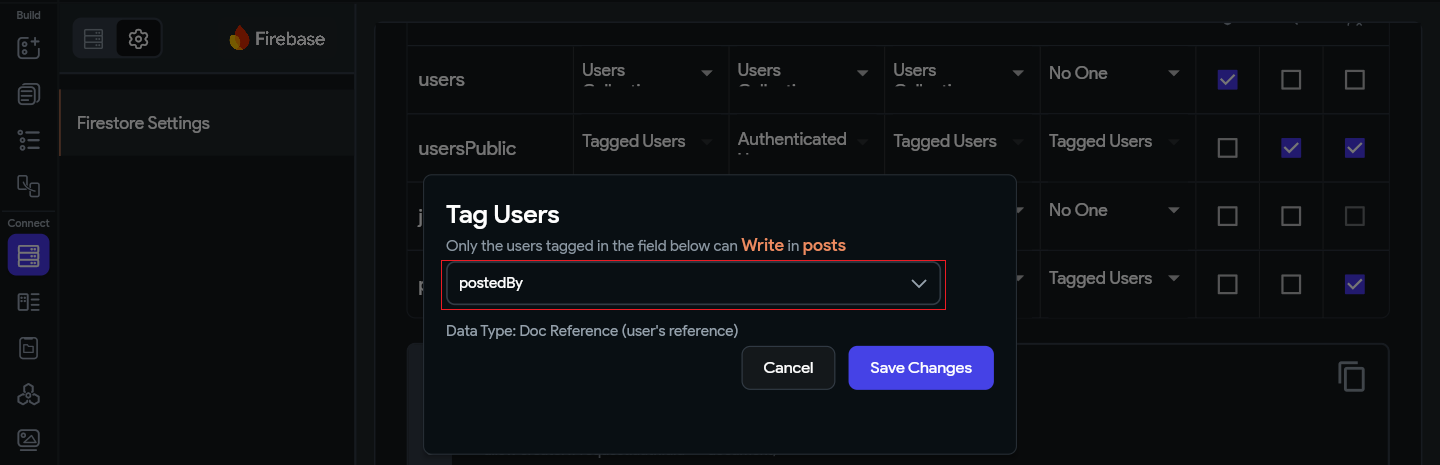
Step 5 Write → Tagged Users (created_by)
Requirement: Only the user who originally created a post can edit (update) it.
- Next to Write, click the dropdown.
- Select Tagged Users. The Tag Users popup appears.
- Click Unset in the popup's dropdown and select the postedBy field.
- Click Save Changes.
How 'Tagged Users' Works Behind the Scenes
FlutterFlow generates a Firebase rule that checks whether the currently authenticated user's UID matches the reference stored in the created_by field of the document being edited. If they match — access is granted. If not — the request is rejected by Firebase.
Step 6: Configure the DELETE Rule
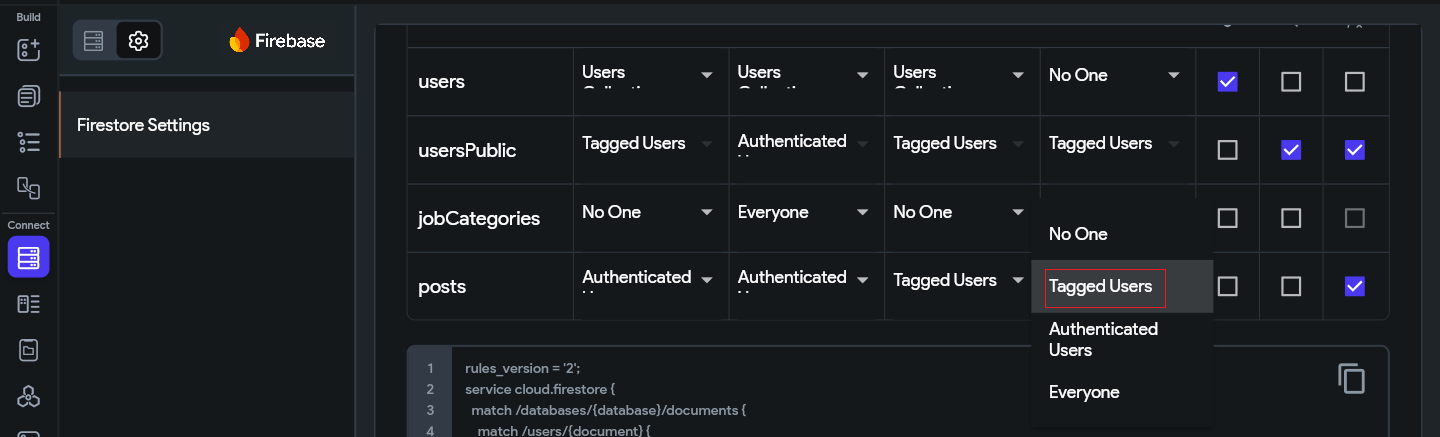
Step 6 Delete → Tagged Users (created_by) + Delete Reference Data
Requirement: Only the original author can delete their post. When the author deletes their account, their posts should be deleted too.
- Next to Delete, click the dropdown.
- Select Tagged Users. The Tag Users popup appears.
- Select the postedBy field and click Save Changes.
- Now enable the Delete Reference Data checkbox.
Step 7: Has Private Data — Leave it Unchecked
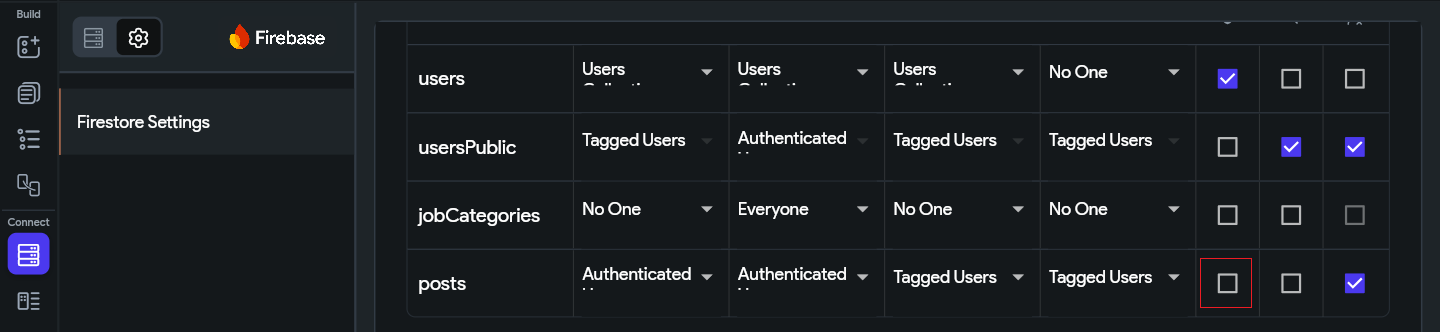
Step 7 Has Private Data → OFF for public posts
Since posts in our use case are intentionally public (Read → Everyone), the Has Private Data checkbox should remain unchecked. Posts are meant to be read by all visitors — there is no sensitive content to protect here.
Enabling it would cause FlutterFlow to show unnecessary warnings about your 'Everyone' Read rule, even though that is the correct and desired setting. Reserve Has Private Data for collections like private messages, user profiles, or personal notes where restricted access is the intent.
Step 8: Review and Deploy
Step 8 Deploy the Configured Rules
- Click the Deploy button at the top of the rules panel.
- Review the diff popup. You should see Create → auth, Read → public, Write → tagged (created_by), Delete → tagged (created_by).
- Click Deploy Now.
✅ Deployed Rules Summary for 'posts'
Create → Authenticated Users (only logged-in users can post)
Read → Everyone (public feed, all users can view)
Write → Tagged Users (created_by) (only author can edit)
Delete → Tagged Users (created_by) (only author can delete)
Has Private Data → ❌ OFF (posts are intentionally public)
Delete Reference Data → ✅ ON (clean up posts on account deletion)
7. Going Further: Custom Rules via Firebase Console
For complex apps, FlutterFlow's visual rule editor may not be sufficient. If you check the 'Exclude' option on a collection, you can write raw Firebase Security Rules directly in the Firebase Console.
For example, to add email verification, field validation, or cross-collection lookups, your custom rule for the 'posts' collection might look like this:
To deploy custom rules from the Firebase Console:
- Go to your Firebase Console → Firestore Database → Rules tab.
- Replace the existing rules with your custom code.
- Click Publish.
Key Points to Know Before Going Advanced
1. Limitations of FlutterFlow's Built-in Rule UI
- Only four access levels per operation: You can only choose from Everyone, Authenticated Users, Tagged Users, Users Collection, or No One. There is no way to combine conditions (e.g., 'Authenticated AND verified email').
- No field-level validation: FlutterFlow rules cannot check whether a field value is non-empty, within a range, or matches a pattern. If a user submits a blank title, the rule cannot block it.
- No cross-collection lookups: You cannot write a rule that checks a value in a different collection. For example, you cannot say 'allow write only if the user has a verified record in the subscriptions collection'.
- No rate limiting or request throttling: FlutterFlow rules cannot cap how many documents a user can create per hour or per day.
- Tagged Users only checks one field: You can tag against a single field per operation. Multi-participant access (e.g., a group chat with many members) cannot be expressed through the UI.
2. Why You May Need Advanced Rules
- Data integrity: You need to guarantee that required fields are present and valid before a document is written — e.g., a post must have a non-empty title and body.
- Role-based access control: Your app has admin, moderator, and regular user roles stored in Firestore, and read/write permissions differ per role.
- Multi-participant collections: A group chat where any of the participants (stored in an array) can read messages — this requires custom array-contains logic not available in the UI.
- Email or phone verification gates: You want to block document creation from users who have not verified their email, even if they are authenticated.
- Cascading or dependent rules: A rule that checks a value in another collection before allowing an action — e.g., only users with an active subscription document can create premium content.
3. Advanced Rules Guide
Writing raw Firebase Security Rules gives you full control over all of the above scenarios and more. For a complete, step-by-step guide covering custom rule syntax, helper functions, field validation, role-based access, and multi-collection logic, refer to the advanced guide here:
📖 Advanced Firestore Security Rules Guide
8. Quick Reference Summary
Rule / Setting
What It Does
Our Posts Use Case
Create → Auth Users
Only signed-in users can add documents.
Only logged-in users can post.
Read → Everyone
Anyone can fetch documents, even guests.
All visitors see the post feed.
Write → Tagged Users
Only the user in the named field can update.
Only the post author can edit.
Delete → Tagged Users
Only the user in the named field can delete.
Only the post author can delete.
Has Private Data
Flags collection as sensitive; warns if rules are too permissive.
❌ OFF — posts are public by design.
Exclude ☑
Removes collection from FlutterFlow-managed rules.
Used for advanced custom rule collections.
Delete Ref. Data ☑
Cascades deletes linked records on user removal.
Deletes posts when the author's account is removed.
FlutterFlow Security Rules Tutorial · Built with FlutterFlow & Firebase
1. What are FlutterFlow Security Rules?
FlutterFlow Security Rules are access control settings that define who can create, read, update, and delete data in your Firebase Firestore database. They help protect your application's data from unauthorized access.
2. Why are Firebase Security Rules important?
Without properly configured Security Rules, attackers may read sensitive data, modify records, delete documents, or abuse your Firebase usage, resulting in security risks and increased billing costs.
3. What access levels does FlutterFlow support?
FlutterFlow supports five primary access levels:
- Everyone
- Authenticated Users
- Tagged Users
- Users Collection
- No One
4. What does the Tagged Users rule do?
Tagged Users allows only the user referenced in a specific document field, such as created_by, to update or delete that document. It is commonly used for owner-based access control. 5. What is the 'Has Private Data' option in FlutterFlow?
Has Private Data is a safety flag that warns you if sensitive collections have overly permissive rules. It doesn't change the rule itself but helps prevent accidental data exposure.
6. When should I use the Exclude option?
Use Exclude when you want to manage a collection's Security Rules directly in the Firebase Console using advanced custom rules that FlutterFlow's visual editor cannot generate.
7. What is Delete Reference Data?
Delete Reference Data automatically removes related documents when a referenced user account is deleted, helping maintain database integrity and support privacy compliance.
8. Can FlutterFlow create advanced Firebase Security Rules?
FlutterFlow's built-in rule editor covers common scenarios, but advanced features such as email verification, field validation, helper functions, role-based access, and cross-collection checks require writing custom Firebase Security Rules.
9. How do I deploy Security Rules in FlutterFlow?
After configuring your rules, click Deploy, review the changes in the diff window, and publish them. Ensure the required Firebase permissions are configured so FlutterFlow can deploy the rules successfully.
10. Can I write custom Firestore Security Rules in Firebase?
Yes. By excluding a collection from FlutterFlow-generated rules, you can write and publish custom Firestore Security Rules directly from the Firebase Console for complete control over your application's security.
.svg)
.svg)


.avif)
