


FlutterFlow Limitations & Workarounds
A Plain-Language Guide for Beginners
Introduction
FlutterFlow is a powerful visual app-builder on top of Flutter. You can build screens, connect to databases, and publish to both Android and iOS — all without writing most of the code yourself. But like every tool, it has boundaries.
This guide explains the most important real-world limitations you will run into as you build more complex apps. For each one, we explain the problem in plain language and give you the exact steps to work around it. No unnecessary detail just what you need to know.
Who is this for?
Developers at any skill level who are using FlutterFlow and want to understand its limits before they get stuck. Basic familiarity with FlutterFlow is assumed, but no advanced coding knowledge is required.
Limitations & Workarounds
The 12 limitations below are ordered by how often you are likely to encounter them in real projects. The most commonly hit issues come first.
1. Firebase Security Rules
Built-in Access Controls:
FlutterFlow provides four basic access control levels for database queries:
- Everyone: Public access.
- Authenticated Users: Any logged-in user.
- Tagged Users: Access granted only if the user’s ID matches a reference field in the document.
- No One: Completely restricted.
Limitation of Tagged Users:
This works well for simple ownership (e.g., a user viewing their own profile), but it only works when user references are stored directly in document fields. It is not suitable for complex role-based access control (RBAC).
When You Still Need Firebase Security Rules:
You must write custom rules in the Firebase Console for scenarios like:
- Admin/Manager roles
- Multi-tenant applications
- Subscription-based permissions
- Department-based access
- Complex ownership validation
Part A — Writing Rules in the Firebase Console
- Go to console.firebase.google.com and open your project.
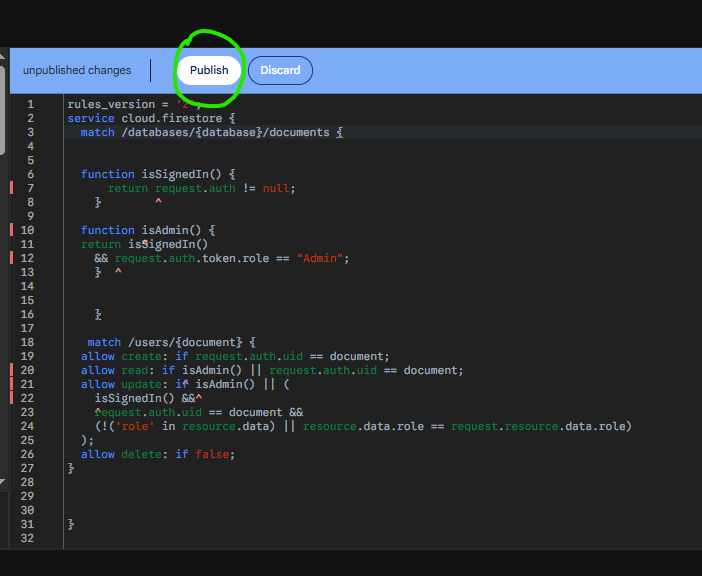
- Click Firestore Database in the left sidebar, then select the Rules tab.
- Replace the default open rules with rules that protect your data. Example:
rules_version = '2';
service cloud.firestore {
match /databases/{database}/documents {
match /users/{userId} {
// Only the logged-in user can read/write their own document
allow read, write: if request.auth.uid == userId;
}
}
}
- Click Publish. Rules go live within seconds.
Important
The default Firebase rule allows everyone to read and write. Always replace it before releasing your app to real users.
Part B — Calling a Cloud Function Before Login
If you need a Cloud Function to run before the user logs in (e.g. sign-up validation), you cannot require Firebase Auth on that function. Leaving it open is a risk. The solution is a shared secret key.
Step 1 — Store the Secret in Firebase
- In your terminal, run:
firebase functions:config:set app.secret="YOUR_STRONG_SECRET_HERE"
firebase deploy --only functions
- In your Cloud Function, verify the key on every request:
const expected = functions.config().app.secret;
const received = req.headers['x-app-secret'];
if (received !== expected) { res.status(403).send('Forbidden'); return; }
// Safe to proceed
Step 2 — Store the Secret in FlutterFlow
- Go to FlutterFlow Settings > Environment Values.
- Add a variable named APP_SECRET. Mark it as sensitive.
Step 3 — Send the Key from a Custom Action
final response = await http.post(
Uri.parse('https://YOUR-PROJECT.cloudfunctions.net/yourFunction'),
headers: { 'x-app-secret': 'YOUR_SECRET', 'Content-Type': 'application/json' },
body: jsonEncode({'email': email}),
).timeout(const Duration(seconds: 30));
Same pattern for Supabase Edge Functions
If you need to call a Supabase Edge Function before login, the SDK cannot attach a session token. Use the same http + secret key approach. On the Edge Function side, read the key with Deno.env.get('APP_SECRET').
2. Built-In API Calls Have a ~10 Second Timeout
Calling a Supabase Edge Function via Custom Action
Never hardcode your Supabase URL or anon key inside a Custom Action. Use the SDK that FlutterFlow already manages for you:
Future<dynamic> saveAnswer(String questionId, String answerText) async {
// 1. Refresh the session token before calling
await SupaFlow.client.auth.refreshSession();
if (SupaFlow.client.auth.currentSession == null) {
return {'success': false, 'message': 'Not authenticated'};
}
// 2. Call the Edge Function by name — no URL or key needed
try {
final response = await SupaFlow.client.functions
.invoke('your_function_name', body: {'question_id': questionId, 'answer': answerText})
.timeout(const Duration(seconds: 30)); // set your timeout here
final body = response.data as Map<String, dynamic>?;
return body ?? {'success': false, 'message': 'Empty response'};
} on TimeoutException {
return {'success': false, 'message': 'Request timed out'};
} catch (e) {
return {'success': false, 'message': e.toString()};
}
}
Timeout guidance
Supabase Edge Functions with moderate logic: 30 s. AI generation (OpenAI etc.): 60–90 s. Heavy reports: 120 s. Always show a loading indicator so the user knows the app is working.
Showing a Loading Indicator
- Add a Page State variable: isLoading (Boolean, default: false).
- Add a CircularProgressIndicator. Set Conditional Visibility to: isLoading = true.
- In your Action Flow — before the Custom Action, set isLoading = true. After it completes, set isLoading = false.
3. Some Packages Need Native File Configuration
Step 1 — Add the Package
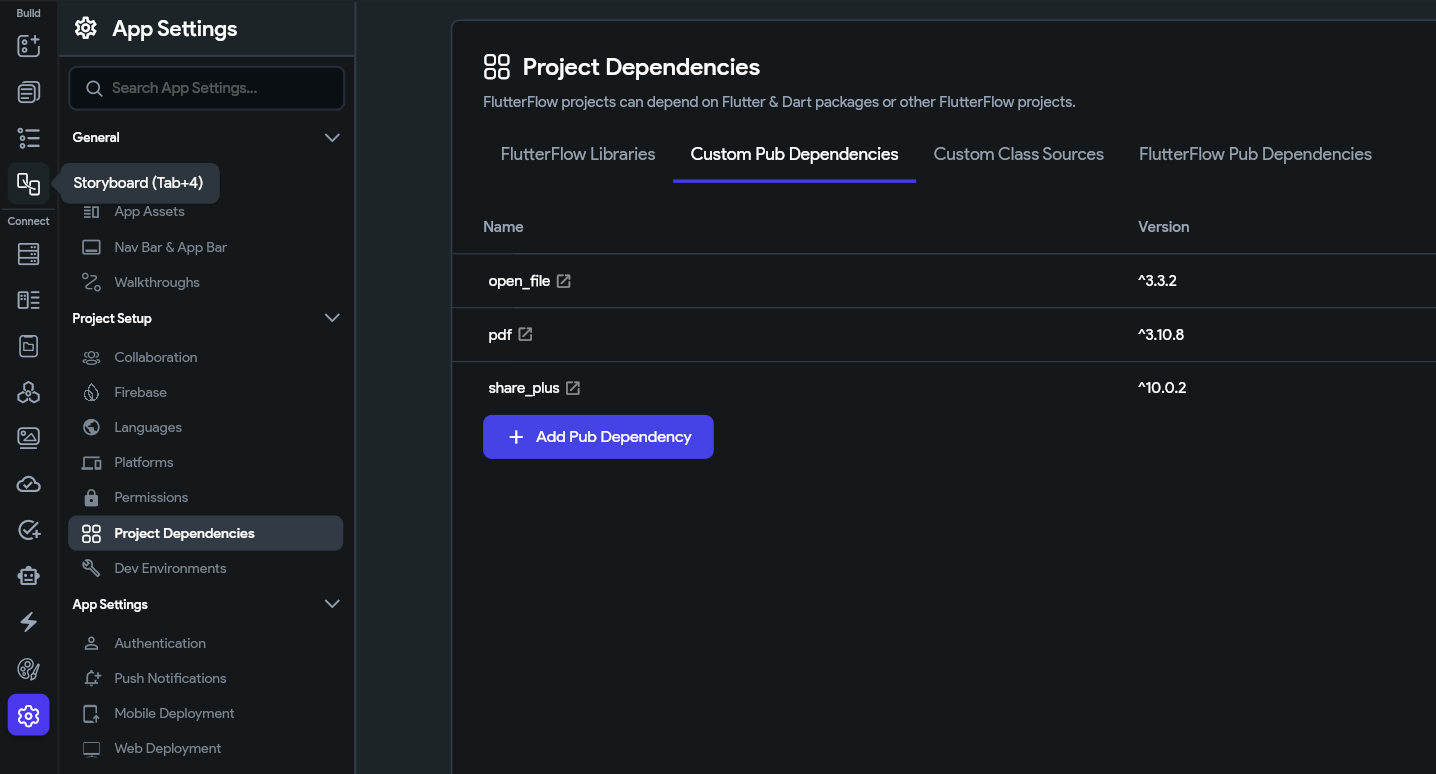
- In FlutterFlow, go to Settings (the < / > icon in the sidebar).
- Select the Project Dependencies tab.
- Click Add Dependency, enter the package name and version from pub.dev, and click Save.
Step 2 — Use the Permissions Panel First
For common permissions (camera, microphone, location, Bluetooth, notifications) — use the built-in Permissions panel. It writes the correct entries in both Android and iOS files automatically.
- Go to FlutterFlow Settings > Permissions.
- Toggle ON the permissions your package needs.
- Done — no manual file editing required for standard permissions.
Step 3 — Edit Config Files Directly in FlutterFlow
For anything beyond standard permissions (e.g. registering a background service, adding a custom metadata tag), edit the native file directly inside FlutterFlow:
- Go to Custom Code > Configuration Files.
- Select the file — e.g. AndroidManifest.xml or Info.plist.
- Use Snippet mode (recommended): paste only the lines you want to add. FlutterFlow injects them in the correct place without breaking its own required settings.
<!-- Example Snippet for AndroidManifest.xml -->
<uses-permission android:name="android.permission.POST_NOTIFICATIONS"/>
<!-- Example Snippet for Info.plist -->
<key>NSMicrophoneUsageDescription</key>
<string>Used to record audio in the app.</string>
Files you can now edit inside FlutterFlow
AndroidManifest.xml · build.gradle · ProGuard files · Info.plist · Entitlements.plist · AppDelegate.swift · main.dart. Downloading the code is only needed for extremely rare edge cases that none of these files cover.
4. Complex Business Logic is Hard to Build Visually
When to Use a Custom Action
- You need a loop — processing every item in a list
- You need reuse — same logic is used on multiple pages
- You need error handling — try/catch is not available in the visual editor
- Your condition tree has more than 3 levels — it becomes unreadable visually
How to Create a Custom Action
- Go to Custom Code > Custom Actions > Add Action.
- Name it, set the return type, and add input parameters.
- Write your Dart logic. Short example — looping through a list:
Future<double> calcTotal(List<double> prices, double taxRate) async {
double subtotal = 0;
for (final p in prices) { subtotal += p; } // loop — not possible visually
return subtotal * (1 + taxRate);
}
- Click Compile, then Save.
- In the Action Flow Editor, add the Custom Action and map your parameters.
- After the action, add a Conditional Action to handle success or error.
5. State Management Gets Messy in Larger Apps
Practical Tips
- Always reset page state on exit — add a clear action when leaving a page to avoid stale values on re-entry
- Enable Real-Time on queries — instead of polling, toggle Real-Time in your Supabase or Firestore backend query so the list auto-updates
- Keep App State minimal — only store data that multiple pages genuinely nee
6. No Try/Catch Error Handling in the Visual Editor
The Pattern
Future<String> doRiskyThing(String input) async {
try {
final result = await someAsyncCall(input);
return result; // success — return actual data
} on TimeoutException {
return 'error:Request timed out.';
} catch (e) {
return 'error:${e.toString()}';
}
}
In the Action Flow after this Custom Action: IF result starts with 'error' → show Snackbar with the message. ELSE → proceed normally.
7. Version Control and Collaboration is Limited
Setting Up GitHub Sync
- Go to FlutterFlow Settings > Integrations > GitHub.
- Click Connect and authorise FlutterFlow to access your GitHub account.
- Select or create a repository.
- Click Push to GitHub. Each push creates a timestamped commit — your history is now on GitHub.
- After every significant set of changes, push again.
Team workflow tip
Assign one person to manage FlutterFlow pushes. Other team members review the generated code on GitHub. Use FlutterFlow Branches for new features — build in isolation, then merge when ready.
📷 Screenshot — FlutterFlow Settings > Integrations panel with the GitHub Connect button visible. Circle the button.
[ Insert screenshot here ]
8. Cannot Store Files or Binary Data in Persisted App State
Encode to Store, Decode to Use
import 'dart:convert';
import 'dart:typed_data';
// Save: convert bytes → Base64 string → store in persisted App State
Future<String> encodeToBase64(Uint8List bytes) async {
return base64Encode(bytes);
}
// Load: convert persisted Base64 string → bytes → use in audio player / image
Future<Uint8List> decodeFromBase64(String b64) async {
return base64Decode(b64);
}
Real-World Example — Saving an Audio Recording
- In App State, add a variable: savedRecordingBase64 | Type: String | Persisted: ON
- After recording completes, call encodeToBase64 with the audio bytes.
- Save the returned string to savedRecordingBase64.
- On next app open, call decodeFromBase64 with savedRecordingBase64 to get the bytes back.
- Pass the bytes to your audio player widget.
File size warning
Base64 inflates data size by ~33%. SharedPreferences (which FlutterFlow uses for persisted state) is designed for small values. For files larger than a few hundred KB, upload to Supabase Storage or Firebase Storage and persist only the download URL.
9. Debugging Tools are Basic Inside FlutterFlow
Quick Debug Inside FlutterFlow
Future<String> myAction(String input) async {
print('[myAction] called with: $input'); // appears in Run Log
try {
final result = await doWork(input);
print('[myAction] result: $result');
return result;
} catch (e) {
print('[myAction] ERROR: $e');
return 'error:$e';
}
}
- Run Test Mode and trigger the action.
- Look for the Run Log / Console panel — your print() lines appear there.
Full Debugging via Flutter DevTools
- Download your project code from FlutterFlow (Export Code button).
- Open it in VS Code and run: flutter run
- Press 'v' in the terminal to open Flutter DevTools in your browser.
- Use the Widget Inspector for layout issues, the Debugger for breakpoints, and the Performance tab for frame analysis.
Quick Reference
All 9 limitations and their solutions at a glance.
Conclusion
FlutterFlow handles the majority of your app beautifully through its visual builder. The limitations in this guide are not dead ends — every single one has a tested workaround. The pattern is always the same:
- Use the visual builder for everything it supports — it is fast and easy to maintain
- Use Custom Actions for logic, loops, error handling, and long-running calls
- Use Configuration Files inside FlutterFlow for native Android and iOS settings
- Download the code only when you need Flutter DevTools or an extreme edge case
The more you practise these techniques, the more natural they become. You will develop an instinct for when to stay visual and when to drop into code.
1. What are the main limitations of FlutterFlow?
FlutterFlow’s main limitations include complex business logic, advanced security rules, debugging limitations, state management challenges, version control restrictions, and limited support for storing binary data.
2. Can FlutterFlow build complex applications?
Yes, FlutterFlow can build complex applications. However, advanced features may require Custom Actions, Dart code, backend configuration, or native Flutter customization.
3. Can I add custom code in FlutterFlow?
Yes, FlutterFlow supports Custom Actions and Custom Functions, allowing developers to add Dart code for advanced workflows and logic.
4. Does FlutterFlow support Firebase Security Rules?
Yes, FlutterFlow works with Firebase Security Rules. Simple apps can use built-in controls, while advanced apps may require custom Firebase rules.
5. Can FlutterFlow handle long API requests?
FlutterFlow’s built-in API calls have timeout limitations. For longer processes like AI generation or complex backend tasks, Custom Actions can provide more control.
6. Can FlutterFlow store files or audio recordings in App State?
No, persisted App State does not directly support files or binary data. You need to convert the data or store files using services like Firebase Storage or Supabase Storage.
7. Does FlutterFlow support GitHub integration?
Yes, FlutterFlow supports GitHub Sync and FlutterFlow Branches, which help with version tracking and safer development workflows.
8. Is FlutterFlow suitable for production apps?
Yes, FlutterFlow can be used for production apps. The key is knowing when to use visual tools and when to extend functionality with custom code.
.svg)
.svg)


.avif)
