


A Beginner's Guide to Custom Functions in FlutterFlow
When building an application in FlutterFlow, the native visual builder can handle the vast majority of your layout, navigation, and backend queries. However, there are times when you need to perform specific data calculations, string cleanups, or mathematical logic that the standard UI components can't do out of the box.
This is where Custom Functions come in. This guide breaks down the What, Why, and How of implementing custom Dart logic into your project.
1. What are Custom Functions?
A Custom Function in FlutterFlow is a short snippet of pure Dart code designed to execute standalone logic or calculations. Unlike other custom code options in FlutterFlow, functions are strictly input-output operations: they take in data (arguments), process it instantly, and return a single result back to your app UI or state variables.
Core Components of a Function
- Input Arguments: The raw variables (numbers, strings, booleans, etc.) you pass from your FlutterFlow app into the code.
- Return Value: The final calculated output that the function sends back to the app.
- The Code Body: The pure Dart logic executing the calculation.
2. Why Use Custom Functions?
Relying on Custom Functions elevates your app from a basic layout prototype to a highly capable production application by offering:
- Instantaneous UI Formatting: Instead of displaying messy raw data from a backend database, functions let you format strings, parse timestamps, or alter text dynamically before it hits the user's screen.
- Encapsulated, Reusable Logic: Write your calculation code once, and reuse it across dozens of different pages, text fields, or conditional visibility rules throughout your project.
- Lightweight Performance: Because functions are written in native Dart and don't deal with asynchronous UI rendering, they execute on the user's device near-instantly.
3. How to Create and Implement a Custom Function
To understand the workflow, let's build an everyday production example: An Order Total Calculator that applies a tax rate and adds a flat shipping fee to an order subtotal.
Step 1: Create a New Function in FlutterFlow
- Navigate to the left navigation sidebar in FlutterFlow and click on the Custom Code icon (represented by a </> symbol).
- Click + Add and select Function.
- Name your function (e.g., calculateFinalOrderTotal). Note: Names must use camelCase and contain no spaces.

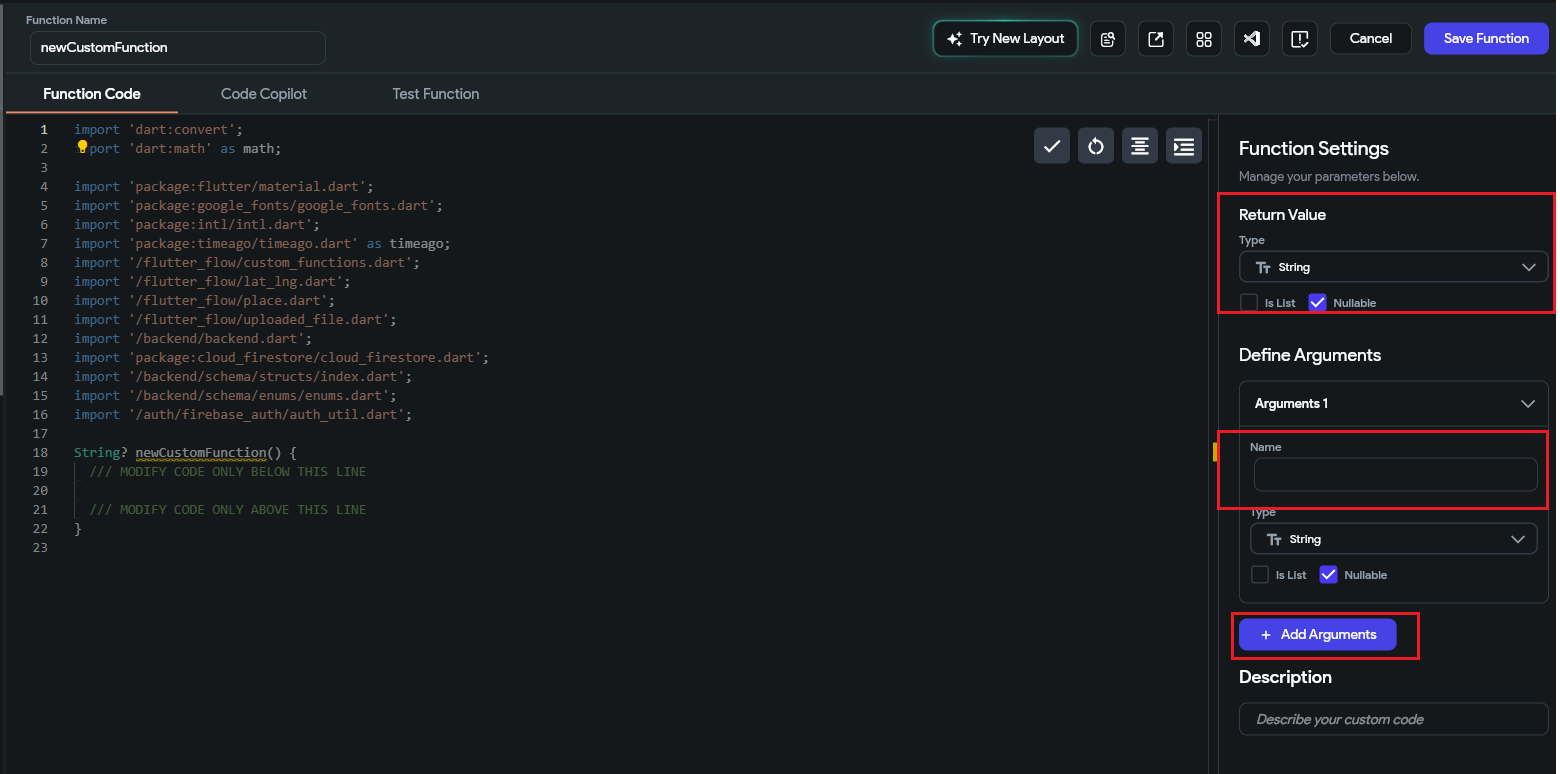
Step 2: Define Arguments and Return Settings
Before writing code, you must explicitly tell FlutterFlow what data types are entering and exiting your function in the right-hand configuration panel.
- Set the Return Type to Double (since our calculated currency will use decimals). Ensure Is List is unchecked.
- Under Arguments, click + Add Argument and define three items:
- subtotal (Type: Double)
- taxRatePercentage (Type: Double)
- shippingFee (Type: Double)
Step 3: Write the Dart Logic
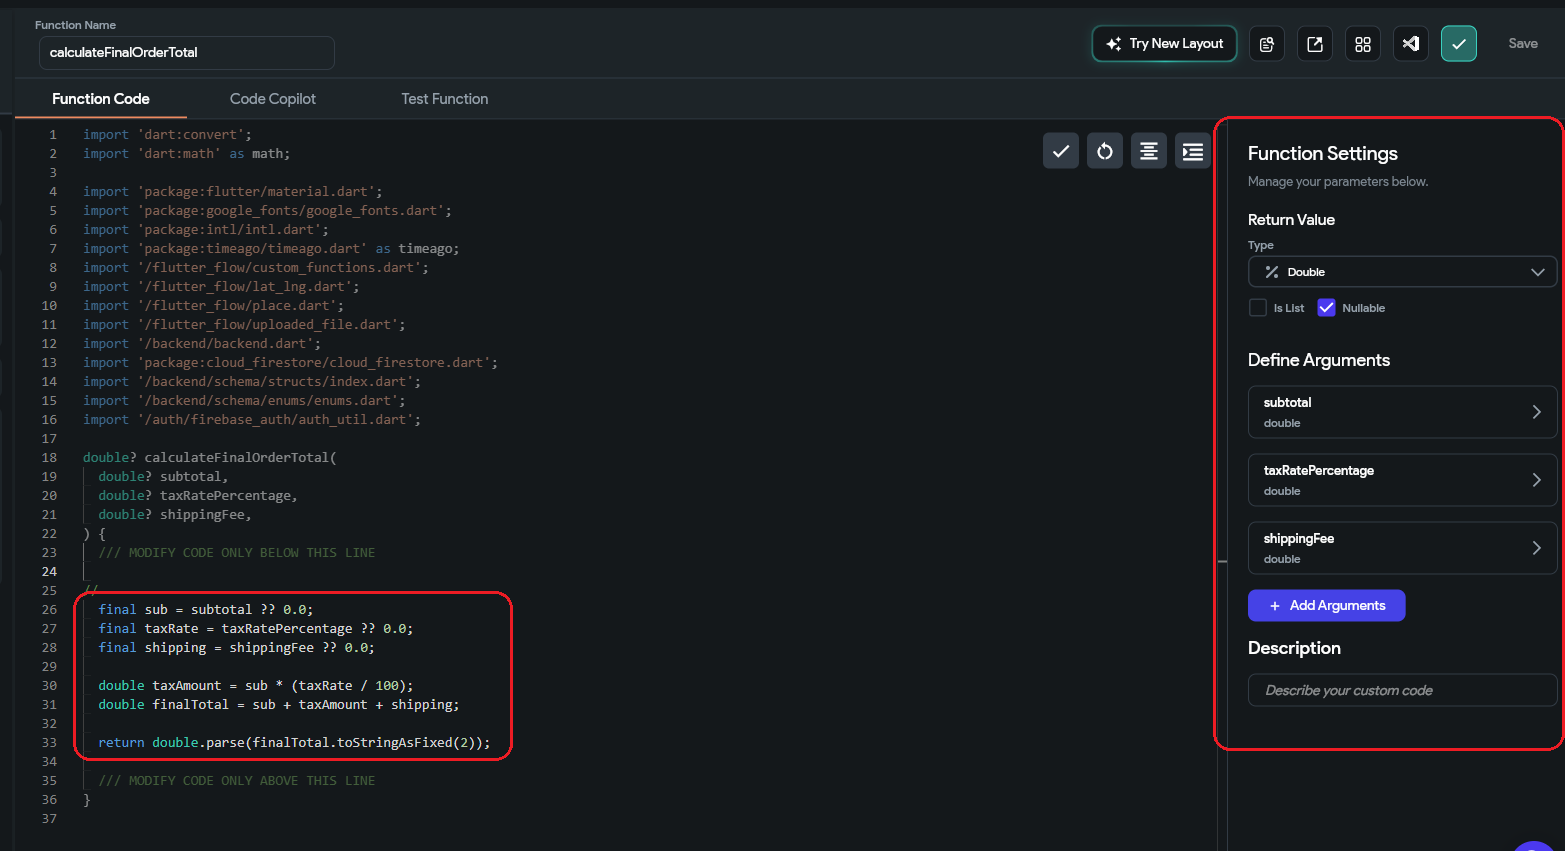
FlutterFlow will automatically generate the function wrapper code based on your configurations. Write your core calculation logic inside the designated green area:
double? calculateFinalOrderTotal(
double? subtotal,
double? taxRatePercentage,
double? shippingFee,
) {
/// MODIFY CODE ONLY BELOW THIS LINE
final sub = subtotal ?? 0.0;
final taxRate = taxRatePercentage ?? 0.0;
final shipping = shippingFee ?? 0.0;
double taxAmount = sub * (taxRate / 100);
double finalTotal = sub + taxAmount + shipping;
return double.parse(finalTotal.toStringAsFixed(2));
/// MODIFY CODE ONLY ABOVE THIS LINE
}
Step 4: Test Your Function
It is critical to validate that your logic works reliably with mock data before plugging it into your user interface.
- Click on the Test Function tab in the main editor section.
- Enter mock values into your argument fields (e.g., Subtotal: 100.0, Tax Rate: 8.25, Shipping: 5.0).
- Click Run. Look at the Output window to ensure it displays the expected result (113.25).

Step 5: Bind the Function to Your UI Widget
Once your code passes testing, map its final output to a visual element on your canvas.
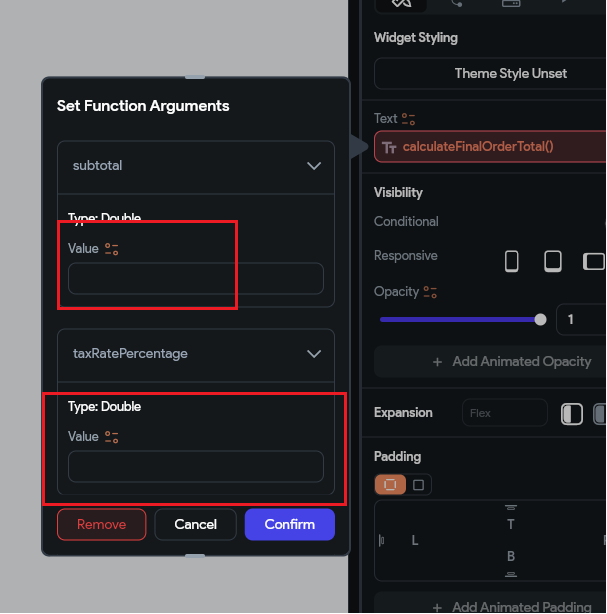
- Select the Text Widget in your App Builder that will display your total cost summary.
- In the right-side Properties Panel, look at the text field value and click the Set from Variable icon.
- Select Custom Function from the dropdown menu, then choose calculateFinalOrderTotal.
- Map each parameter to its live source variable (e.g., bind subtotal to your App State item total or a database entry field). Click Confirm.

4. Production Best Practices
1. Implement Null Safety and Empty Checks
If an empty form field passes a null string or an unassigned value into a function, your application will crash in production. Always use conditional defaults (like input ?? 0.0) or handle empty validations safely inside your logic blocks to prevent execution failures.
2. Leverage the Utility Functions Library
Before constructing complex custom mathematical operations or regex data validations from scratch, check the Utility Functions Library built directly into FlutterFlow. It contains over 50 pre-built, production-vetted functions for date formatting, text scrubbing, and security validation that can save development hours.
3. Keep Functions Synchronous
Custom functions should never perform heavy API calls, write information directly to database tables, or fetch local device hardware coordinates. If your script requires a Future or an asynchronous await modifier, delete the function code and rebuild the workflow as a Custom Action instead.
1. What is a Custom Function in FlutterFlow?
A Custom Function is a reusable piece of Dart code that takes input, performs a calculation or transformation, and immediately returns a result.
2. When should I use a Custom Function?
Use a Custom Function for calculations, text formatting, date formatting, validation, or any logic that returns a value instantly without accessing APIs or databases.
3. What is the difference between a Custom Function and a Custom Action?
Custom Functions are synchronous and return data immediately. Custom Actions support asynchronous tasks like API calls, device features, and database operations.
4. Can Custom Functions update App State?
No. Custom Functions only return data. They cannot directly update App State or perform side effects.
5. What data types can Custom Functions use?
They support common Dart data types such as String, Integer, Double, Boolean, DateTime, Lists, and custom data types supported by FlutterFlow.
6. How do I test a Custom Function in FlutterFlow?
Use the built-in Test Function feature to provide sample inputs and verify that the function returns the expected output before using it in your app.
7. Why is null safety important in Custom Functions?
Null safety prevents your app from crashing when inputs are empty or missing by allowing you to provide safe default values.
8. Can a Custom Function call an API?
No. API calls require asynchronous code, so they should be implemented as a Custom Action instead.
9. Can I reuse a Custom Function across multiple pages?
Yes. Once created, a Custom Function can be used anywhere in your FlutterFlow project, making your code cleaner and easier to maintain.
10. Should I use a Utility Function or create my own?
Check FlutterFlow's Utility Functions first. If one already meets your needs, use it. Otherwise, create a Custom Function for your specific logic.
.svg)
.svg)


.avif)
