


A Beginner's Guide to Branching and Merging in FlutterFlow
What Section:
Welcome to the team! When working on a large app with multiple people, we don't all edit the exact same file at the same time. It would cause total chaos. Instead, we use a system called Branching and Merging (powered by Git behind the scenes).
Think of FlutterFlow projects as being made up of human-readable configuration files called YAML files. When we branch and merge, FlutterFlow is actually comparing these files to track changes.
Here is everything you need to know to get started.
1. What is Branching?
Imagine you have a successful eCommerce app. You want to build a new "Product Recommendation" feature, but you don't want to risk breaking the live app while you are coding it.
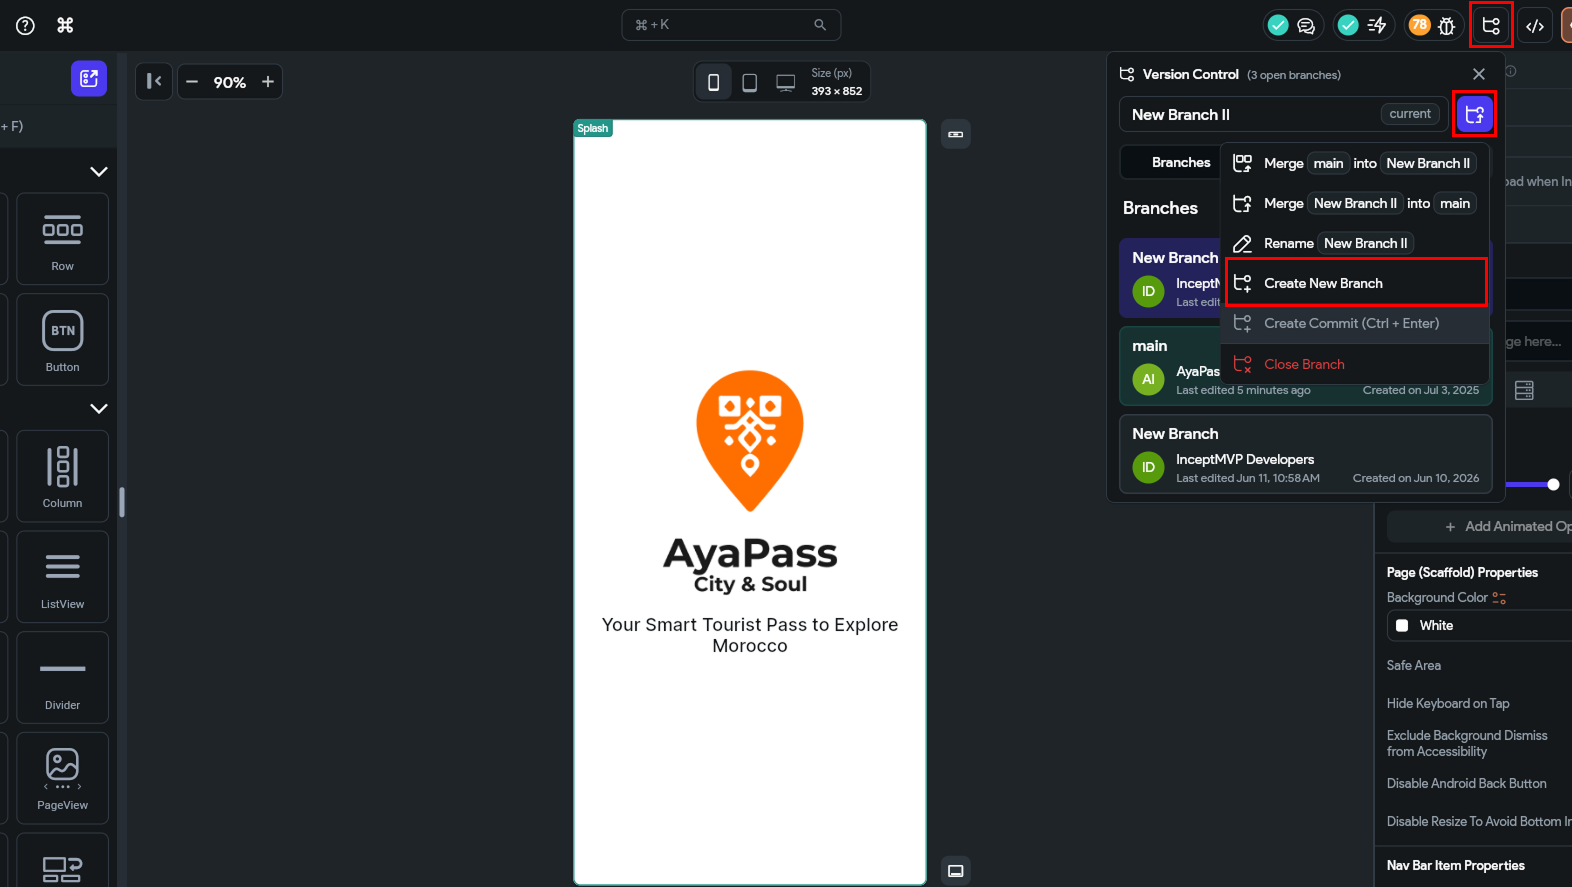
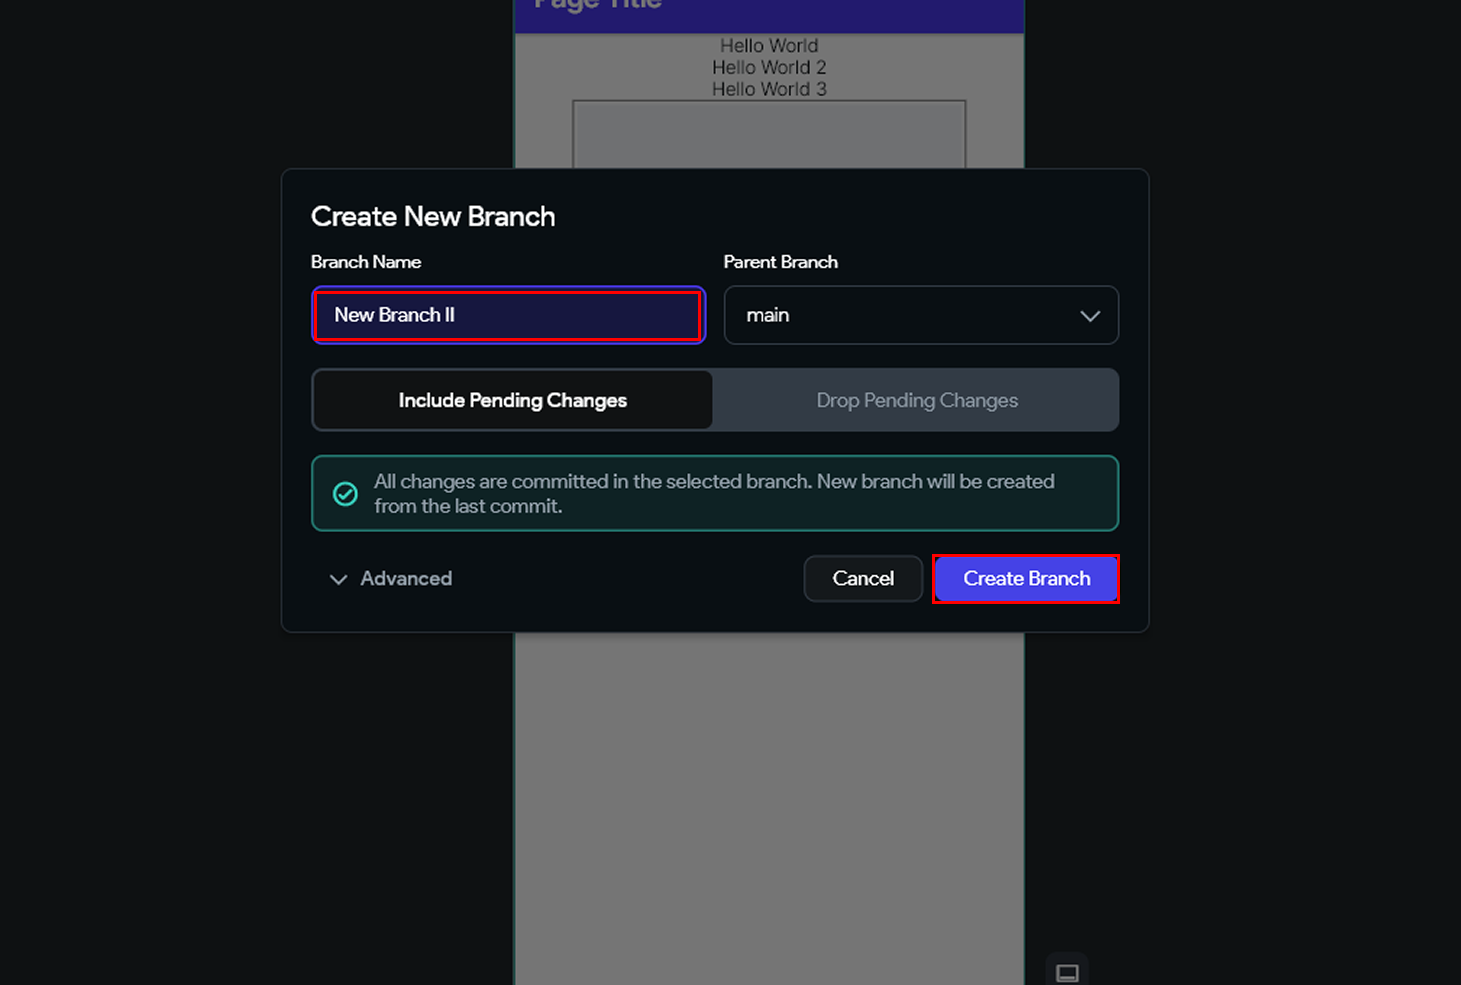
Instead of working on the Main version, you create a Branch. A branch is like a safe, isolated copy of the project. You can add widgets, break things, and experiment without touching the live app or disrupting your teammates.
💡 Tip: Anyone can see the branching menu, but your team needs a Growth Plan or higher to create new branches. Also, branches created inside FlutterFlow stay inside FlutterFlow—they don't automatically sync to GitHub.
Why Section:
2. Why use Branching and Merging?
Using this system provides the safety and structure needed for professional development:
- Isolation: You can work on new features (e.g., "Product Recommendations") without risking the stability of the live eCommerce app.
- Collaboration: Multiple people can work on the same app simultaneously without overwriting each other's work.
- Auditability: Because of Commits, you can see exactly who changed what, when, and why.
- Conflict Prevention: By separating work into branches, you minimize the chance of two people editing the same item at the same time.
HOW Section:
3. What is a Commit?
A Commit is like a manual "Save Game" checkpoint.
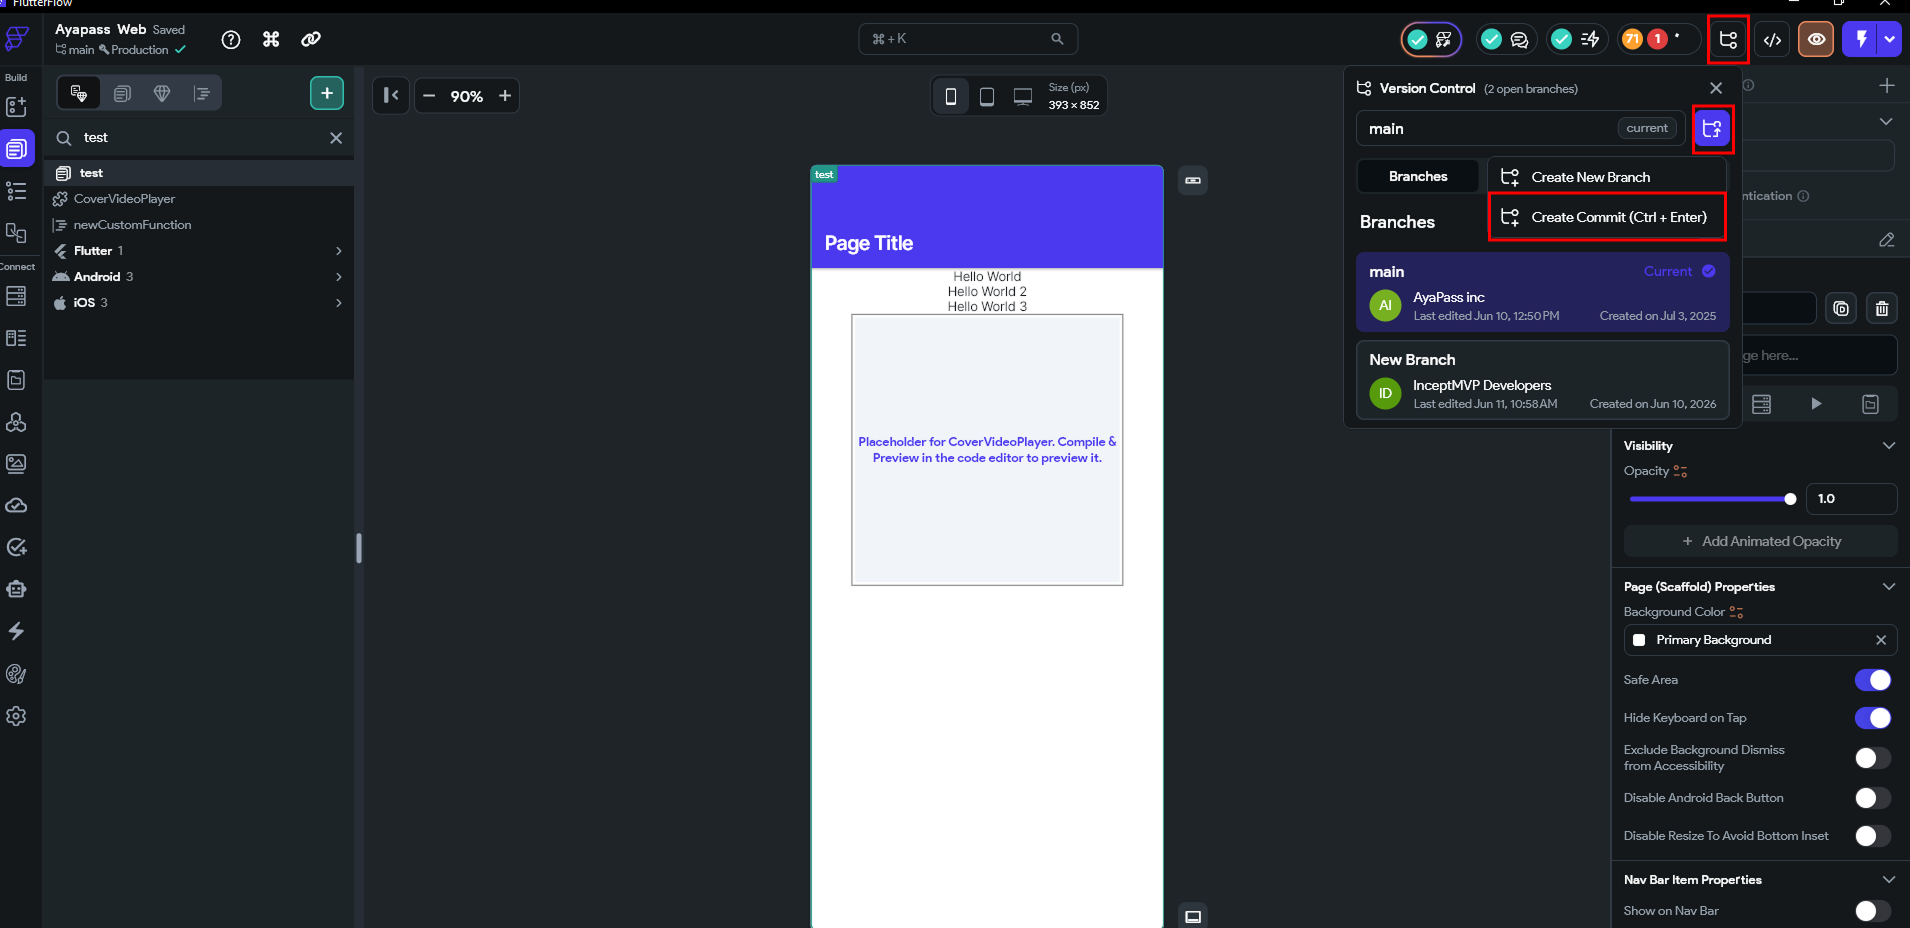
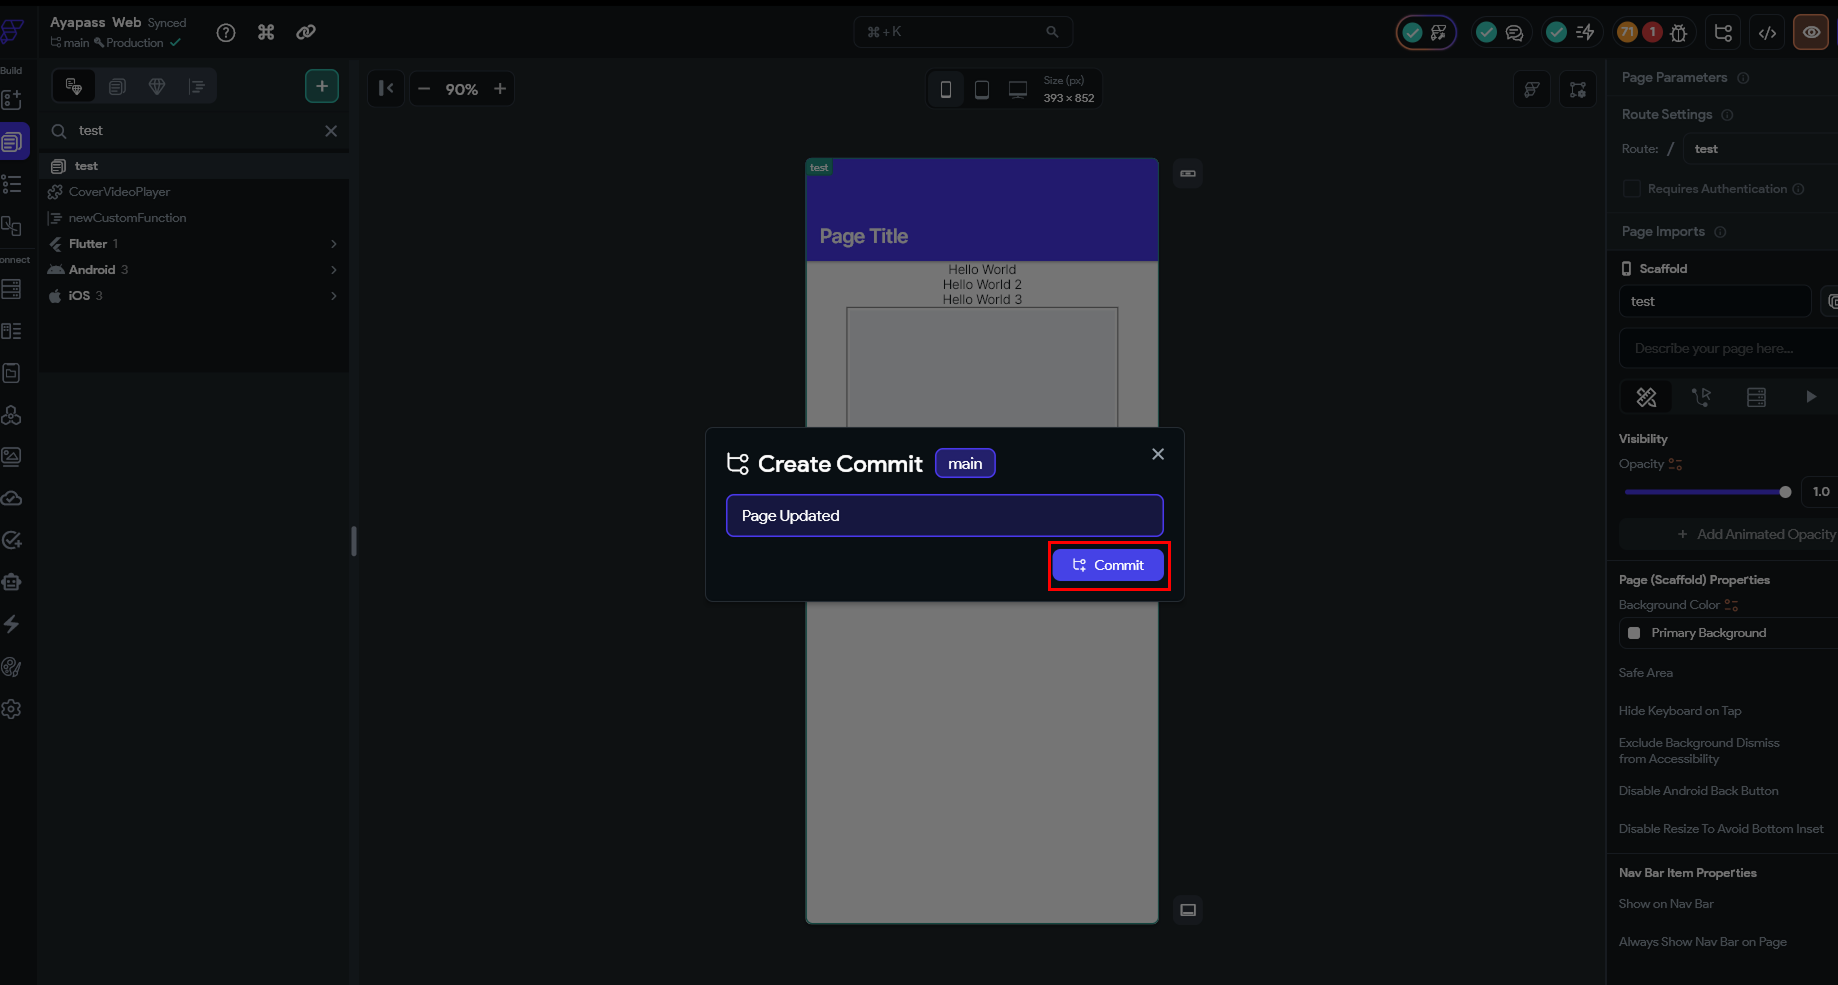
Whenever you finish a small task (like building a button, setting up an API call, or designing a page), you should create a commit. It saves a snapshot of your project at that exact moment.
Best Practices for Commits:
- Commit Often: Save your work frequently. You can use the shortcut Cmd + Enter (or Ctrl + Enter on Windows) to save quickly.
- Write Clear Messages: Don't just type "fixed stuff." Write "Changed submit button color to blue." Your future self and your teammates will thank you.
- Test Before You Save: Make sure your app actually runs before making a commit.
Commits vs. Snapshots vs. Versions
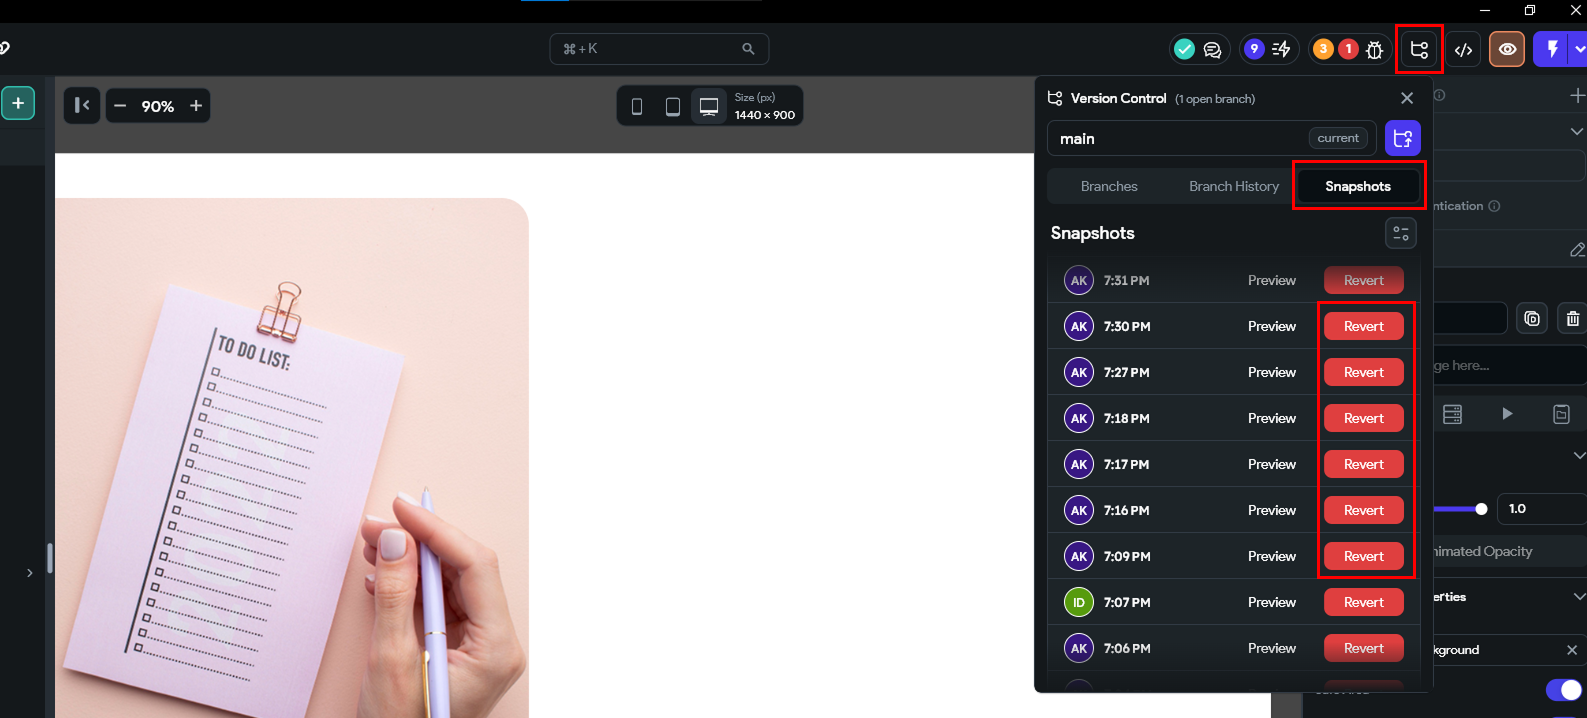
- Snapshots: Automatic backups FlutterFlow makes for you in the background.
- Versions: Manual checkpoints for the whole project.
- Commits: Advanced, flexible checkpoints used specifically inside branches. They let you see the exact lines of code that changed.
3. What is Merging?
Once your new feature is finished and tested, you want to bring those changes back into the Main branch so everyone can use it. This process is called Merging.
Important Note on Merging: Merging does not just "mix" everything together. It compares the differences.
⚠️ Warning: If you completely delete a page in your feature branch and then merge it back to Main, Git thinks you wanted that page gone forever. It will delete it from Main too! Only make intentional, step-by-step changes.
Merging Directions:
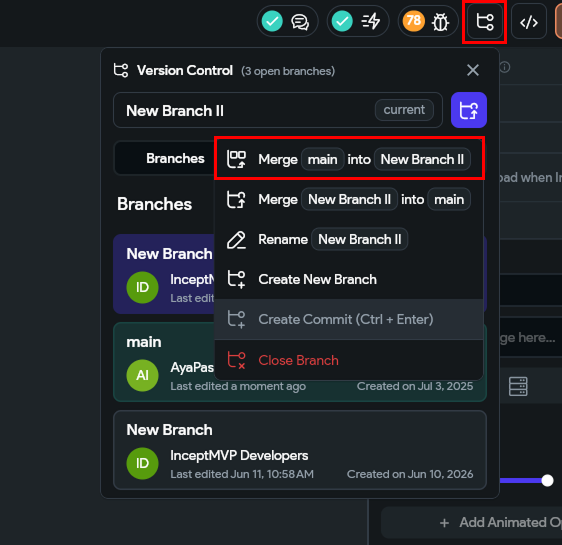
- Parent → Child: Pulling recent updates from the Main branch down into your feature branch to keep your workspace up-to-date.
- Child → Parent: Pushing your finished feature branch up into the Main branch.
4. How to Handle Merge Conflicts
A Merge Conflict happens when two people change the exact same thing at the same time, and FlutterFlow doesn't know which version to keep.
Example: > * Alice changes a button's text to "Submit Form" and makes it Blue.
- Bob changes the same button's text to "Send" and makes it Green.
- Alice merges her work first. When Bob tries to merge next, FlutterFlow will pause and ask: "Hey, do you want Alice's blue button or Bob's green button?"
Understanding the Merge Window
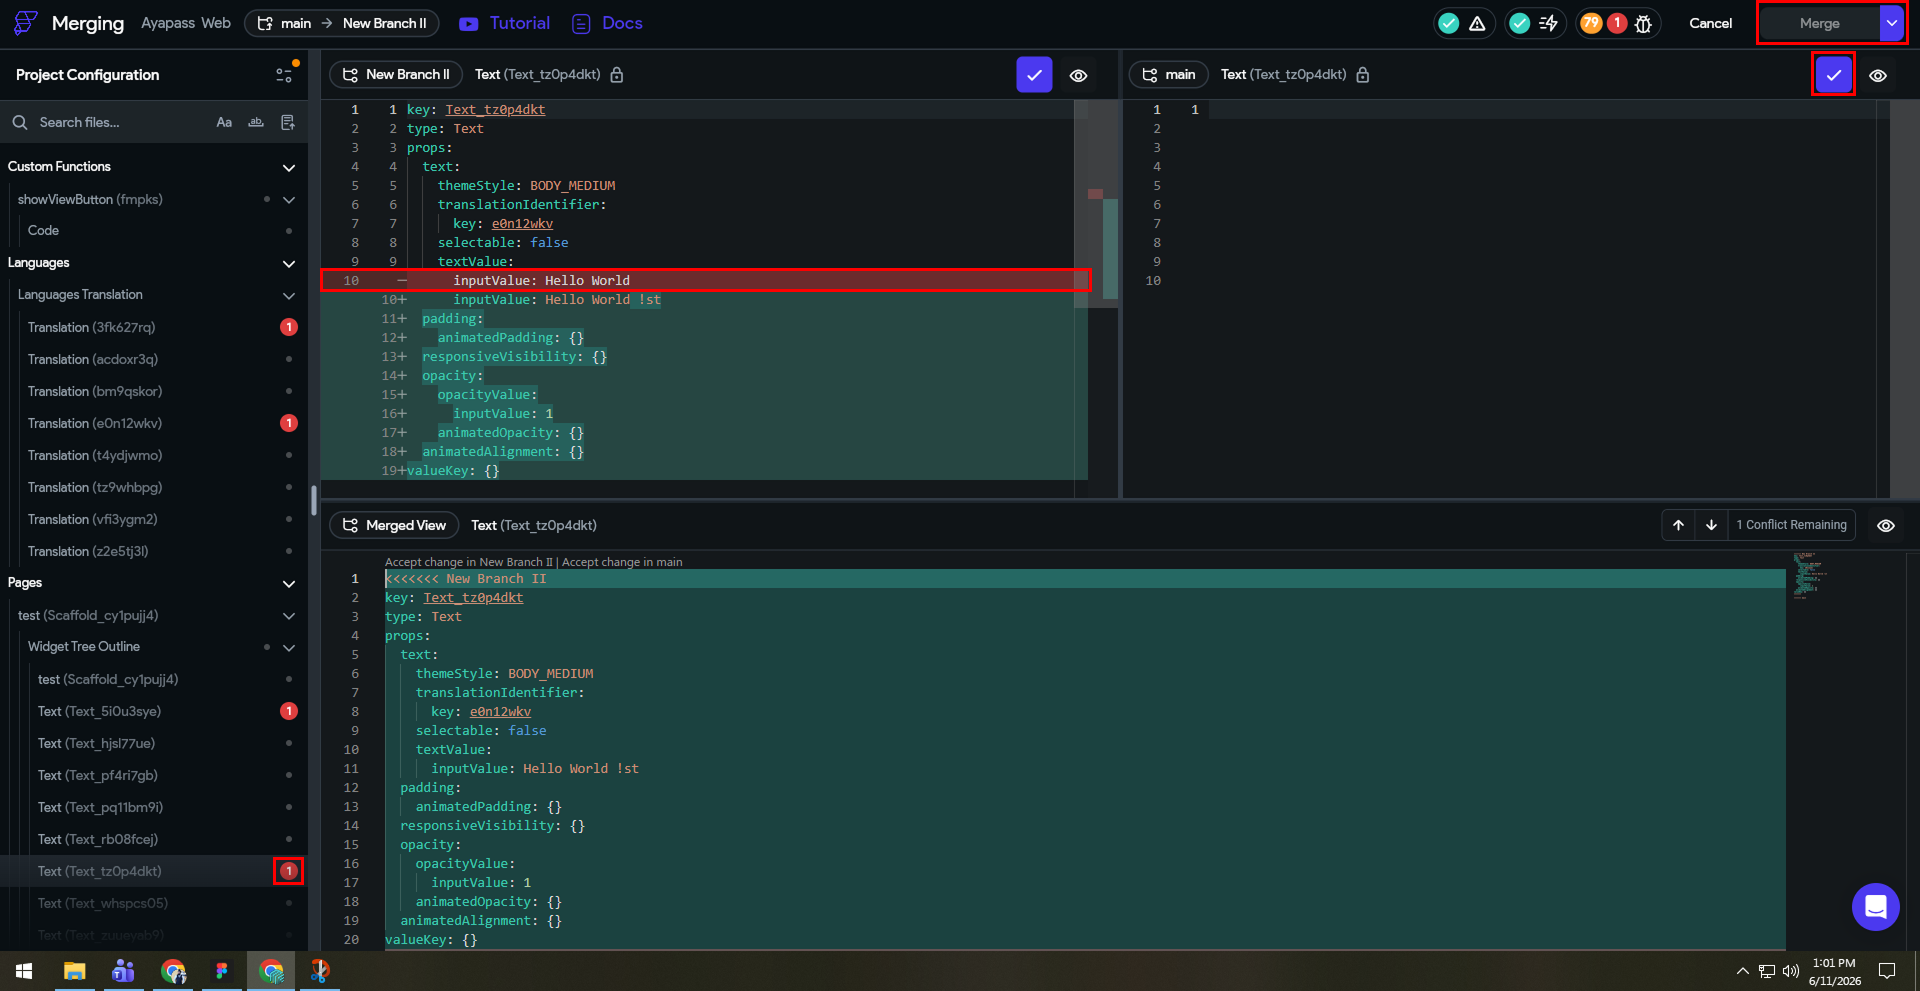
When a conflict happens, FlutterFlow will open a special merging screen:
- The Left Panel: Shows you a list of files. You can filter them to see only "Files with Conflicts."
- The Right Upper Panel: Shows a side-by-side comparison.
- Line highlighted in Red = Content that was removed.
- Line highlighted in Green = Content that was added.
- You can click "Accept Change" to pick a side, or click the Eye Icon to see a visual preview of what the change looks like in the app builder.
- The Right Lower Panel: Shows the final combined file. If there is a conflict, you will see code markers like this:
- <<<<<<< (The other branch's changes)
- ======= (The divider line)
- >>>>>>> (Your branch's changes)
- You can manually edit the text here to clean it up, then hit Save Changes.
Handling Errors During a Merge
- YAML Validation Errors: This means the code format got messed up during the merge (e.g., a page was deleted in both branches, leaving 0 pages). You must fix these before you can finish the merge.
- Project Errors: This happens if the merge creates a logical error, like two data types having the exact same name. You can fix these during the merge, or finish the merge and fix them in the app builder afterward.
5. Branch Roles & Permissions
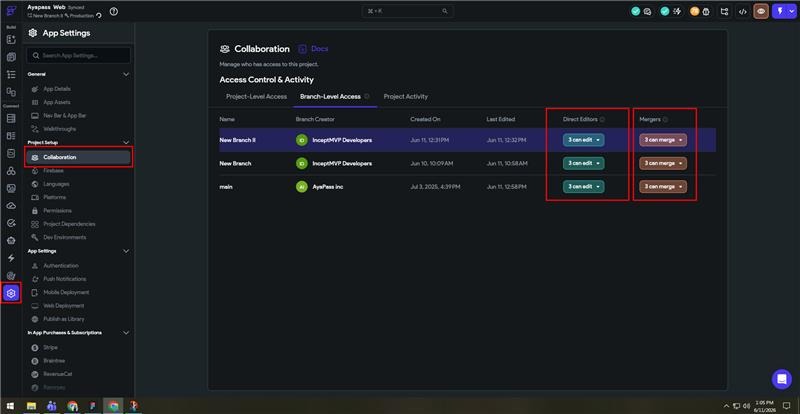
To keep our project safe, we can assign roles to team members for different branches (found under Settings & Integrations > Project Setup > Collaboration):
- Editors: Can work inside the branch and make direct changes.
- Mergers: Can only merge other branches into this branch. We use this to protect the Main branch so nobody accidentally edits it directly.
6. Closing and Restoring Branches
Once your feature is safely merged into Main, the feature branch has done its job. To keep our workspace clean, you should Close the branch.
- Always talk to your team before closing a branch to ensure no one else is using it.
- If you accidentally close a branch, don't panic! You have 30 days to go to the branch filter, find it under "Show Closed Branches," and click Restore Branch.

Got it. Let’s focus strictly on the initial setup and how the ongoing push process works, keeping your exact branch name (flutterflow) in mind.
Here is the straightforward breakdown of how to connect your project and keep sending updates.
Part 1: The Initial Connection
To get your FlutterFlow project talking to GitHub for the first time, you only need to do these three steps:
- Create a Repository: Go to your GitHub account and create a brand new, empty repository.
- Install the App: Install the official FlutterFlow GitHub App on your GitHub account and give it access to your new repository.
- Link & First Push: Inside your FlutterFlow project settings, paste your GitHub repository URL, choose your branch name (flutterflow), and click the initial push button.
Part 2: The Continuous Push Workflow
Once connected, sending new updates from FlutterFlow to GitHub is a repetitive, straightforward process.
1. Make Changes in FlutterFlow
Whenever you build new screens, change UI layouts, or add logic inside the visual FlutterFlow builder, these changes live on FlutterFlow's servers.
2. Send a New Push
When you are ready to update your GitHub repository with your latest visual work:
- Click the GitHub icon in the FlutterFlow toolbar (usually in the top right or within your project settings).
- Enter a commit message (a short note describing what you changed, e.g., "Added new onboarding screens").
- Click Push to GitHub.
3. What Happens on GitHub
FlutterFlow packages your visual design into clean Flutter/Dart code and streams it directly to your repository. Because your designated branch is flutterflow, every single push you trigger from the platform will automatically target, update, and sync directly with that exact branch.
💡 Keep in Mind: Every time you hit "Push", FlutterFlow completely generates fresh code based on your latest visual builder state. As long as you are only building visually inside FlutterFlow and pushing straight to your flutterflow branch, your GitHub repo will stay perfectly synced with your design canvas.
🔄 Crucial Rule: This is One-Way Syncing
The connection between FlutterFlow and GitHub is strictly a one-way street (from FlutterFlow to GitHub).
- FlutterFlow can send code to your GitHub repository.
- FlutterFlow cannot read code back from GitHub. If you or anyone else types custom code directly into GitHub or changes files there, FlutterFlow will not see those changes, and they will be completely overwritten the next time you press "Push to GitHub" from the builder.
Following are the screenshots tutorial showing how can you practically implement the connection and one way syncing of flutterflow to github
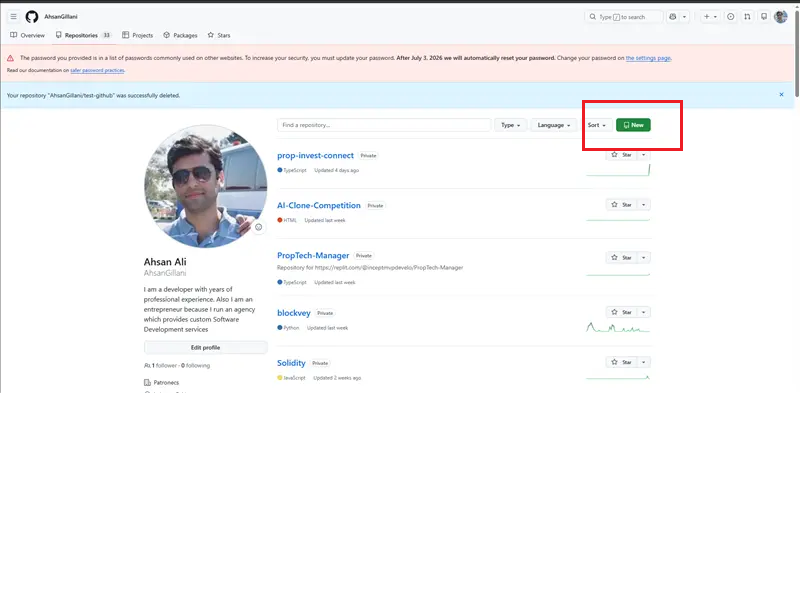

Then open this URL to install “Flutterflow github app” Link
1. What is branching in FlutterFlow?
Branching creates an isolated copy of your project where you can develop new features without affecting the main application.
2. Why should I use branches instead of editing the main project?
Branches let developers work independently, reduce the risk of breaking production, and make team collaboration much easier.
3. What is a commit in FlutterFlow?
A commit is a saved checkpoint of your work inside a branch. It records your changes so you can track progress and collaborate with your team.
4. What is merging in FlutterFlow?
Merging combines changes from one branch into another, typically moving completed work from a feature branch into the main branch.
5. What is a merge conflict?
A merge conflict occurs when two developers modify the same element differently. FlutterFlow asks you to choose which version to keep or merge them manually.
6. How do I resolve merge conflicts in FlutterFlow?
Use FlutterFlow's merge interface to review conflicting changes, compare versions, select the correct changes, and save the merged result.
7. Does FlutterFlow support GitHub integration?
Yes. FlutterFlow can push your generated Flutter code directly to a GitHub repository using the official GitHub integration.
8. Is FlutterFlow's GitHub integration two-way?
No. FlutterFlow only pushes code to GitHub. Changes made directly in GitHub are not imported back into FlutterFlow and can be overwritten during the next push.
9. How often should I push my FlutterFlow project to GitHub?
Push your project after completing meaningful features, bug fixes, or design updates so your repository stays current and your work is backed up.
10. What happens when I close a FlutterFlow branch?
Closing a branch removes it from the active workspace after it has been merged. If needed, it can usually be restored within the available recovery period.
.svg)
.svg)


.avif)
