

Connecting Brevo to FlutterFlow
to Send Emails — A Step-by-Step Tutorial for Beginners
Introduction
Welcome! This tutorial will walk you through connecting Brevo (an email service) to your FlutterFlow app so your app can send emails — for example, a welcome message when a new user signs up, an order confirmation, or a contact form reply.
What is FlutterFlow? FlutterFlow is a no-code / low-code platform that lets you build mobile and web apps visually — no deep programming knowledge required. You drag and drop components onto a canvas, and FlutterFlow generates the Flutter code for you.
What is Brevo? Brevo (formerly known as Sendinblue) is an email-sending service. It is specially designed for transactional emails — automated emails triggered by user actions, like order confirmations or verification codes. Brevo's free tier lets you send up to 300 emails per day, which is perfect for getting started.
How do they talk to each other? FlutterFlow does not have a built-in Brevo button. Instead, you connect the two using an API call. An API call is simply a message your app sends to another service asking it to do something — in our case, asking Brevo, “Please send this email.” You will set this up step-by-step; no coding experience is needed.
Why connect Brevo to FlutterFlow? FlutterFlow can't send email by itself. Firebase covers two narrow cases — Authentication sends password-reset and verification emails, and Cloud Messaging sends push notifications — but anything else (a welcome message, an order confirmation, a contact-form reply) has nowhere to go. Sending those requires a dedicated email service, and Brevo is the one this tutorial uses. That's the gap you're filling here.
By the end of this tutorial, you will have a working email integration: a button inside your FlutterFlow app that triggers Brevo to send a real email.
Prerequisites
Before you start, please make sure you have the following ready:
- A FlutterFlow account — Sign up for free at flutterflow.io. The free tier is sufficient for this tutorial.
- A Brevo account — Sign up for free at brevo.com. The free plan allows up to 300 emails per day.
- A verified sender email address — This is the email address that will appear as the sender of your emails. You will verify it inside Brevo during Step 2.
- An existing FlutterFlow project — You can create a blank project if you do not have one yet.
- Firebase connected, on the Blaze plan — Your FlutterFlow project must be connected to a Firebase project upgraded to the Blaze (pay-as-you-go) plan. Making the Brevo API group private (Step 7) deploys a Firebase Cloud Function, and Cloud Functions do not deploy on the free Spark plan. Blaze has a generous free tier, so a low-volume tutorial app normally costs nothing.
NOTE:
This tutorial uses Brevo's API Key method, which is the recommended and most straightforward approach for FlutterFlow integration. You do not need to configure SMTP settings manually.
Part 1: Setting Up Your Brevo Account
In this section, you will create a Brevo account, verify your sender email, and generate an API key that FlutterFlow will use to communicate with Brevo.
STEP 1 · Create a Brevo Account
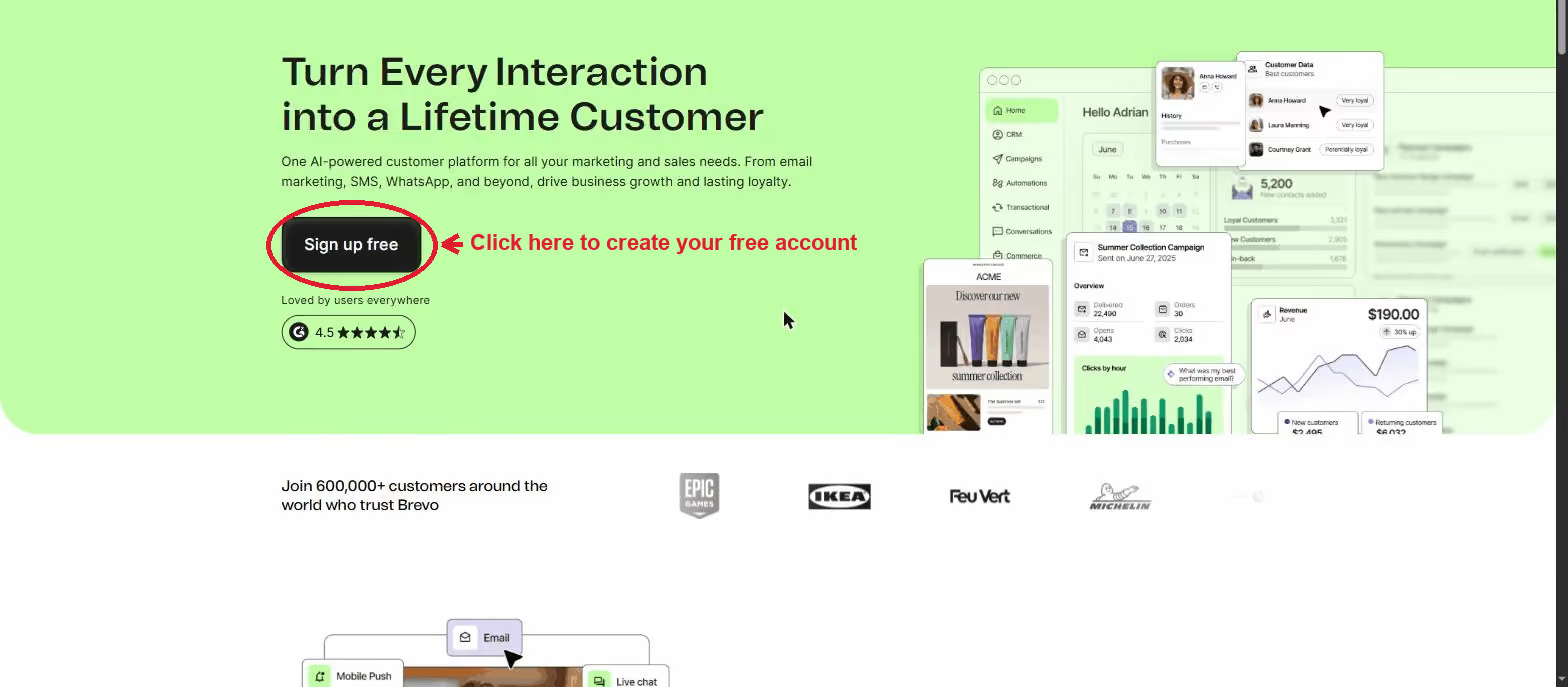
- Open your browser and go to brevo.com.
- Click the Sign up free button.
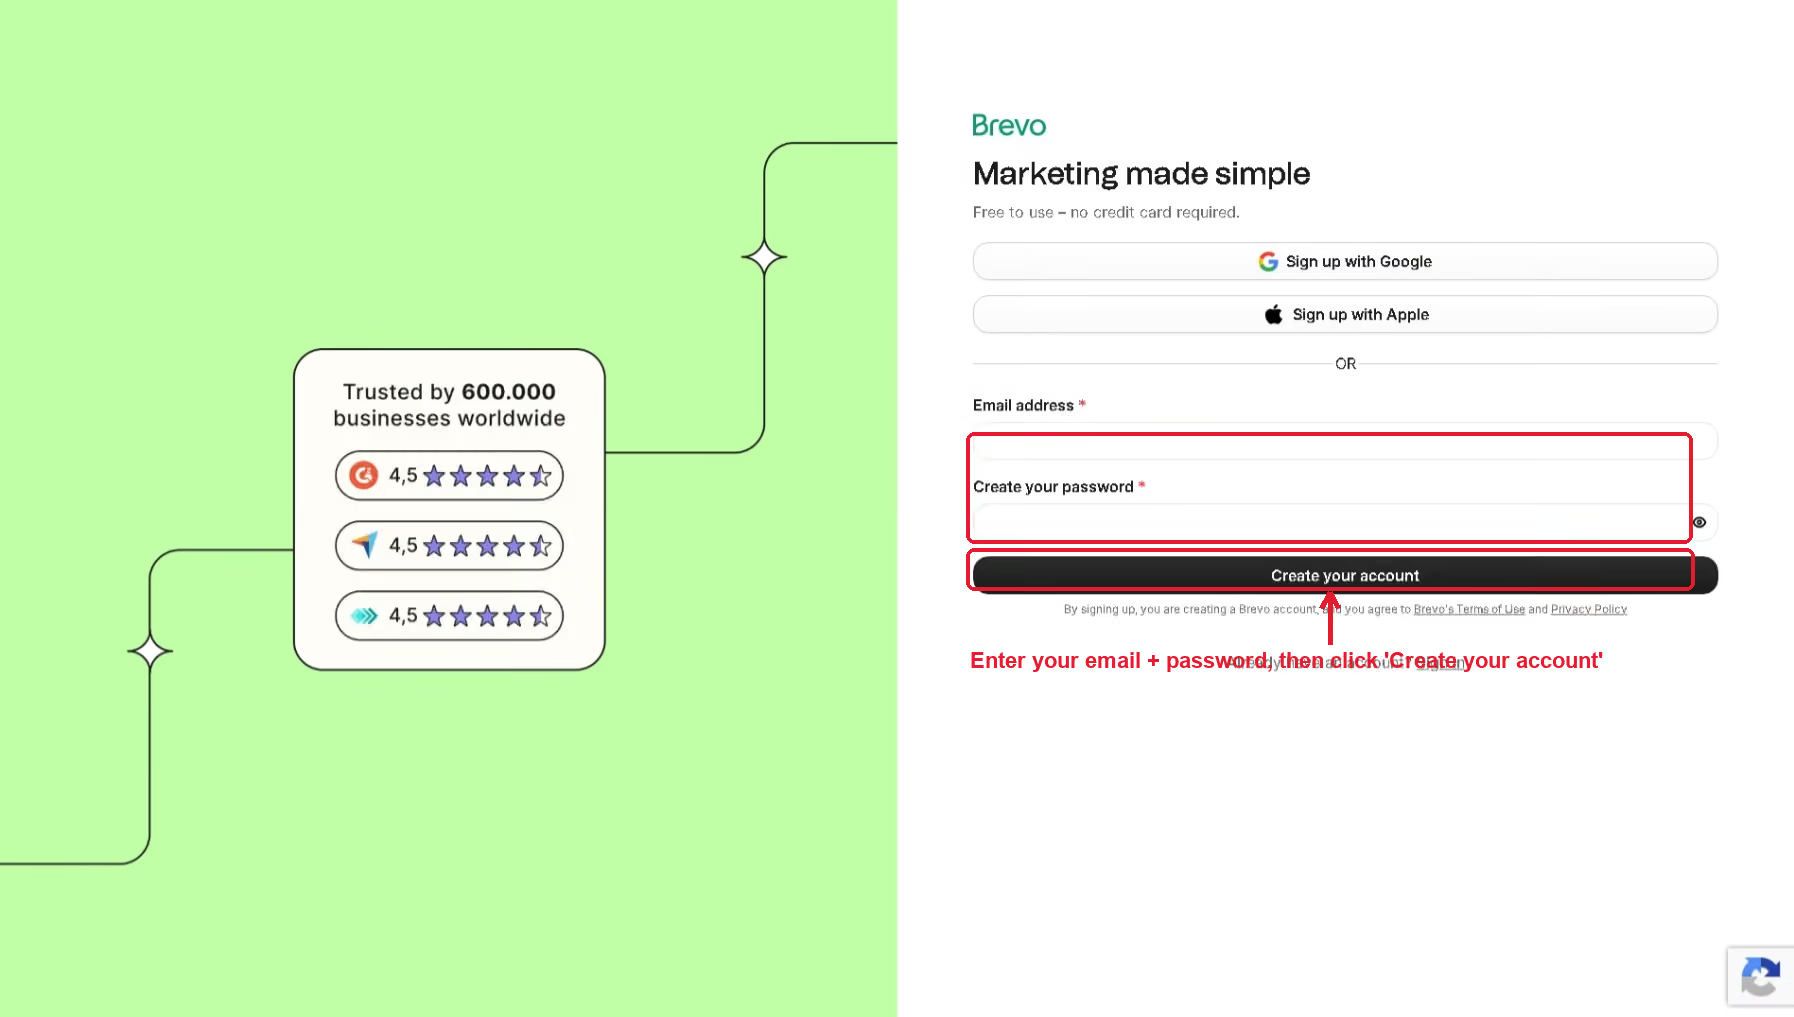
- Enter your email address, create a password, and click Create your account. (You can also sign up with Google or Apple.)
- Brevo will ask a few short onboarding questions about you and your company — answer them and continue until you land on your dashboard.
TIP:
If you already have a Brevo account, simply log in and skip to Step 2.
STEP 2 · Check Your Sender Email Address
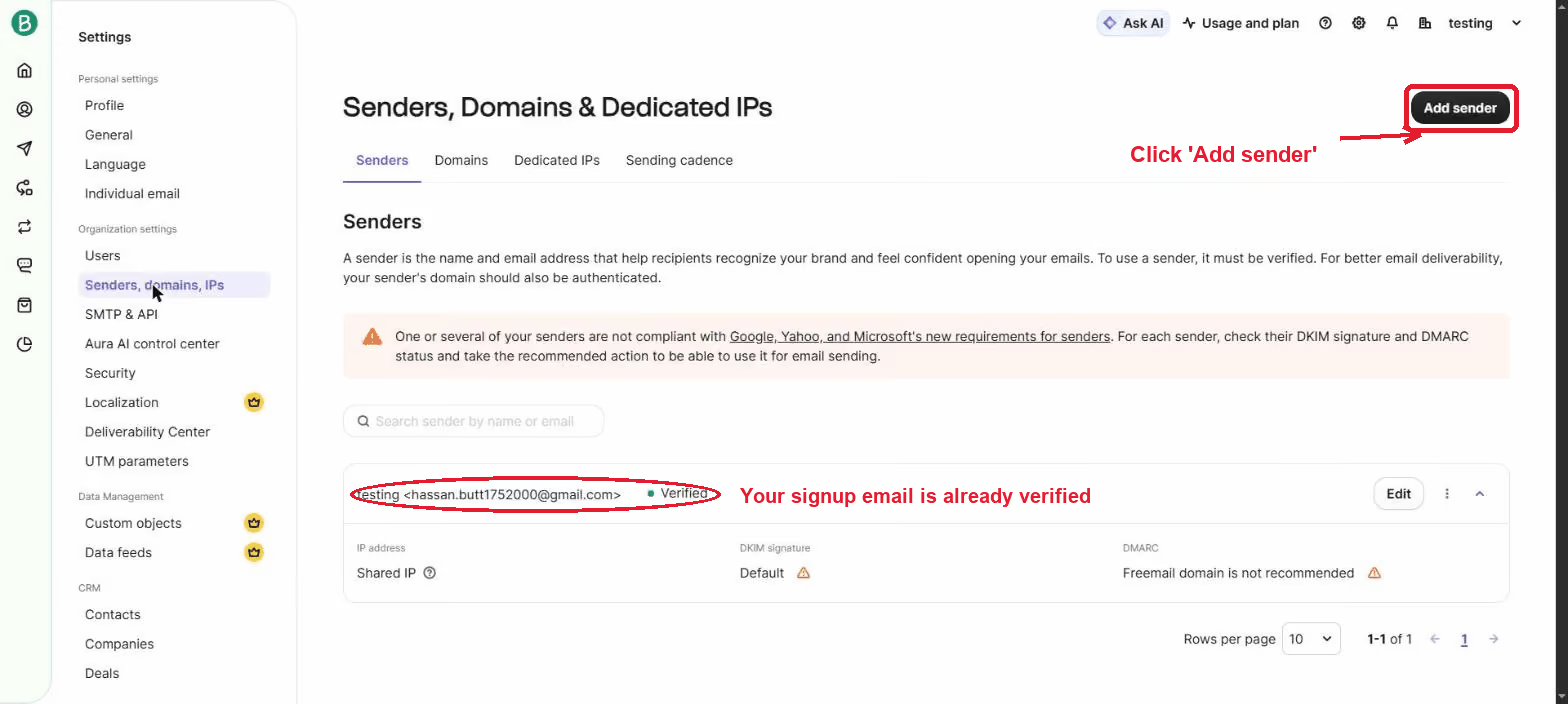
The 'sender' is the email address your recipients will see as the 'From' address. Good news: Brevo automatically adds and verifies the email you signed up with, so for testing you may not need to add anything. Here is where to find and manage your senders:
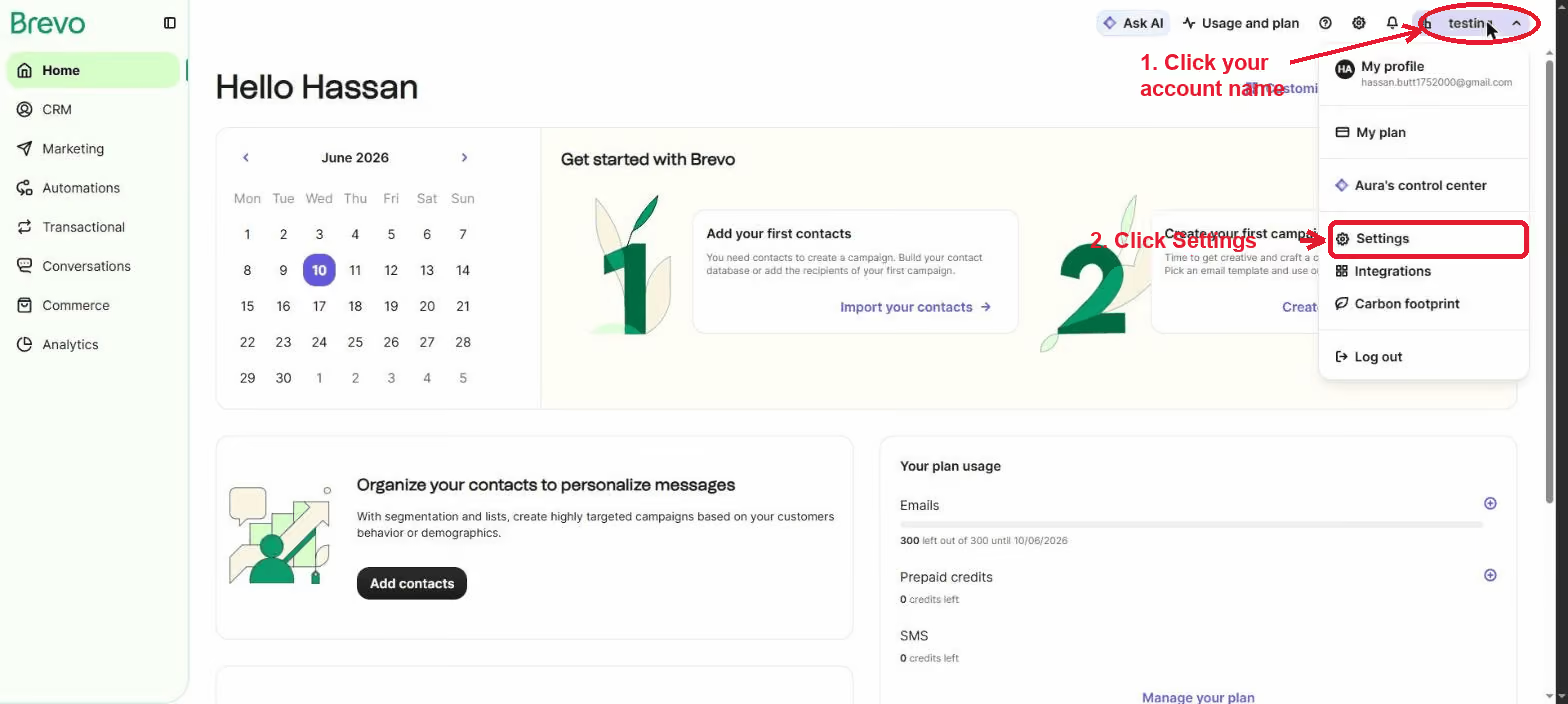
- Click your account name in the top-right corner, then click Settings in the dropdown menu.
- In the Settings sidebar, under Organization settings, click Senders, domains, IPs.
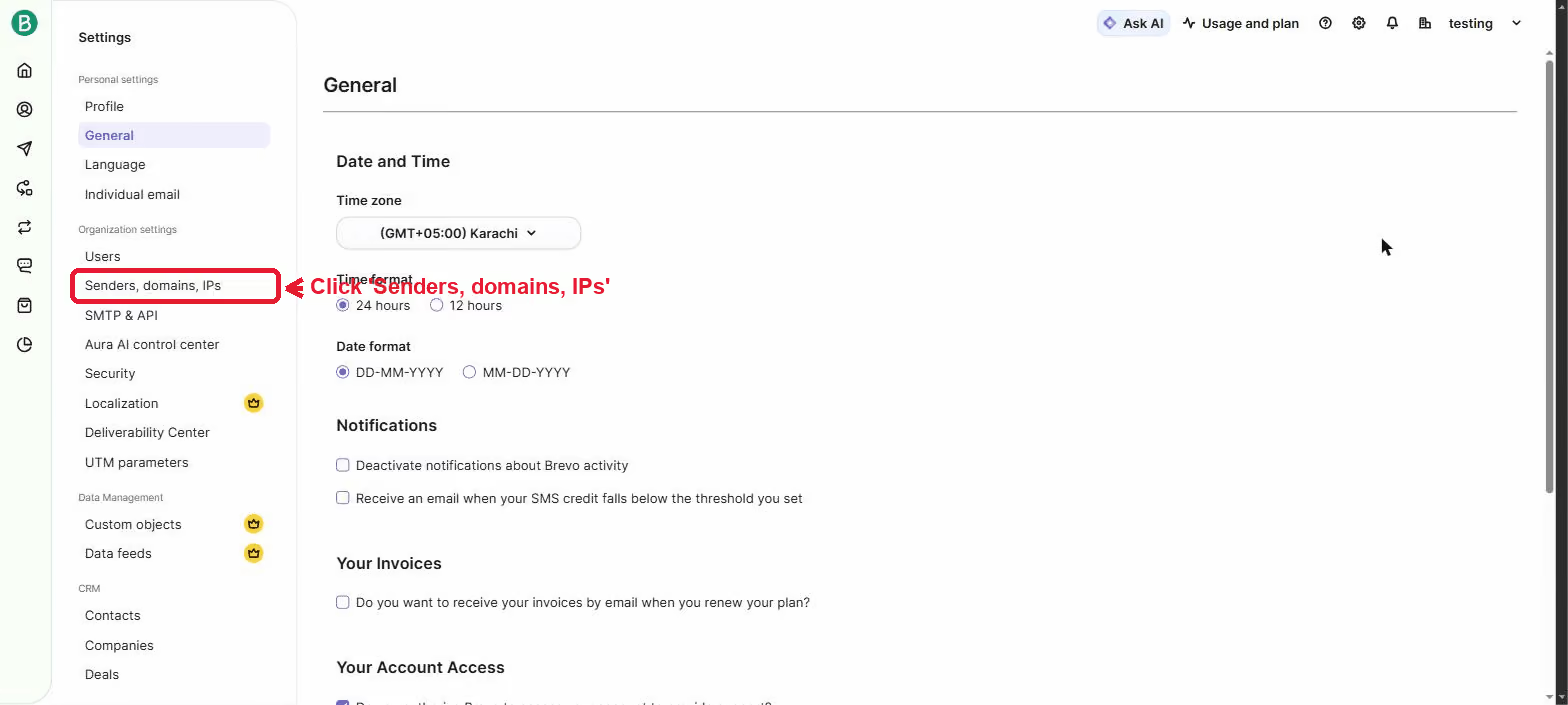
Screenshot of the live Brevo interface (captured June 2026).
- You will see your signup email already listed with a green Verified badge. To send from a different address (for example, hello@yourcompany.com), click Add sender.
- Fill in the From Name (what recipients see, e.g. 'My App') and the From Email, then click Add sender. Brevo emails a verification link to that address — click it before using the sender.
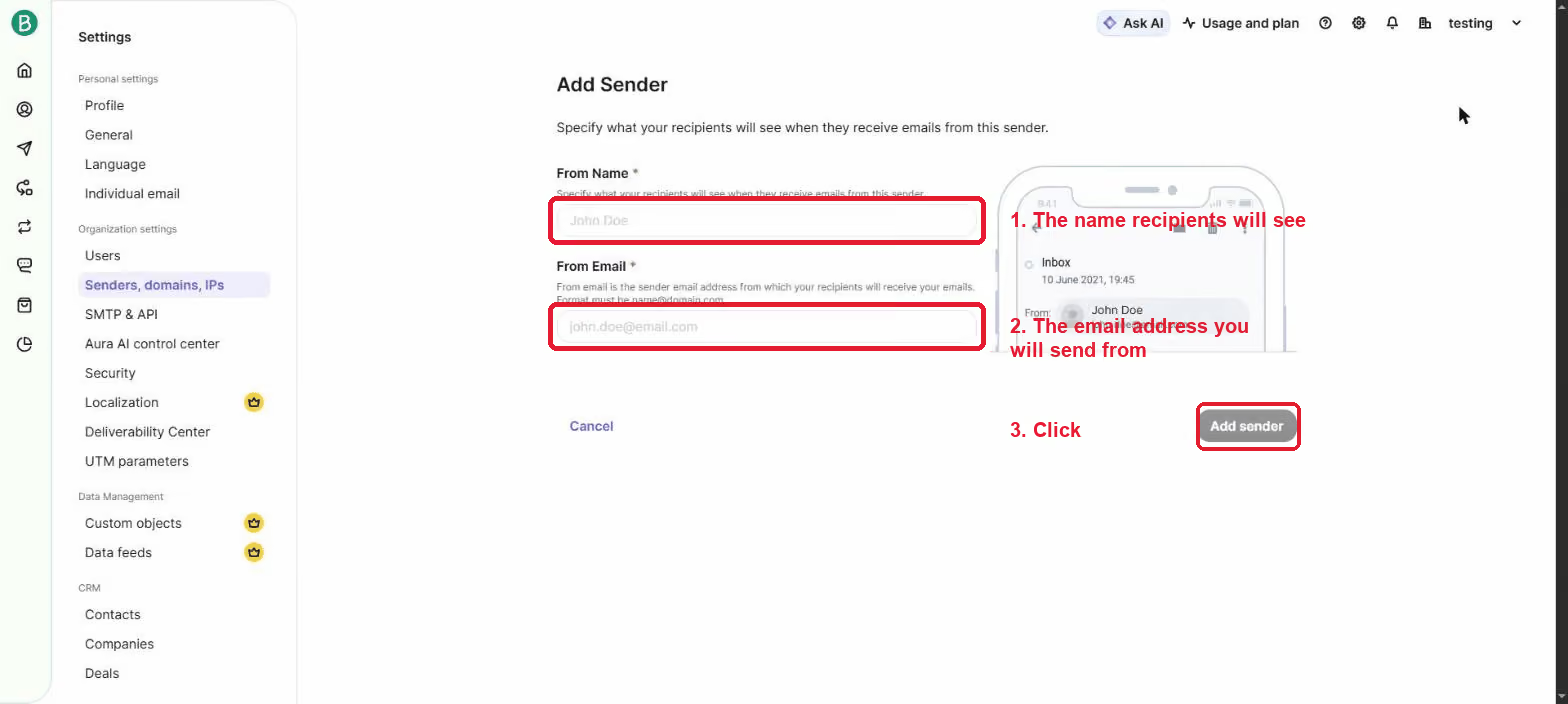
IMPORTANT:
Whichever email you choose as your sender must show the 'Verified' status before you can send from it. A personal Gmail works fine for testing, but for a real product use an address on your own domain — Brevo flags free email domains as 'not recommended' for deliverability.
STEP 3 · Generate a Brevo API Key
An API key is like a secret password that allows FlutterFlow to connect to your Brevo account securely. You will generate one here and paste it into FlutterFlow in Part 2.
- Still in Settings, click SMTP & API in the sidebar (right below 'Senders, domains, IPs').
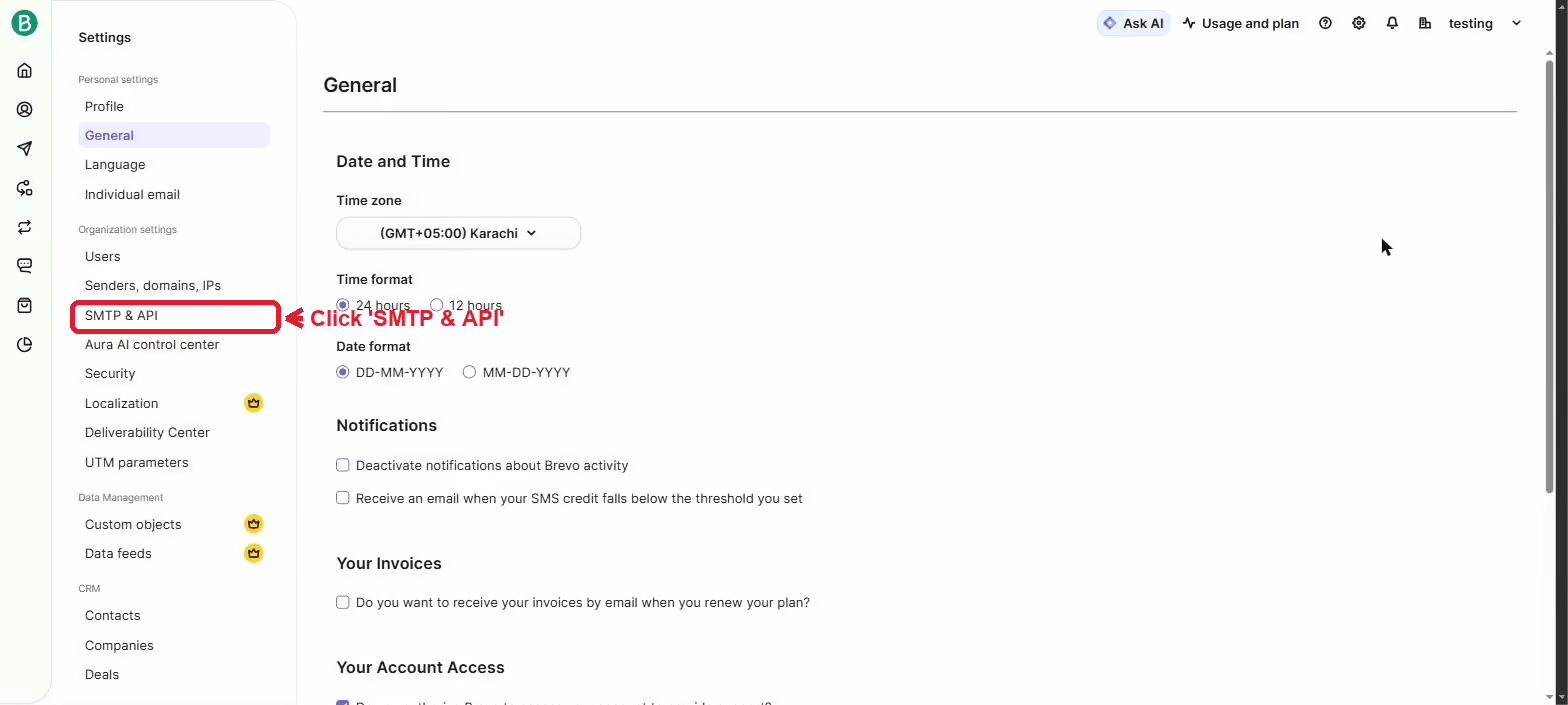
Screenshot of the live Brevo interface (captured June 2026).
- Open the API keys & MCP tab, then click the + Generate API key button in the top-right corner.
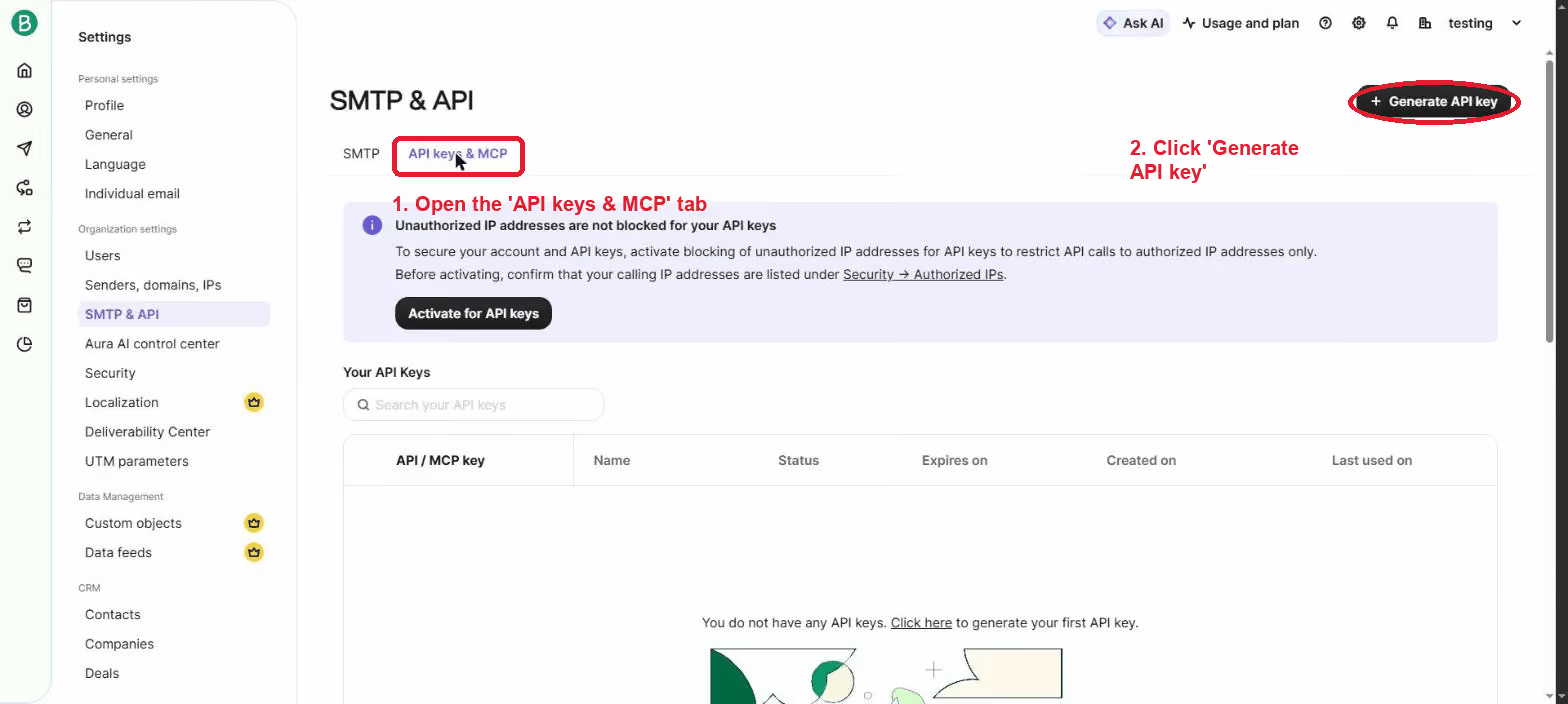
Screenshot of the live Brevo interface (captured June 2026).
- Give the key a name you will recognize later (for example, FlutterFlow Integration). You can leave the Expiry at its default of 1 year. Click Generate.
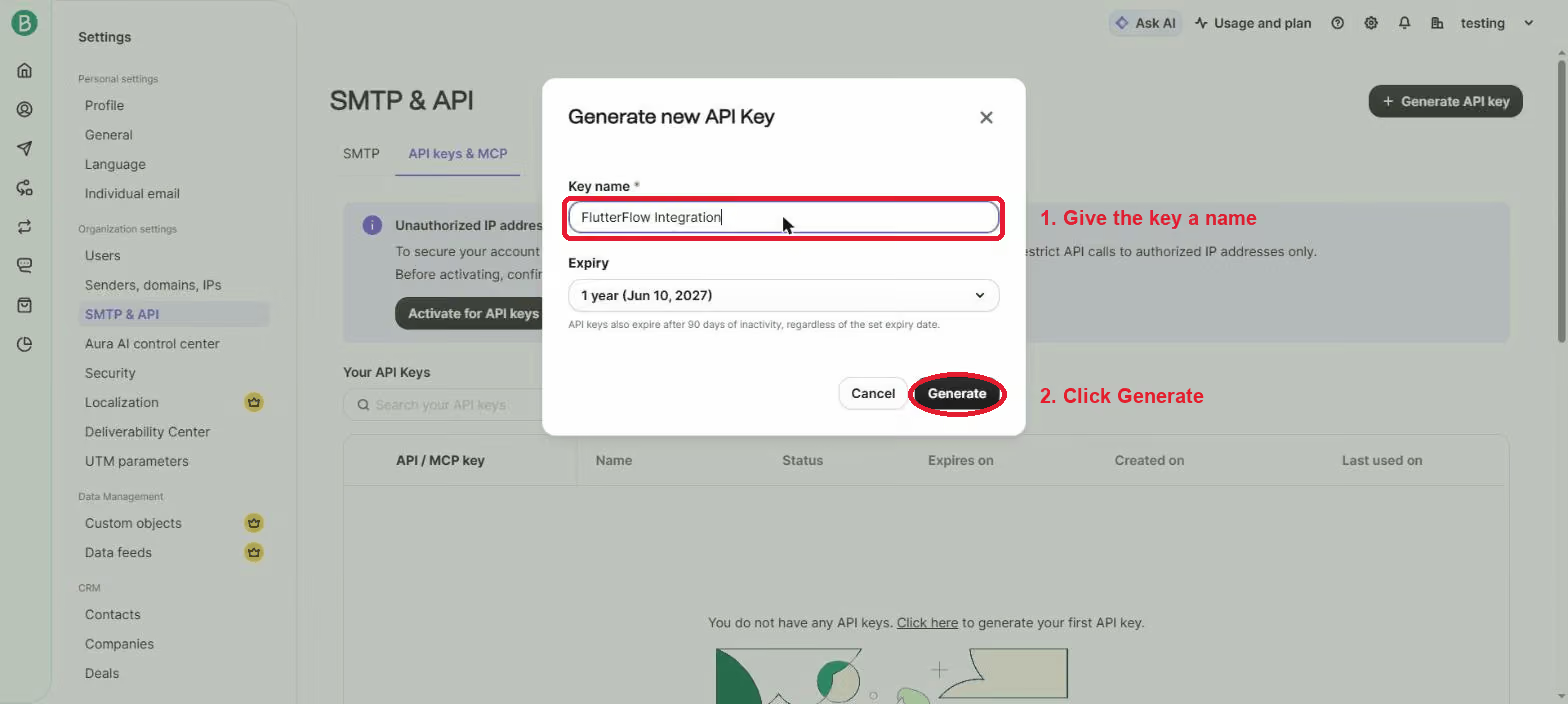
- Your new key appears once — click the copy icon and store it somewhere safe (a password manager or private note). For security reasons Brevo will never show it again.
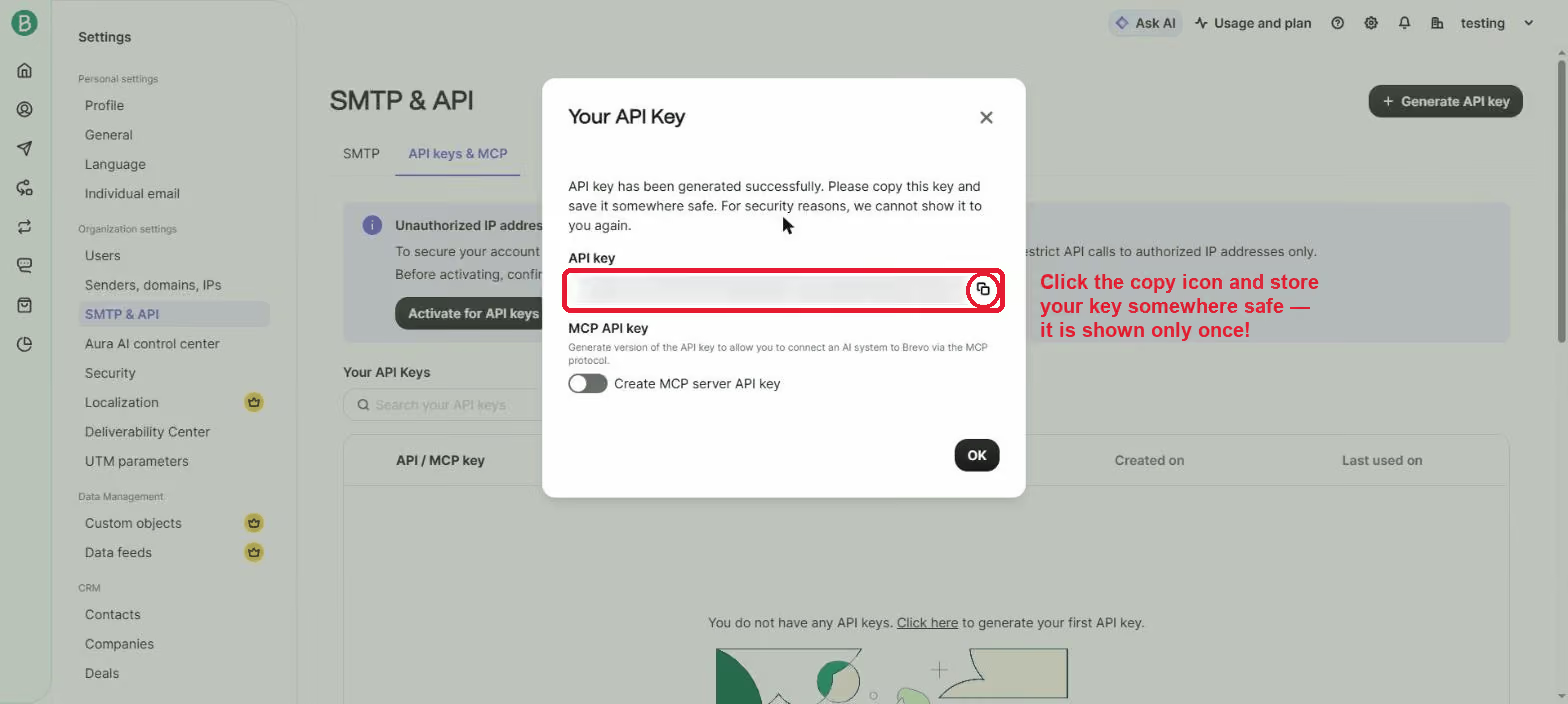
NOTE:
API keys also expire after 90 days of inactivity, regardless of the expiry date you choose — if emails suddenly stop working months later, check whether the key expired.
IMPORTANT:
Treat your API key like a password. Never share it publicly, never post it in a public GitHub repository, and never send it over email. If it is ever exposed, delete it from Brevo and generate a new one. (The key in the screenshot above is blurred for exactly this reason.)
Part 2: Creating the Brevo API Call in FlutterFlow
FlutterFlow does not have a ready-made Brevo button, so we will build the connection ourselves using an API Call. Don't worry — FlutterFlow has a friendly visual screen for this, and we will fill it in together, field by field.
NOTE:
We will use an API Call GROUP rather than a single call. A 'group' lets you set the web address and security details once, and every email call inside the group automatically reuses them. This keeps things tidy and makes it easy to add more Brevo features later.
STEP 4 · Open Your FlutterFlow Project
- Go to flutterflow.io and log in to your account.
- From your dashboard, click on the project you want to add email functionality to. If you do not have one yet, click New Project to create a blank project.
STEP 5 · Open the API Calls Panel
This is where FlutterFlow keeps all connections to outside services like Brevo.
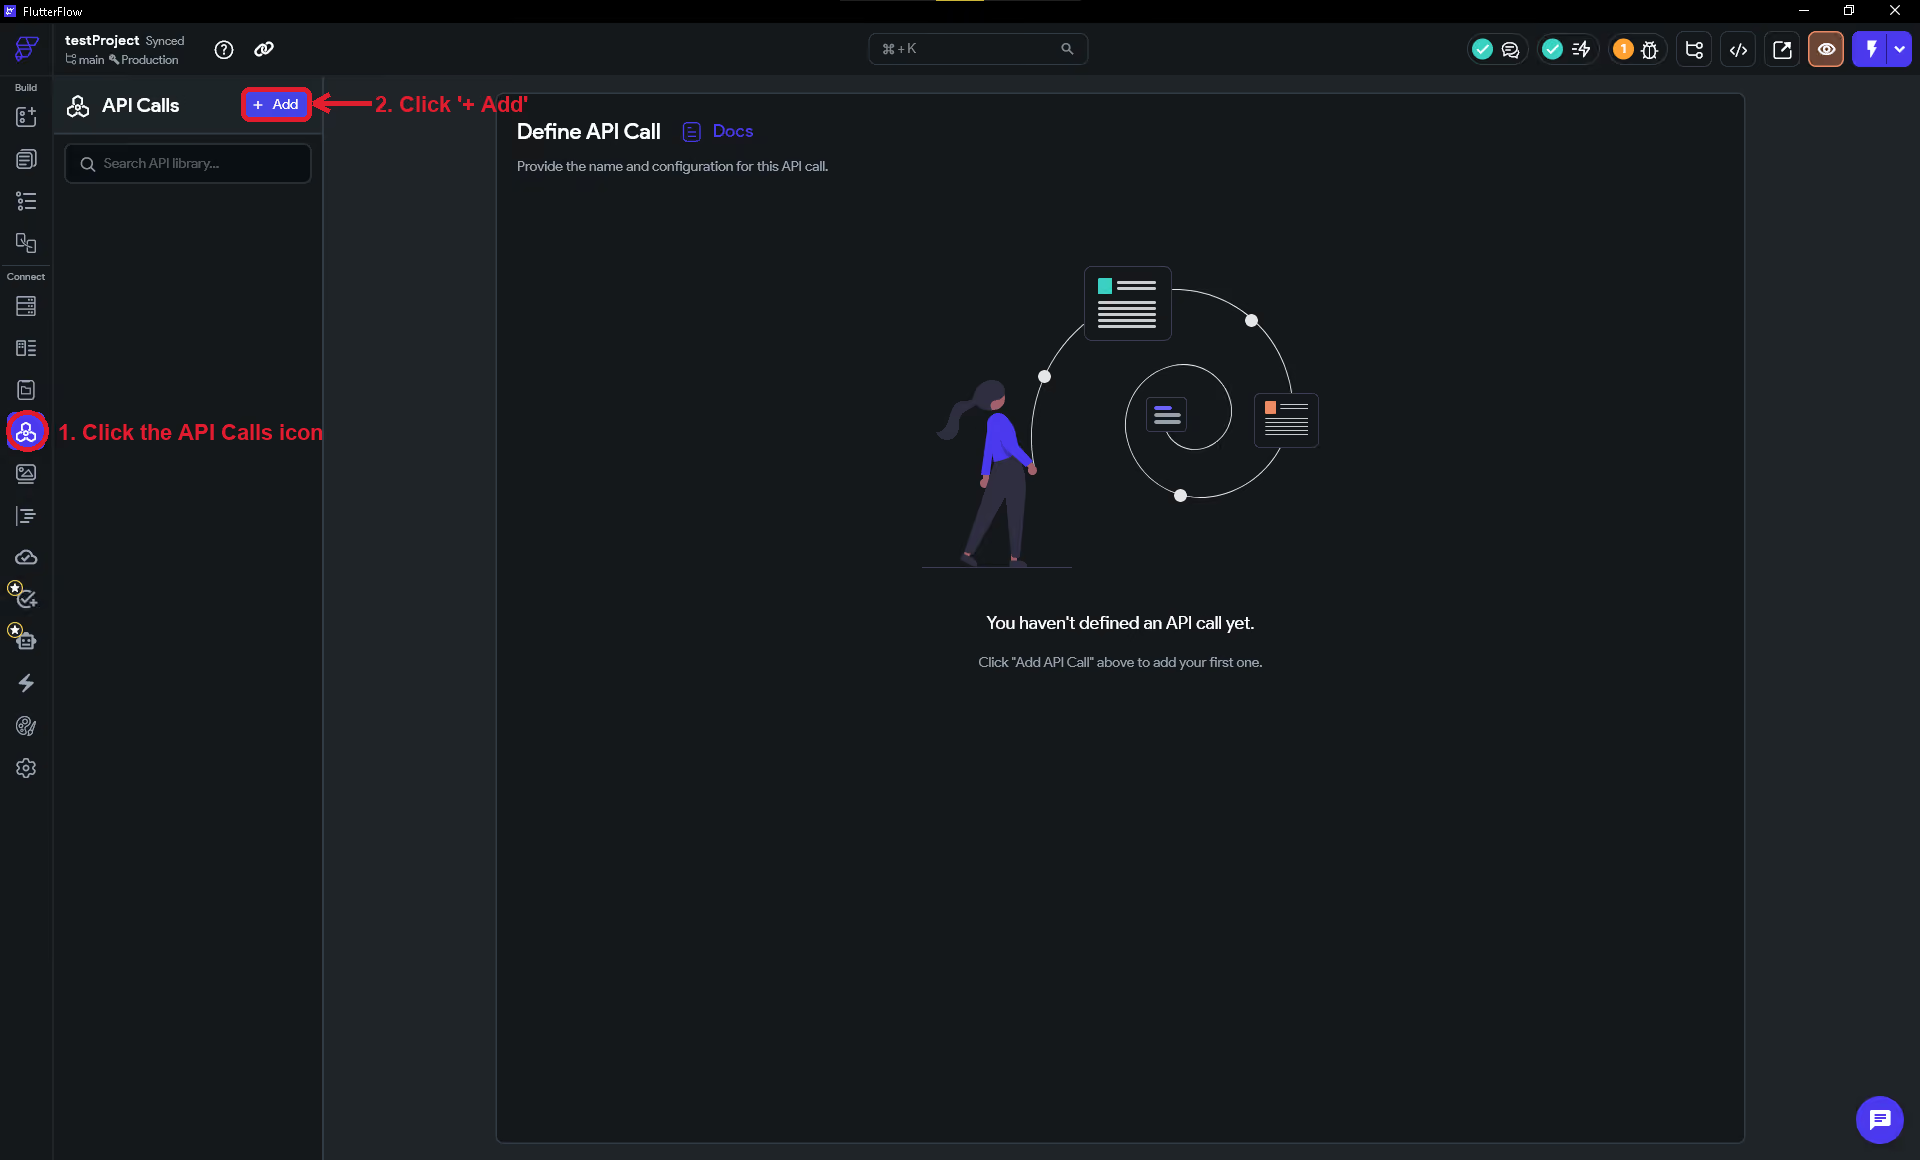
- Look at the left sidebar — it contains a vertical icon menu for the different sections of FlutterFlow.
- Under the Connect heading, click the API Calls icon (the small connected-nodes symbol). The panel opens with a 'Define API Call' welcome screen because you have not created any calls yet.
- Click the + Add button at the top of the panel to begin.
STEP 6 · Create a Brevo API Group
Now we will create the group that holds our Brevo connection and set its web address (called the 'Base URL').
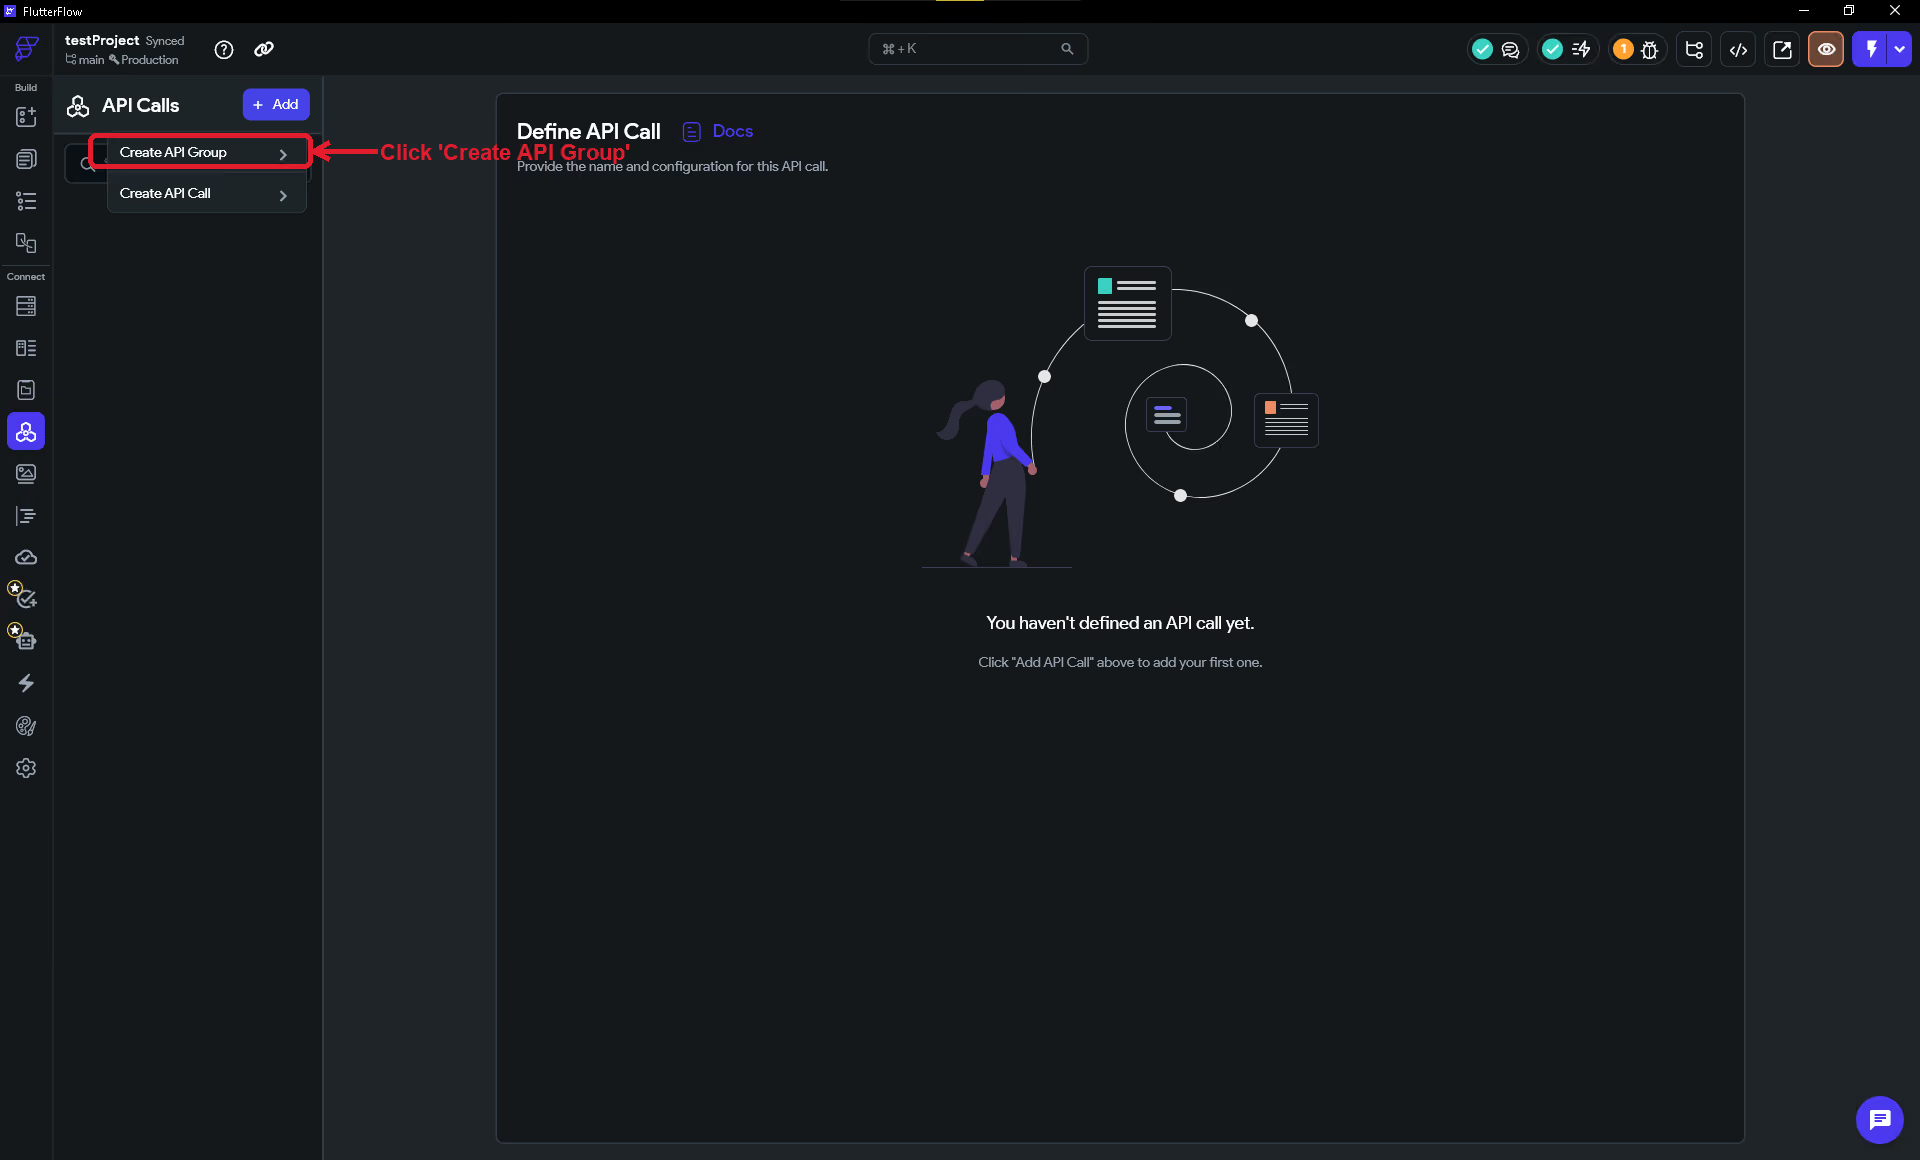
- Click the + Add button, then choose Create API Group from the menu.
- In the API Group Name field, type Brevo.
- In the API Base URL field, enter exactly:
API Base URL (the part shared by every Brevo call)
https://api.brevo.com/v3
IMPORTANT
Do NOT put a slash ( / ) at the end of the Base URL. Type it exactly as shown above. A trailing slash is the single most common reason these calls fail.
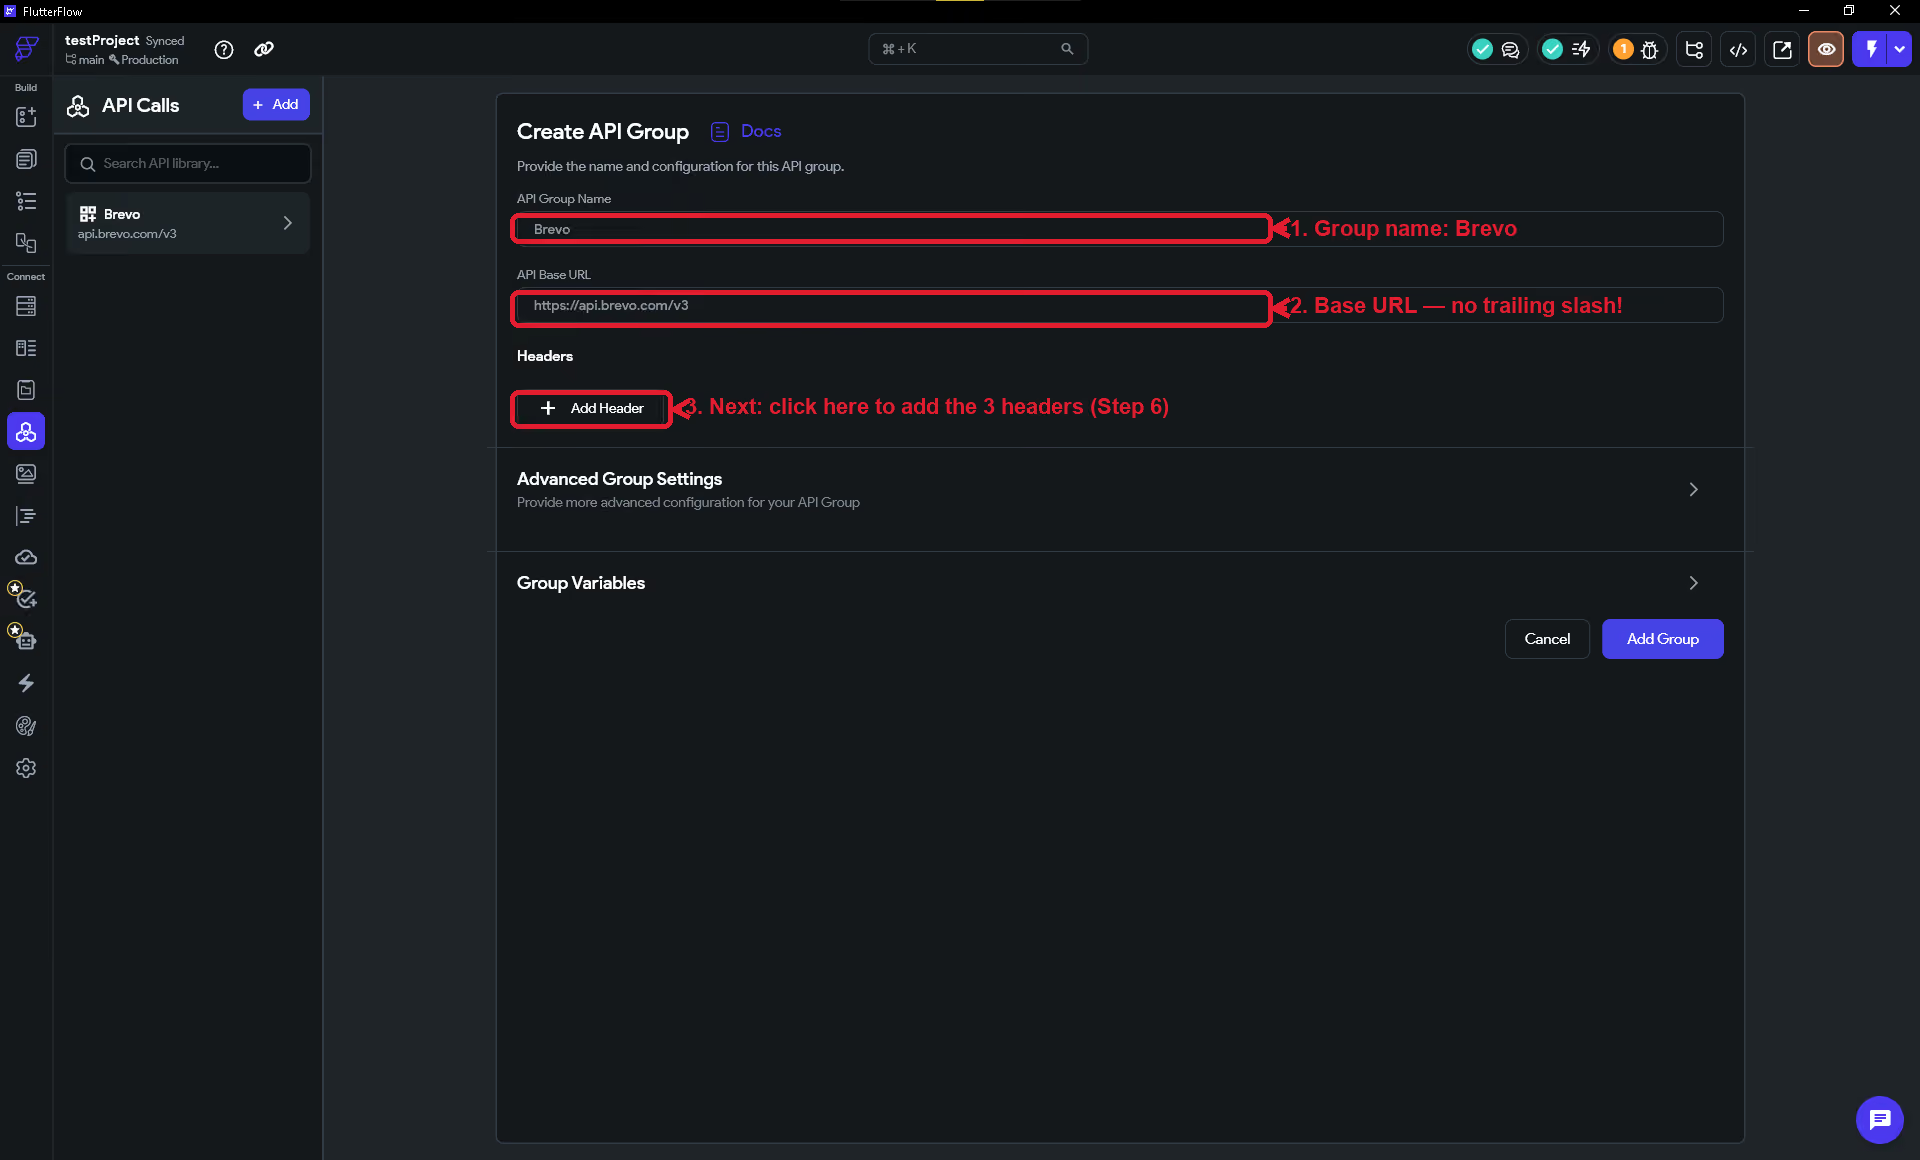
STEP 7 · Store Your API Key Safely, Add the Headers, and Make the Group Private
This is the most important step for security. Your API key proves a request is really from you, so it must never be left lying in plain sight inside your app. We will do four things: (A) store the key as a Private Environment Value, (B) create a group variable that points to it, (C) use that variable in the api-key header, and (D) make the whole group private so the key only ever lives on a secure server.
A. Store your key as a Private Environment Value
- In the left sidebar open Settings (gear icon), then under Project Setup open Dev Environments. Click + Add Value.
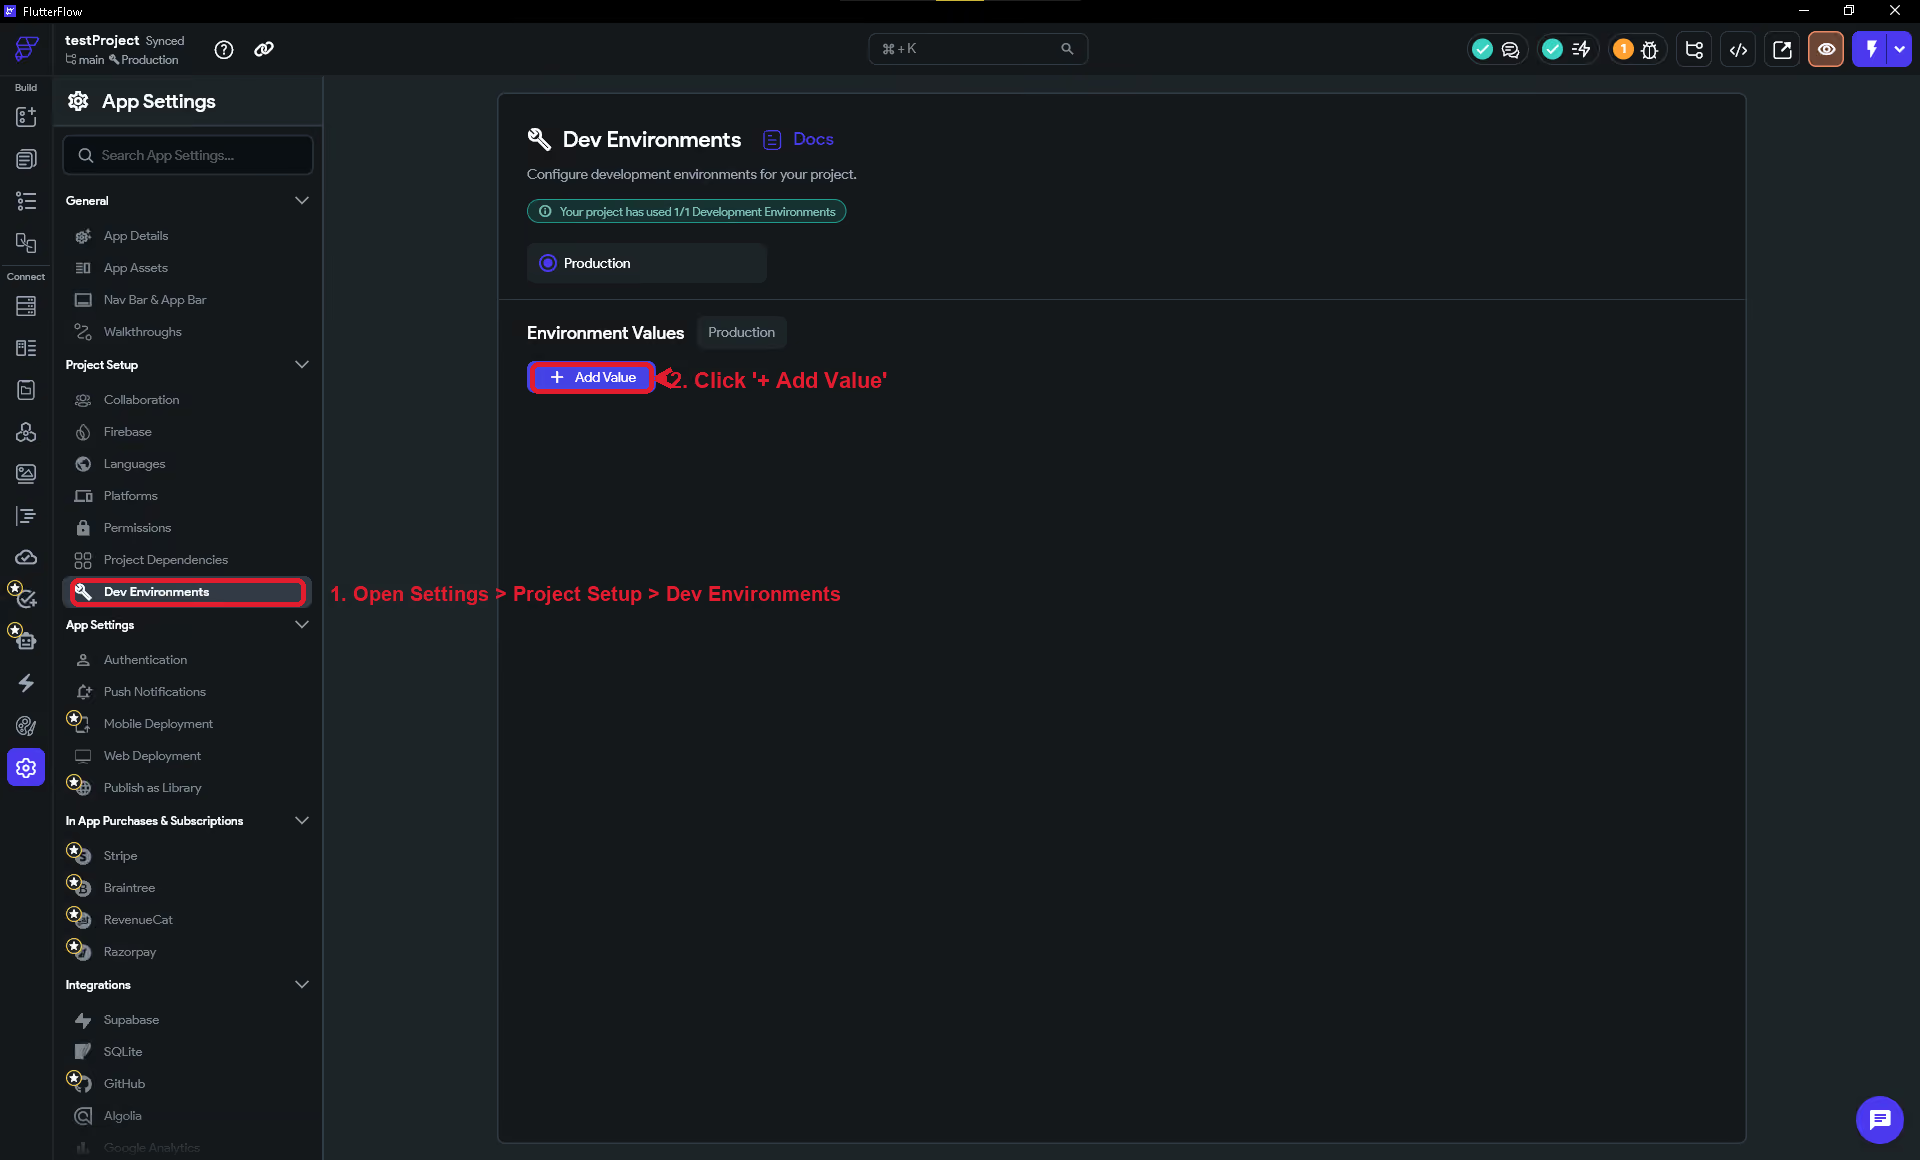
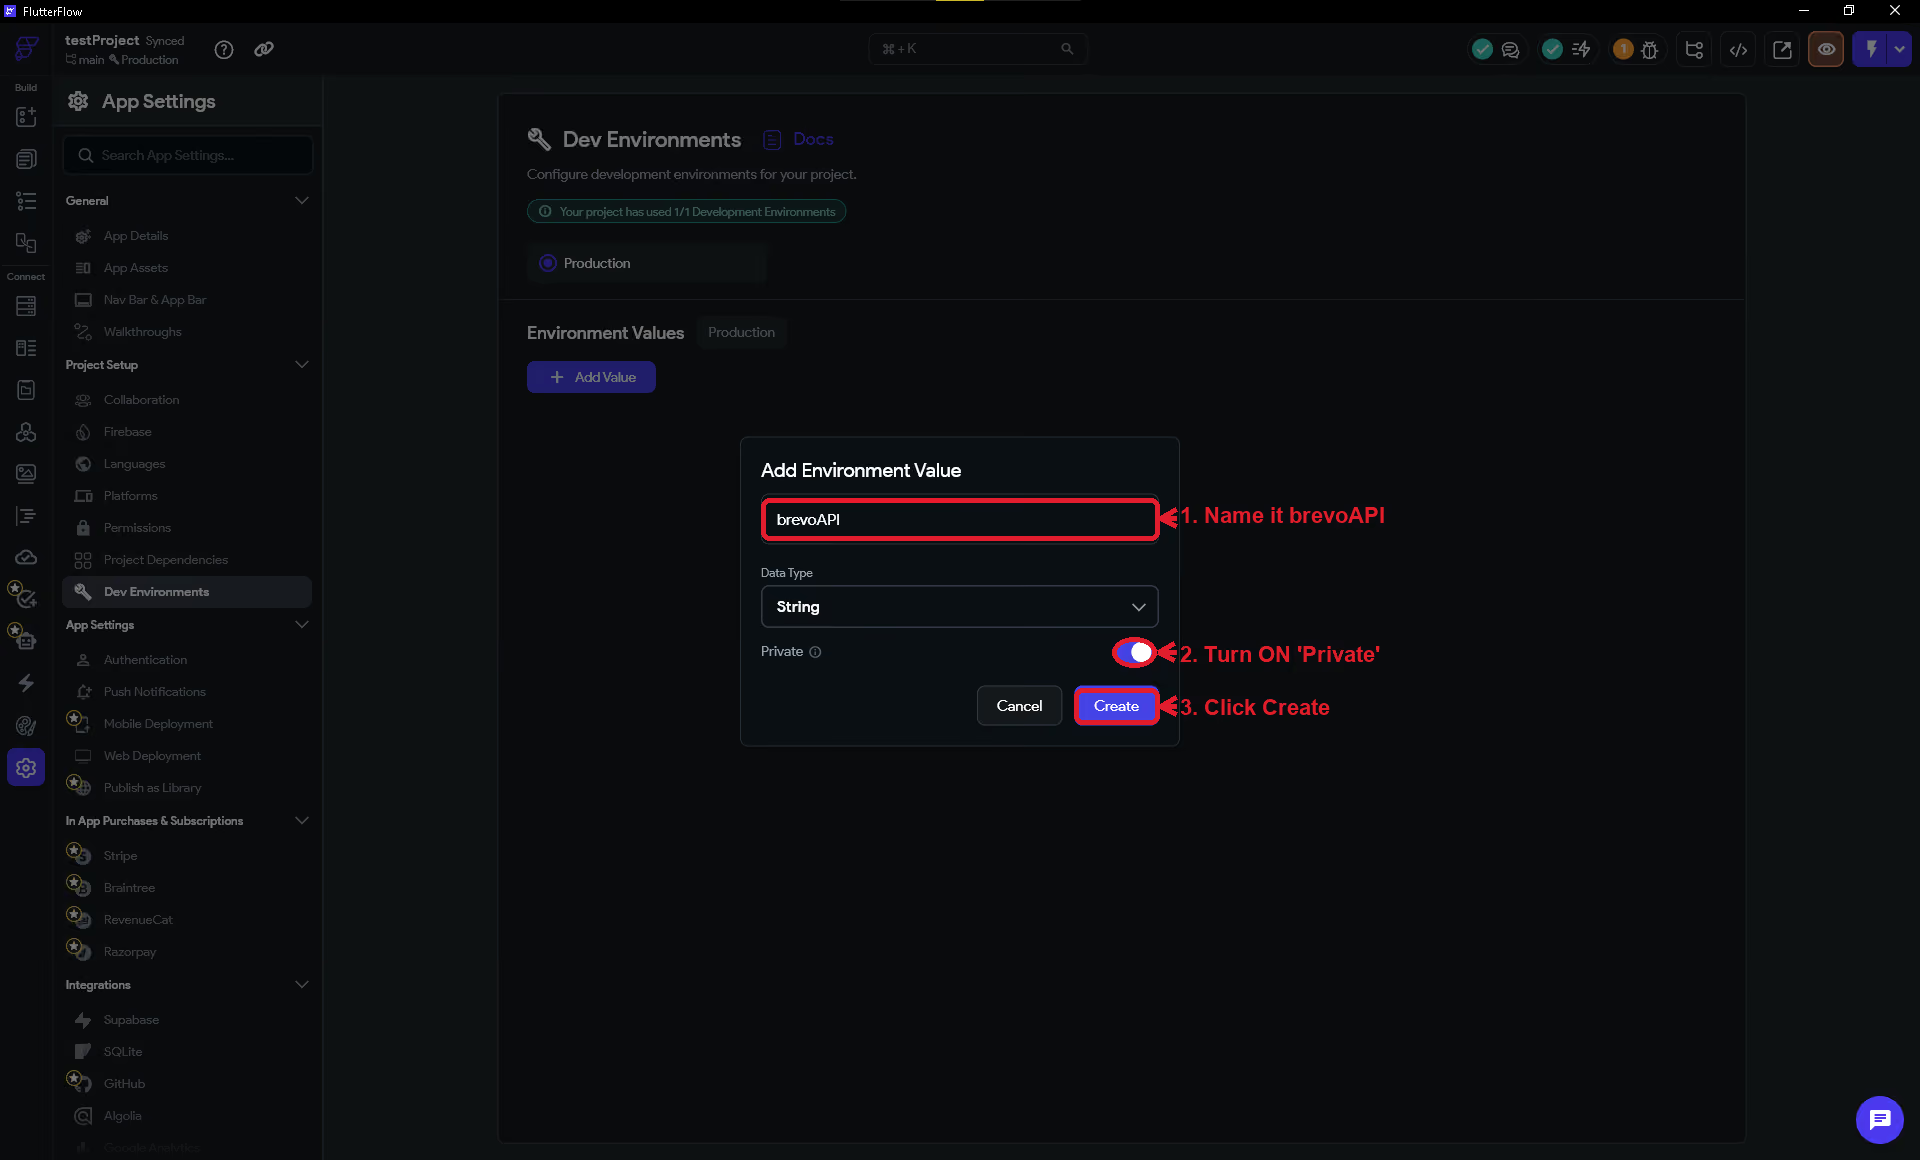
- Name the value brevoAPI, leave Data Type as String, turn ON the Private toggle, then click Create.
- Paste the API key you copied from Brevo in Step 3 into the value box. Because Is Private is ON, FlutterFlow keeps it server-side and out of your app code.
IMPORTANT
The real key only appears here, this once. Treat this screen like a password field — do not screenshot it unblurred, paste it into chats, or commit it anywhere.
B. Create a group variable that points to the key
- Open your Brevo API group. Scroll to Group Variables and click + Add Variable.
- Name the variable key, set Type to String, then click the Default Value binding to choose where its value comes from.
Screenshot of the live FlutterFlow interface (captured June 2026).
- In the source menu choose Environment Values, then pick brevoAPI. The variable now pulls its value from your Private Environment Value.
C. Add the three group headers
Headers are small pieces of information sent with every request. Brevo needs three. Because we add them at the GROUP level, every Brevo call will include them automatically.
- In the Headers section click + Add Header three times and fill them in as shown. For api-key, set the value to the [key] variable you just made — not the raw key.
The three headers to add
api-key: [key] <- the group variable, NOT the raw key
Content-Type: application/json
accept: application/json
D. Make the whole group private
Right now the key would still be bundled inside your app. FlutterFlow's 'Make Private' option fixes this by routing every call in the group through a secure server (Firebase Cloud Functions), so the key never ships to users' devices. Doing it at the GROUP level covers every call you add later.
- Open Advanced Group Settings and turn ON Make Private. Also turn ON Require Authentication so only signed-in users of your app can trigger the call.
- Click Add Group (or Save) to finish. FlutterFlow will deploy the secure Cloud Function for you.
TIP:
Why all this indirection? The key lives in ONE private place (the Environment Value). The group variable and header just point to it, so the raw key never appears in your headers, your screenshots, or your app code — and 'Make Private' keeps it on the server. This is the layered approach: each piece on its own is hygiene; together they are real protection.
IMPORTANT
Make Private requires a Firebase Blaze (pay-as-you-go) plan. The Blaze plan has a generous free tier and you are unlikely to incur charges for a low-volume app, but you must upgrade your Firebase project from the free Spark plan before FlutterFlow can deploy the Cloud Function. If you skip this, the 'Make Private' toggle will appear to save but the deployment will fail silently. To upgrade: go to console.firebase.google.com → select your project → click 'Upgrade' in the bottom-left.
IMPORTANT
After deploying, if a call returns 401 Unauthorized, re-open the brevoAPI Environment Value and confirm the key was pasted with no extra spaces. Remember a private group routes through a Cloud Function — you must Deploy/Save after any change to the key or headers.
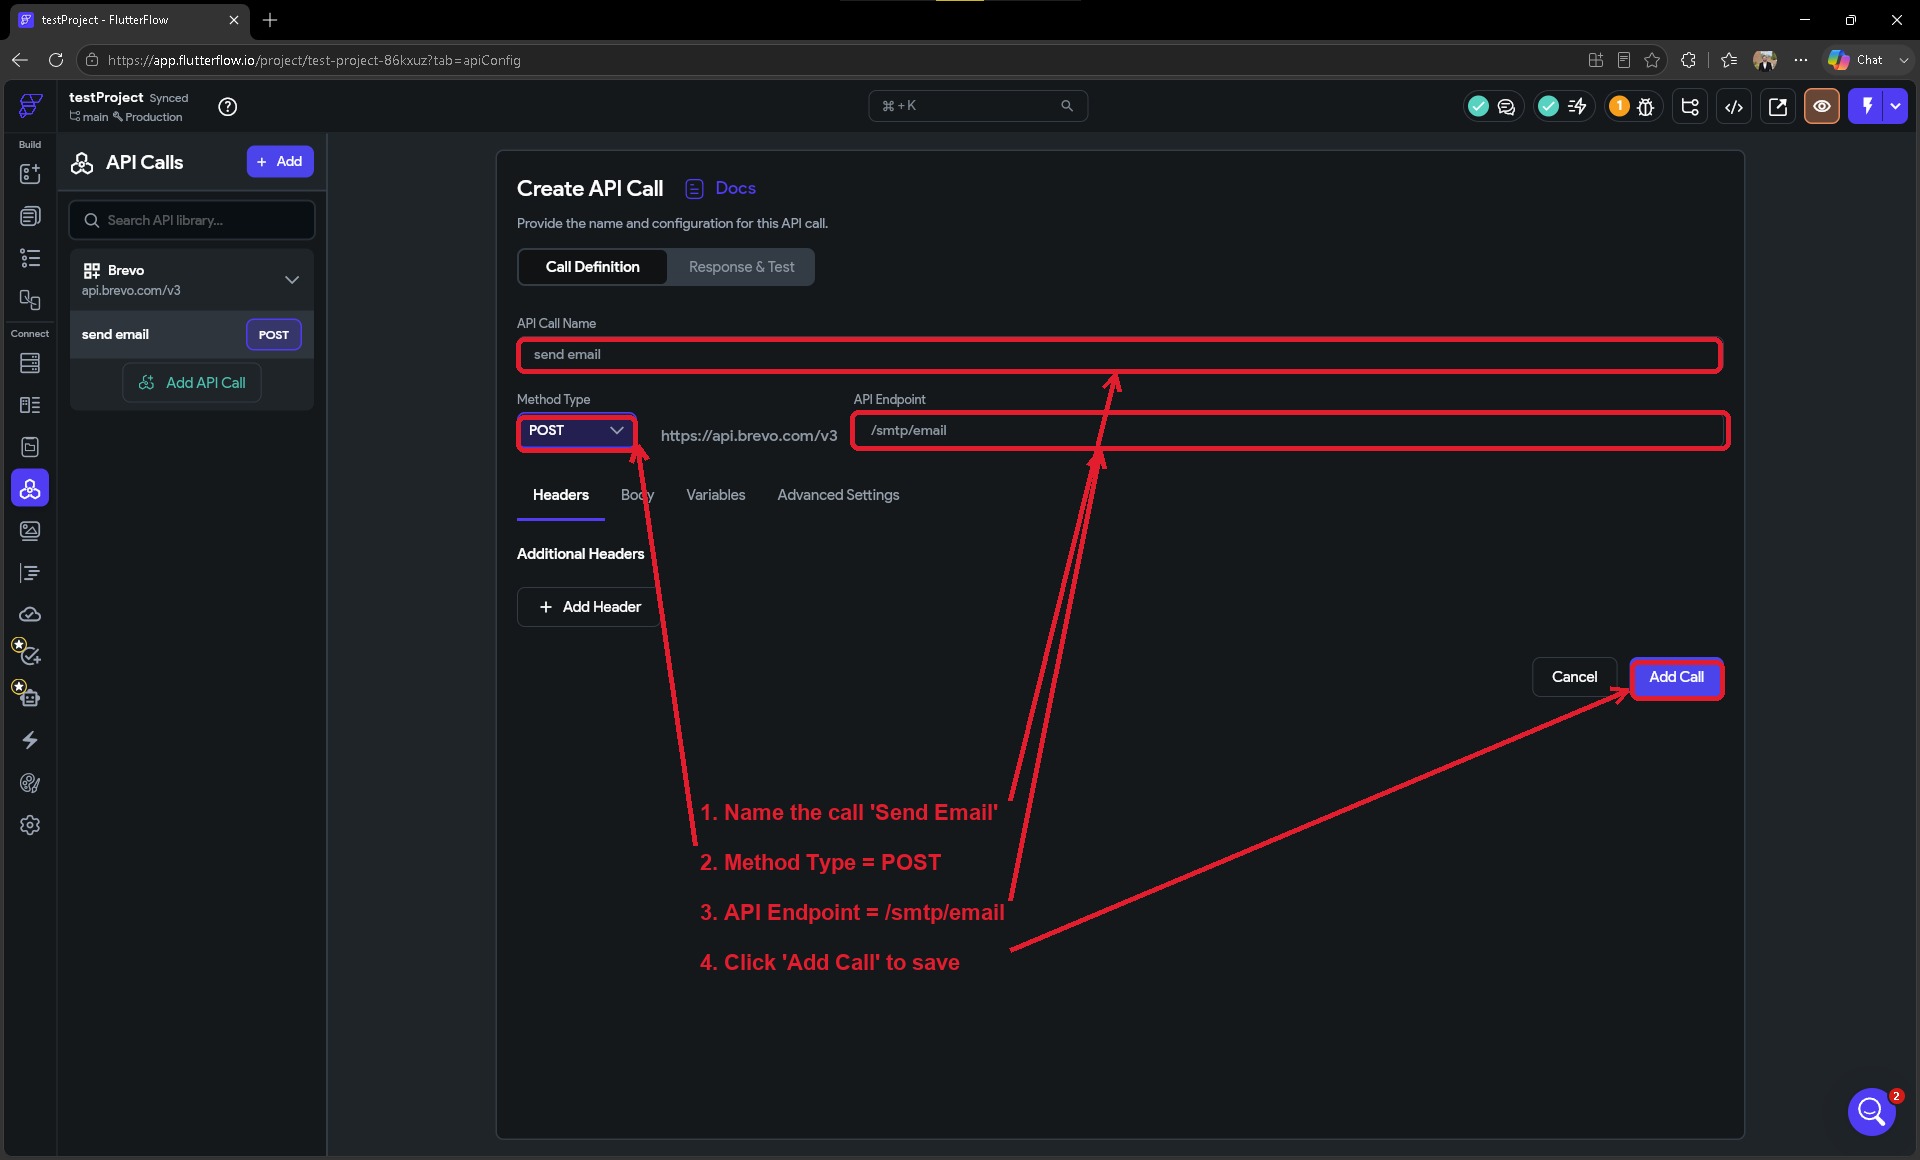
STEP 8 · Add the 'Send Email' Call Inside the Group
Now we add the actual call that sends an email. Because it lives inside the Brevo group, we only need to enter the part of the web address that comes AFTER the Base URL.
- With the Brevo group open, click Add API Call.
- Give it a Name: type Send Email.
- Set the Method dropdown to POST. (POST means 'I'm sending data to the service' — here, the email details.)
- In the URL/path field, enter only the path that comes after the base URL:
The call path
/smtp/email
(Full address becomes: https://api.brevo.com/v3/smtp/email)
NOTE
You only type '/smtp/email' here — not the full address. FlutterFlow automatically joins it to the group's Base URL. That is the whole point of using a group.
- Click Add Call to save. Your new Send Email call now appears under the Brevo group in the left sidebar.
STEP 9 · Define the Variables, Add the Email Body, and Test the Call
Before we write the body, we create the variables — the changeable parts of the email (who it's from, who it's to, the subject, and the message). Defining them first means FlutterFlow gives you a ready-made 'chip' for each one that you simply drop into the body.
- Open the Variables tab of the Send Email call. Click + Add Variable once for each of the six variables below, leaving the Type as String:
The six variables to create
senderName (String)
senderEmail (String)
receiverName (String)
receiverEmail (String)
title (String)
htmlContent (String)
NOTE:
Recommended: give senderName and senderEmail a Default Value right here on the Variables tab — set them to your verified Brevo sender from Step 2 (e.g. senderName = 'My App', senderEmail = your verified address). The sender is the same on every email, so there's no reason to pass it in each time. Here's why this pays off later: on the button (Step 13) you don't get every variable automatically — you pick which ones to set with a 'Set Additional Variable' button. By giving the sender a default now, you can simply leave senderName and senderEmail OUT of the button action and they'll still be filled from these defaults. You only add the four parts that actually change (receiver name, receiver email, subject, message).
- Now open the Body tab and set the body type to JSON. Build the body below, dropping in each variable where you see the [bracketed] name (drag the variable's chip from the row above the editor, or just type the name in square brackets):
JSON body (the [chips] are the variables you just created)
{
"sender": {
"name": "[senderName]",
"email": "[senderEmail]"
},
"to": [
{
"email": "[receiverEmail]",
"name": "[receiverName]"
}
],
"subject": "[title]",
"htmlContent": "[htmlContent]"
}
- Open the Response & Test tab and type test values into the six fields — use your verified sender for senderEmail and a real inbox you can check for receiverEmail:
- Click Test API Call. Watch for a green Status: 201 (Success) — that means Brevo accepted your email:
And the real proof — the test email landing in the recipient's inbox a moment later:
The delivered test email in the recipient's inbox (here, a free YOPmail disposable inbox used for testing).
TIP
If the test fails, check the response message at the bottom. 'unauthorized' usually means the api-key header is wrong; a message about JSON usually means a typo in the body (a missing comma or quote); a sender error usually means senderEmail isn't your verified Brevo address.
STEP 10 · Deploy Your Private Group and Confirm It's Secure
Good news: because you turned on 'Make Private' for the whole Brevo group back in Step 7D, your Send Email call is ALREADY private — every call in the group automatically runs on a secure server (Firebase Cloud Functions) instead of inside your app. There is no per-call toggle to flip. You just need to make sure the secure version is deployed.
- Open the Brevo group. At the top you'll see a Deploy Private APIs panel. If it says Not Deployed, click the Deploy APIs button.
- Wait for it to finish (it can take a minute). When it's done, the status changes to Deployed with a green check — your secure Cloud Function is now live.
- Re-run your test from Step 9 after deploying. A green 200/201 confirms the private, deployed call works end to end.
IMPORTANT
Deploying requires a Firebase Blaze (pay-as-you-go) plan — the Cloud Function will not deploy on the free Spark plan. See the note in Step 7D. The Blaze plan has a generous free tier, so a low-volume app like this usually costs nothing.
TIP:
Doing 'Make Private' once at the group level is cleaner than per call: every call you add to the Brevo group later — not just Send Email — is private automatically, and they all share the same secured api-key header.
IMPORTANT
Two rules to remember: (1) You must click Deploy APIs after ANY change to a private group — the key, a header, or the body — or the live Cloud Function keeps running the old version. (2) Never pass the key in from a page or button as a runtime variable; that would route it through the app where it could leak. The Private Environment Value from Step 7 is the correct, safe source.
Part 3: Sending an Email from a Button
Now comes the exciting part — triggering the email from inside your app! You will connect your Send Email API call to a button so it runs when a user taps it.
STEP 11 · Open a Page with a Button
- In the FlutterFlow left sidebar, open the Page Selector or Widget Tree to see your app pages.
- Open the page that has your form, and click the Send Email button on the canvas to select it (or drag a Button widget on first if your page doesn't have one yet). With the button selected, the right-hand panel shows its Actions — that's where we'll attach the email call.
STEP 12 · Add a 'Backend Call' Action and Choose Send Email
An 'action' in FlutterFlow is something that happens when the user taps a widget. We will add an action that runs our Brevo Send Email call.
- Click the Button on your canvas to select it.
- In the right-hand properties panel, find the Actions section and click Add Action (or Open Action Flow Editor).
- Click Add Action, then in the action type list choose Backend / Database → API Call (also shown as 'Backend Call').
- In the Group or Call Name dropdown, select Brevo, then set Endpoint Name to Send Email.
First, choose the trigger — for a tap, pick On Tap:
Then add the Backend Call and point it at your Brevo → Send Email endpoint. FlutterFlow auto-creates an output variable (here 'apiResultjp4') that holds the call's result — we'll use it in Step 14 to show a success message:

STEP 13 · Fill In the Email Details (Variable Values)
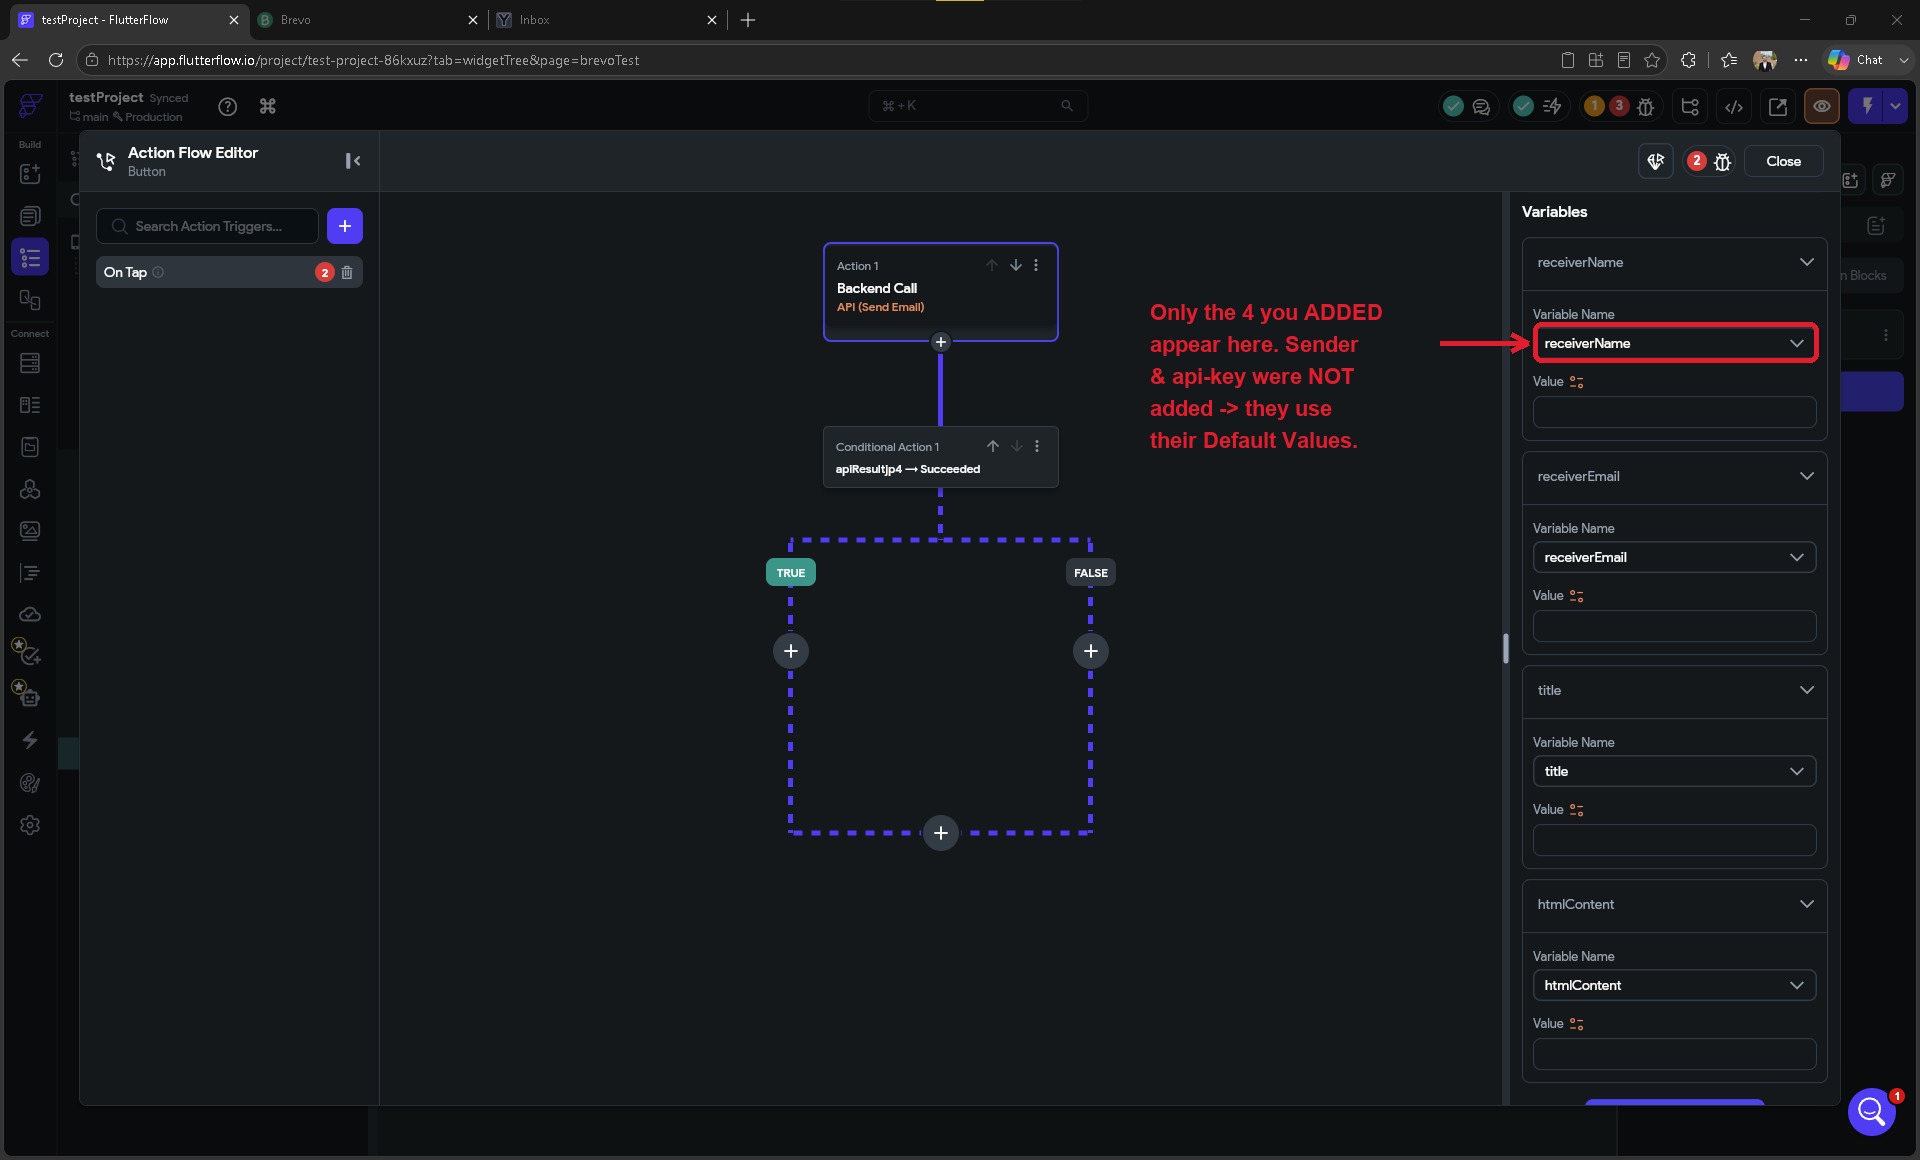
After you select the Send Email call, the action's Variables section starts empty. You decide which variables to set by clicking 'Set Additional Variable' and choosing one from the list. Add a value for only the FOUR parts that change on every send: receiverName, receiverEmail, title, and htmlContent.
Deliberately leave out senderName, senderEmail, and the api-key variable — by simply not adding them here, they keep the Default Values you set earlier (the sender pair in Step 9, the api-key back in Step 7). That's why a clean Send Email action shows just these four fields, not six or seven:
IMPORTANT
Never add the api-key variable to this action. Leaving it unset is exactly what keeps your key on its private, server-side Default Value (Step 7). Adding it here and typing a value would route the key through your app where it could leak — see Step 10.
Now connect each of the four variables to the matching input field on the page you built — that way the email uses whatever the user actually types. Click the variable's Value field to open the source picker, choose Widget State, then pick the TextField from the list:

Repeat for all four variables, matching each one to its field:
Bind each variable to its field on the page
receiverName -> TextField (Name)
receiverEmail -> TextField (Email)
title -> TextField (Subject)
htmlContent -> TextField (Message)

NOTE
In the JSON body, 'title' maps to Brevo's email subject and 'htmlContent' is the message body — you can put plain text here, or simple HTML later for formatting (e.g. <b>bold</b> or <a href>links</a>).
TIP:
Binding to Widget State is what makes the form live — each user's typed values are sent. If you just want a quick one-off test instead, you can set a variable to 'Specific Value' and type a fixed string (e.g. receiverEmail = your own inbox) rather than binding it to a field.
STEP 14 · Show a Success Message, Then Test in Test Mode
Optional but recommended: give the user feedback when the email sends. Add a second action right after the Backend Call — a Conditional that checks the call's output (apiResultjp4 → Succeeded), and on the TRUE branch a Show Snack Bar that says 'Email Sent Successfully'. Now the user knows their message went through.
Screenshot of the live FlutterFlow interface (captured June 2026).
Now test it. Before going live, always confirm emails are actually being sent.
- In the top toolbar of FlutterFlow, click the Test Mode button (a play triangle, sometimes labelled 'Run')
- FlutterFlow will launch a live preview of your app in a browser window.
- Navigate to the page with your button and click the button.
- Check the inbox of the email you set as receiverEmail — your test email should arrive within a minute or two.
Here's the payoff — the email sent by tapping the button in Test Mode, delivered to the recipient's inbox (here a free YOPmail test inbox). Notice the 'From' name is brevoTesters, the sender Default Value you set back in Step 9:
The email delivered by tapping the button while the app ran in Test Mode.
TIP:
No email? Re-check the four bound variables (Step 13), confirm the Brevo group shows 'Deployed' (Step 10), and make sure receiverEmail is a real inbox you can open. The Part 4 table below covers the common causes.
Part 4: Testing & Troubleshooting
If your test email did not arrive, do not worry! Here are the most common issues and how to fix them:
NOTE
If none of the above solutions work, check the Brevo dashboard under 'Email Logs' or 'Transactional' to see if Brevo received and processed the request. This can help pinpoint where the issue is.
Summary
Congratulations! You have successfully connected Brevo to FlutterFlow and set up a button that sends a real email. Here is a quick recap of what you accomplished:
- Created and configured a Brevo account with a verified sender email address.
- Generated a Brevo API key for secure access.
- Built a Brevo API Call Group in FlutterFlow with a 'Send Email' call, and made it private so your key stays hidden.
- Connected that call to a button and sent a real email from your app.
Where You'd Use This: Two Real Scenarios
The same Send Email setup you just built powers many everyday app features. Here are two common situations where this Brevo integration earns its keep:
Scenario 1 · A Contact or Support Form
Imagine your app has a 'Contact Us' page where users type their name, email, and a message. When they tap Send, the button fires the exact Send Email call from this tutorial — delivering their message straight to your support inbox. You can even add a second Send Email action that sends an automatic 'We got your message!' confirmation back to the user, so they know it went through. No backend code and no mail server — just the button action you already wired up in Part 3.
Scenario 2 · Order & Booking Confirmations
Now picture an online store or an appointment-booking app. The moment a customer completes checkout or confirms a booking, you trigger the same Send Email call — this time automatically, on the action that finishes the order rather than a manual button tap — to send a branded confirmation with the order number, items, and total (or the appointment date and time) to the customer's inbox. Because the call is already private and deployed, every confirmation goes out securely with your API key kept safely on the server.
Heading 1
Heading 2
Heading 3
Heading 4
Heading 5
Heading 6
Lorem ipsum dolor sit amet, consectetur adipiscing elit, sed do eiusmod tempor incididunt ut labore et dolore magna aliqua. Ut enim ad minim veniam, quis nostrud exercitation ullamco laboris nisi ut aliquip ex ea commodo consequat. Duis aute irure dolor in reprehenderit in voluptate velit esse cillum dolore eu fugiat nulla pariatur.
Block quote
Ordered list
- Item 1
- Item 2
- Item 3
Unordered list
- Item A
- Item B
- Item C
Bold text
Emphasis
Superscript
Subscript
.avif)


.avif)


